# Quick Start
# Install Devtools
Go to Developer Tools Download Page and download the corresponding installation package and install it according to your operating system.
# Your First Mini Game
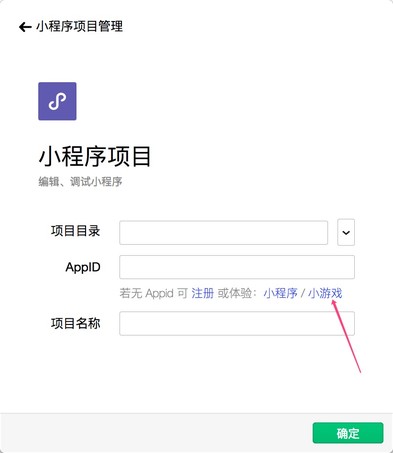
Create new project please select the Mini Program Project, select the hard drive path where the codes are stored, and enter AppId.
You can go to Mini Game Registration The AppId can be obtained by registering a Mini Game account, and the experience mode without AppId can also be used. Give your project a good name, and finally, check the "Create a quick start template" (Note: You have to select an empty directory to have this option), click OK, you will get your first Mini Game now.
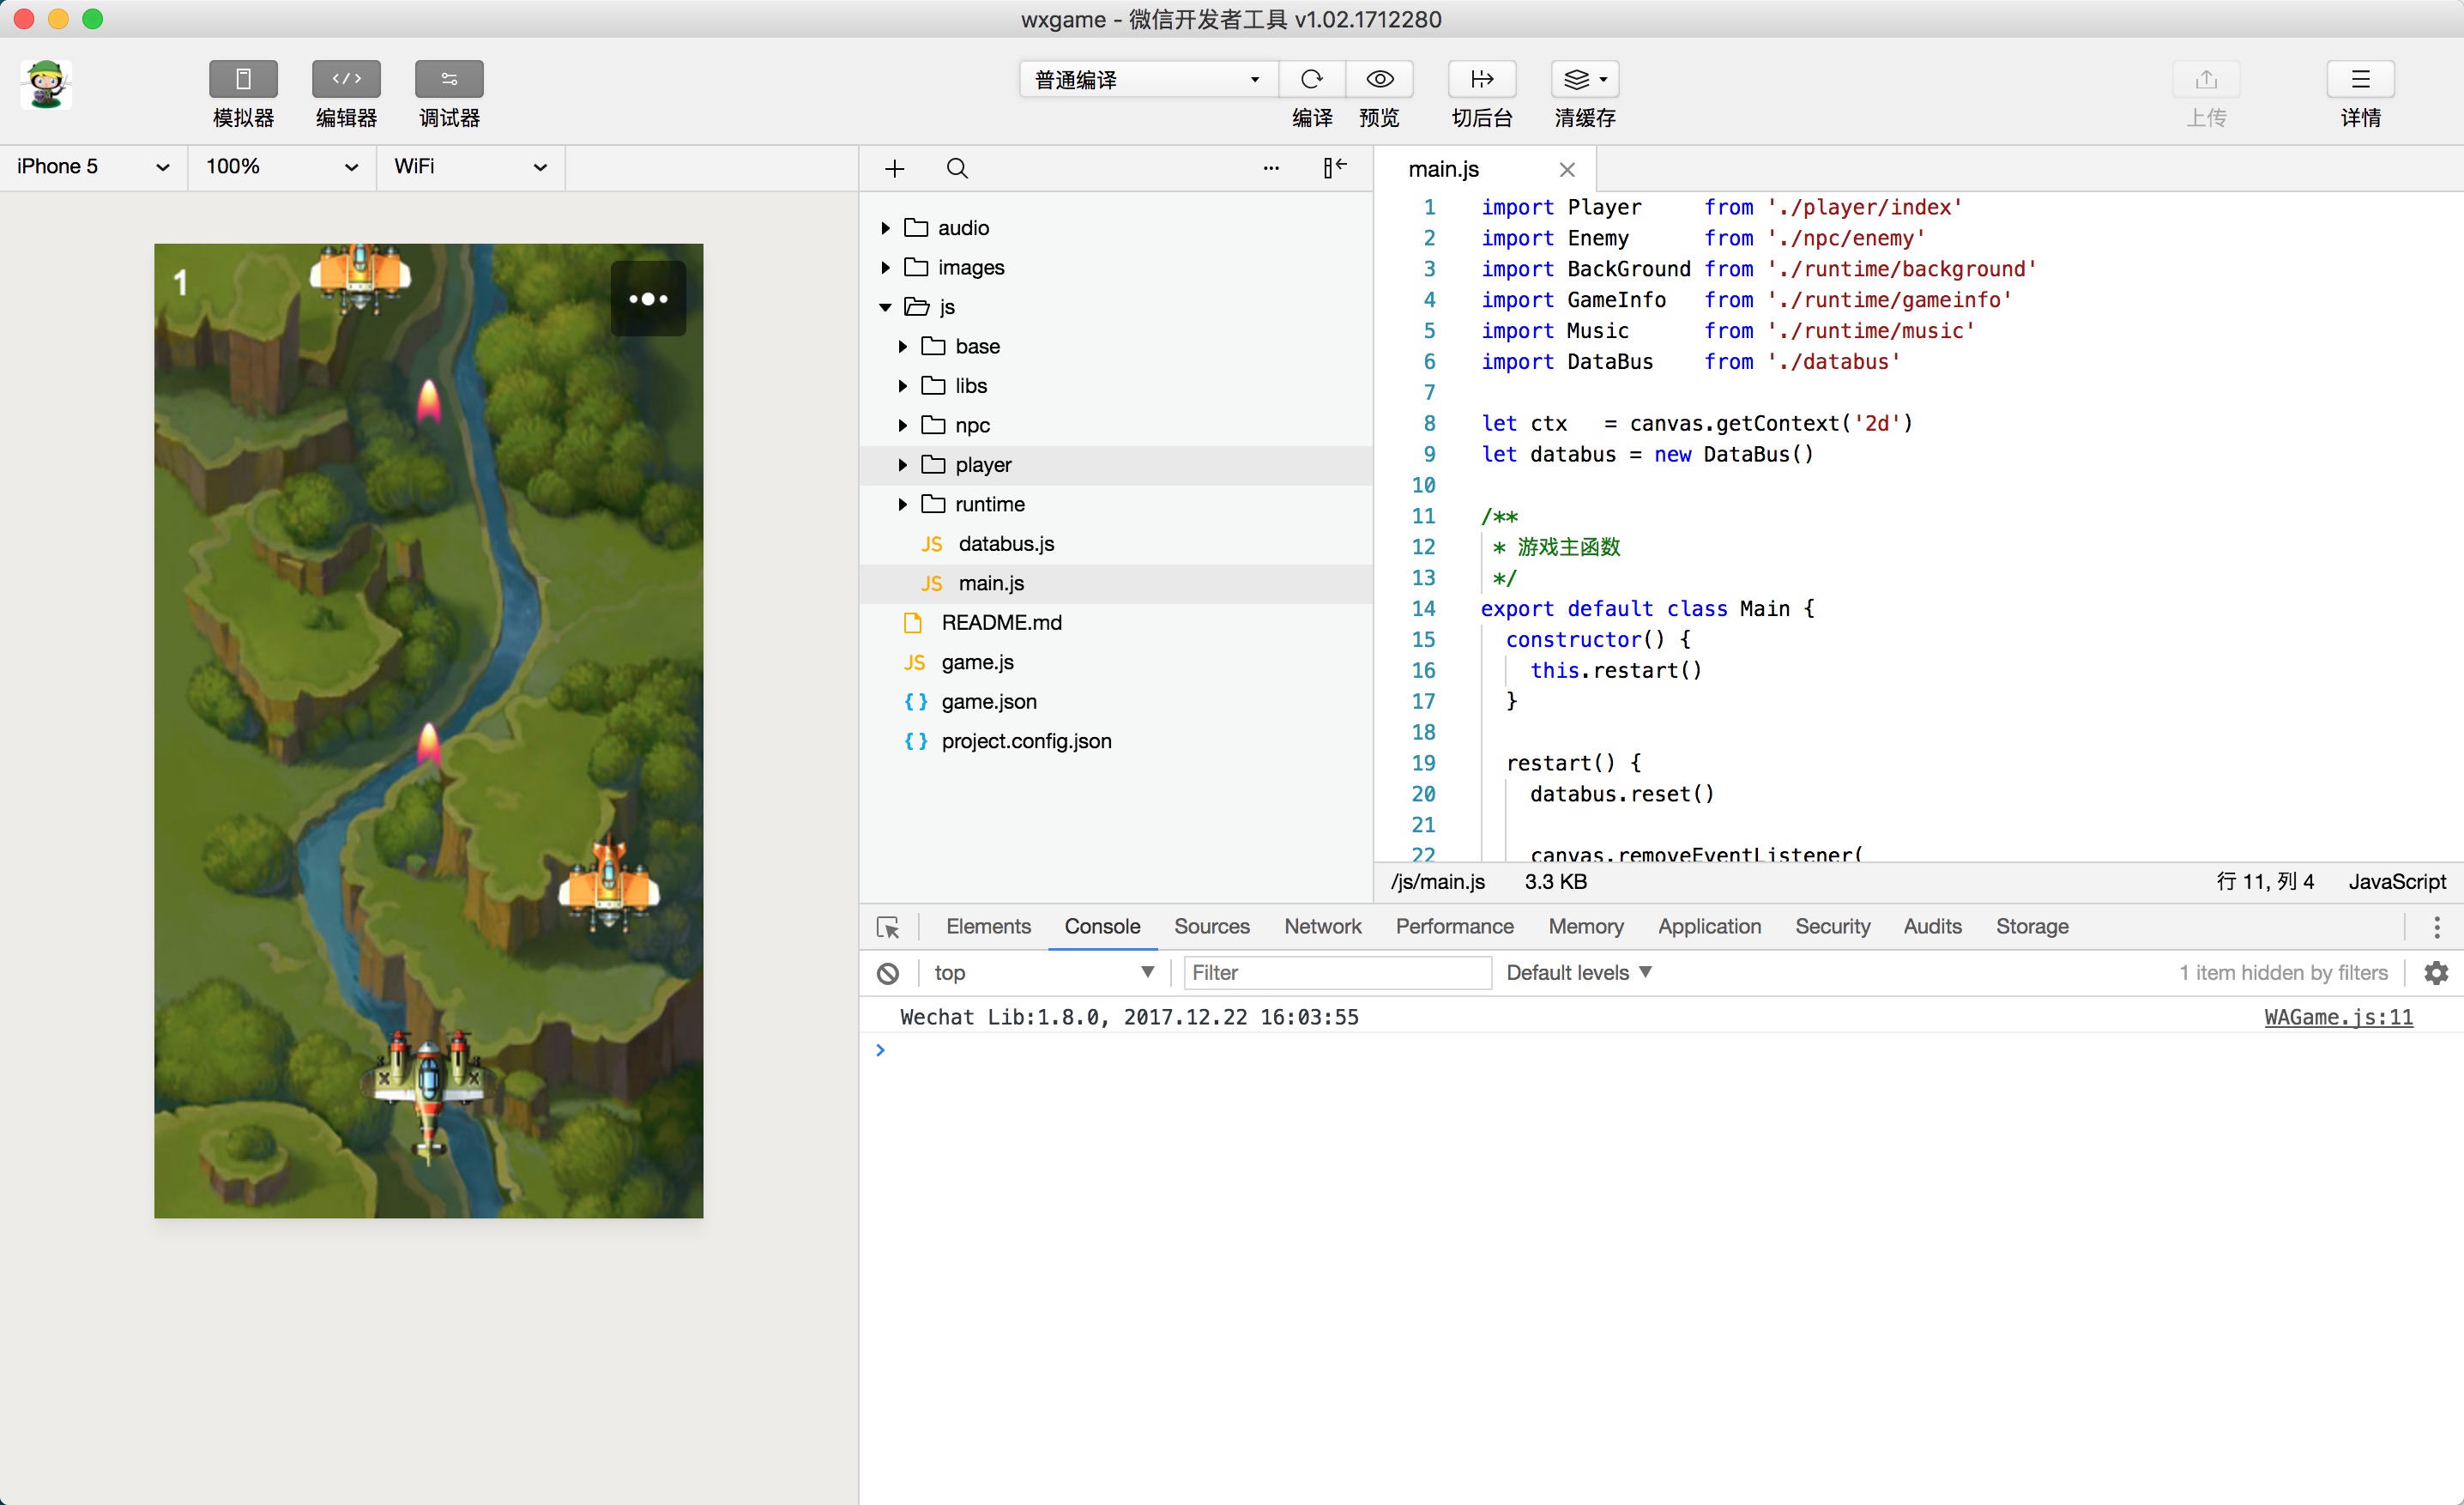
Click on the Compile button on the top menu then you can preview your first Mini Game in the IDE.
# Weixin Preview
Click the Compile button on the Tools to see the performance of this Mini Game on the simulator on the left side. Click the Preview button and experience your first Mini Game on your mobile phone by using Scan on Weixin.
# File Structure
The Mini Game has only the following two necessary files:
├── game.js
└── game.json
game.jsMini Game entry filegame.jsonconfiguration file
# Code Package Size Limit
The total size of the code package allowed for each Mini Game is 4MB.
# Configuration
The Mini Game developer configures by writing a game.json file in the root directory. Developer Tools and clients need to read this configuration to complete the relevant interface rendering and attribute settings.
| Key | data type | description | default |
|---|---|---|---|
| deviceOrientation | String | Supported Screen Orientations | portrait |
| showStatusBar | Boolean | Show status bar or not | false |
| networkTimeout | Number | Timeout period of the network request,unit:millisecond | 60000 |
| networkTimeout.request | Number | Timeout period of wx.request, unit: millisecond | 60000 |
| networkTimeout.connectSocket | Number | Timeout period of wx.connectSocket, unit: milliseconds | 60000 |
| networkTimeout.uploadFile | Number | Timeout period of wx.uploadFile, unit: millisecond | 60000 |
| networkTimeout.downloadFile | Number | Timeout period of wx.downloadFile, unit: millisecond | 60000 |
| workers | String | Multithreading Worker configuration items, please refer to the Worker Document | None |
# deviceOrientation
| Value | Description |
|---|---|
| portrait | vertical screen |
| landscape | horizontal screen |
# Example Configuration
{
    "deviceOrientation": "portrait",
    "networkTimeout": {
        "request": 5000,
        "connectSocket": 5000,
        "uploadFile": 5000,
        "downloadFile": 5000
    }
}
# wx API
You can only use JavaScript to write Mini Game. The running environment of the Mini Game is a JavaScript VM with some methods bound to it. Unlike the browser, this running environment does not have a BOM and DOM API, only the wx API. Next we will describe how to use the wx API to complete basic functions such as creating canvases, drawing graphics, displaying pictures, and responding to user interactions etc.
# Create Canvas
A Canvas object can be created by calling the wx.createCanvas() interface.
var canvas = wx.createCanvas()
The canvas created at this time is an on-screen Canvas that has been displayed on the screen and has the same width and length with the screen.
console.log(canvas.width, canvas.height)
Calling wx.createCanvas() for the first time in the entire Mini Game code creates the on-screen Canvas, which is then called to create an off-screen Canvas. If your project uses the official Adapter ie weapp-adapter.js (for what is Adpater, please refer to the official tutorial Adapter, then you will create an off-screen Canvas. Because we have called wx.createCanvas() once in weapp-adapter.js and exposed the returned canvas as a global variable. Suppose your project directory structure is as follows:
├── game.js
├── weapp-adapter.js
└── game.json
A call to wx.createCanvas() has been made in weapp-adapter.js and the returned canvas is exposed as a global variable.
// weapp-adapter
canvas = wx.createCanvas()
If you call wx.createCanvas() after require weapp-adapter.js, the created Canvas will be an off-screen Canvas because it is not the first call to this API.
require('./weapp-adapter')
var myCanvas = wx.createCanvas()
# Drawing on Canvas
However, because there is no drawing on the canvas, the canvas is transparent. With a simple drawing of the 2d rendering context, you can see a 100x100 red rectangle in the upper left corner of the screen.
var context = canvas.getContext('2d')
context.fillStyle = 'red'
context.fillRect(0, 0, 100, 100)
The 2d or WebGL rendering context RenderingContext can be obtained via the Canvas.getContext(), calling the rendering context of drawing method can draw on Canvas. The Mini Game basically supports all the properties and methods of 2d and WebGL 1.0. For details please see RenderingContext. Due to the complexity of the drawing process using WebGL, the sample code in this article is written in the drawing method of the 2d rendering context.
The width and height of the Canvas object can be changed by setting the width and height properties, but this also results in the emptying of the Canvas content and resetting of the rendering context.
canvas.width = 300
canvas.height = 300
# Display Image
An Image object can be created via the wx.createImage() interface. Image objects can load pictures. When the Image object is drawn on the Canvas, the image will be displayed on the screen.
var image = wx.createImage()
Setting the src property of the Image object can load a local image or web image. When the image is loaded, it will execute the registered onload callback function. At this time, the Image object can be drawn to the Canvas.
image.onload = function () {
    console.log(image.width, image.height)
    context.drawImage(image, 0, 0)
}
image.src = 'logo.png'
# Creating Multiple Canvas
During the entire run of Mini Game, the first call to the wx.createCanvas interface creates an on-screen Canvas. Everything drawn on this canvas will be displayed on the screen. The second, third, and later calls to wx.createCanvas create an off-screen canvas. The content drawn on the off-screen Canvas is only drawn to this offscreen Canvas and will not be displayed on the screen.
Take the following code as an example, after running you will find that the screen does not show a red rectangle of 100x100 at the position of (0, 0). Because we are drawing on an off-screen Canvas.
var screenCanvas = wx.createCanvas()
var offScreenCanvas = wx.createCanvas()
var offContext = offScreenCanvas.getContext('2d')
offContext.fillStyle = 'red'
offContext.fillRect(0, 0, 100, 100)
In order for this red rectangle to appear on the screen, we need to draw off-screen offScreenCanvas onto the on-screen screenCanvas.
var screenContext = screenCanvas.getContext('2d')
screenContext.drawImage(offScreenCanvas, 0, 0)
# Animation
In JavaScript, animation effects are usually implemented via setInterval/setTimeout/requestAnimationFrame. The Mini Game provides support for these API:
- setInterval()
- setTimeout()
- requestAnimationFrame()
- clearInterval()
- clearTimeout()
- cancelAnimationFrame()
In addition, the frequency of executing the requestAnimationFrame callback function can be modified by wx.setPreferredFramesPerSecond() to reduce the performance consumption.
# Touch Events
Responding to the user's interaction with the screen is an essential part of the game, and Mini Game provides the following API to subscribe touch events with reference to TouchEvent in DOM::
wx.onTouchStart(function (e) {
    console.log(e.touches)
})

wx.onTouchMove(function (e) {
    console.log(e.touches)
})

wx.onTouchEnd(function (e) {
    console.log(e.touches)
})

wx.onTouchCancel(function (e) {
    console.log(e.touches)
})
# Global Objects
The window object is a global object in the browser environment. There is no BOM API in the running environment of the Mini Game, so there is no window object. However, the global object GameGlobal is provided, and all globally defined variables are GameGlobal properties.
console.log(GameGlobal.setTimeout === setTimeout)
console.log(GameGlobal.requestAnimationFrame === requestAnimationFrame)
// true
Developers can mount their own encapsulated classes and functions to GameGlobal as needed.
GameGlobal.render = function () {
    //Omit the specific implementation of the method...
}

render()
GameGlobal is a global object and itself an object that has circular references.
console.log(GameGlobal === GameGlobal.GameGlobal)
Console.log cannot output a circular referenced object to vConsole on a Weixin. Therefore, when debugging on Weixin please add notes to the code of console.log(GameGlobal), otherwise it will produce such error:
An object width circular reference can't be logged
# File Type Limitation
Mini Game limits the types of files that can be uploaded. Only the files in the following list can be uploaded successfully:
- png
- jpg
- jpeg
- gif
- svg
- js
- json
- cer
- obj
- dae
- fbx
- mtl
- stl
- 3ds
- mp3
- pvr
- wav
- plist
- ttf
- fnt
- gz
- ccz
- m4a
- mp4
- bmp
- atlas
- swf
- ani
- part
- proto
- bin
- sk
- mipmaps
- txt
- zip
- tt
- map
- ogg
- silk
- dbbin
- dbmv
- etc
- lmat
- lm
- ls
- lh
- lani
- lav
- lsani
- ltc