# 自定义路由
小程序采用多 WebView 架构,页面间跳转形式十分单一,仅能从右到左进行动画。而原生 App 的动画形式则多种多样,如从底部弹起,页面下沉,半屏等。
Skyline 渲染引擎下,页面有两种渲染模式: WebView 和 Skyline,它们通过页面配置中的 renderer 字段进行区分。在连续的 Skyline 页面间跳转时,可实现自定义路由效果。
# 效果展示
下方为半屏页面效果,点击可查看更多 Skyline 示例。
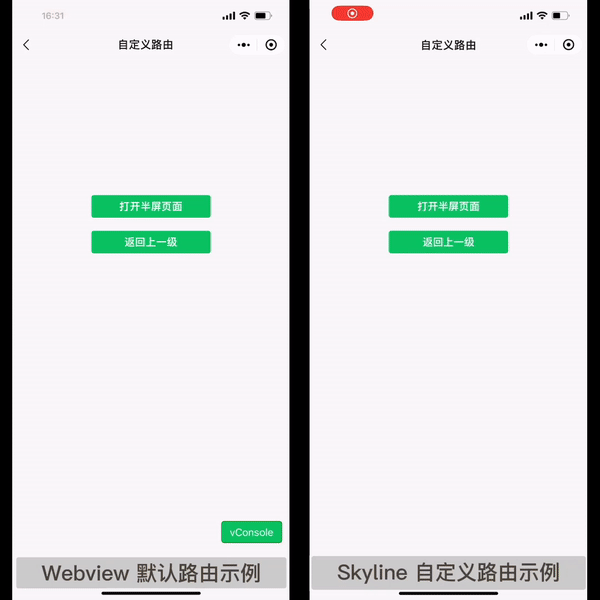
扫码打开小程序示例,交互动画 - 基础组件 - 自定义路由 即可体验。
# 使用方法
建议先阅读完 worklet 动画 和 手势系统 两个章节,它们是自定义路由的基础内容。
# 接口定义
自定义路由相关的接口
- 页面跳转 wx.navigateTo
- 路由上下文对象 wx.router.getRouteContext
- 注册自定义路由 wx.router.addRouteBuilder
type AddRouteBuilder = (routeType: string, routeBuilder: CustomRouteBuilder) => void

type CustomRouteBuilder = (routeContext: CustomRouteContext, routeOptions: Record<string, any>) => CustomRouteConfig

interface SharedValue<T> {
  value: T;
}

interface CustomRouteContext {
  // 动画控制器,影响推入页面的进入和退出过渡效果
  primaryAnimation: SharedValue<number>
  // 动画控制器状态
  primaryAnimationStatus: SharedValue<number>
  // 动画控制器,影响栈顶页面的推出过渡效果
  secondaryAnimation: SharedValue<number>
  // 动画控制器状态
  secondaryAnimationStatus: SharedValue<number>
  // 当前路由进度由手势控制
  userGestureInProgress: SharedValue<number>
  // 手势开始控制路由
  startUserGesture: () => void
  // 手势不再控制路由
  stopUserGesture: () => void
  // 返回上一级,效果同 wx.navigateBack
  didPop: () => void
}

interface CustomRouteConfig {
  // 下一个页面推入后,不显示前一个页面
  opaque?: boolean;
  // 是否保持前一个页面状态
  maintainState?: boolean;
  // 页面推入动画时长,单位 ms
  transitionDuration?: number;
  // 页面推出动画时长,单位 ms
  reverseTransitionDuration?: number;
  // 遮罩层背景色,支持 rgba() 和 #RRGGBBAA 写法
  barrierColor?: string;
  // 点击遮罩层返回上一页
  barrierDismissible?: boolean;
  // 无障碍语义
  barrierLabel?: string;
  // 是否与下一个页面联动,决定当前页 secondaryAnimation 是否生效
  canTransitionTo?: boolean;
  // 是否与前一个页面联动,决定前一个页 secondaryAnimation 是否生效
  canTransitionFrom?: boolean;
  // 处理当前页的进入/退出动画,返回 StyleObject
  handlePrimaryAnimation?: RouteAnimationHandler;
  // 处理当前页的压入/压出动画,返回 StyleObject
  handleSecondaryAnimation?: RouteAnimationHandler;
  // 处理上一级页面的压入/压出动画,返回 StyleObject 基础库 <3.0.0> 起支持
  handlePreviousPageAnimation?: RouteAnimationHandler;
  // 页面进入时是否采用 snapshot 模式优化动画性能 基础库 <3.2.0> 起支持
  allowEnterRouteSnapshotting?: boolean
  // 页面退出时是否采用 snapshot 模式优化动画性能 基础库 <3.2.0> 起支持
  allowExitRouteSnapshotting?: boolean
  // 右滑返回时,可拖动范围是否撑满屏幕,基础库 <3.2.0> 起支持,常用于半屏弹窗
  fullscreenDrag?: boolean
  // 返回手势方向 基础库 <3.4.0> 起支持
  popGestureDirection?: 'horizontal' | 'vertical' | 'multi'
}

type RouteAnimationHandler = () => { [key: string] : any}
# 默认路由配置
const defaultCustomRouteConfig = {
  opaque: true,
  maintainState: true,
  transitionDuration: 300,
  reverseTransitionDuration: 300,
  barrierColor: '',
  barrierDismissible: false,
  barrierLabel: '',
  canTransitionTo: true,
  canTransitionFrom: true,
  allowEnterRouteSnapshotting: false,
  allowExitRouteSnapshotting: false,
  fullscreenDrag: false,
  popGestureDirection: 'horizontal'
}
# 示例模板
以下是注册自定义路由的一份示例模板(未添加手势处理部分),完整实现半屏路由效果见示例代码。
const customRouteBuiler = (routeContext: CustomRouteContext) : CustomRouteConfig => {
  const {
    primaryAnimation,
    secondaryAnimation,
    userGestureInProgress
  } = routeContext

  const handlePrimaryAnimation: RouteAnimationHandler = () => {
    'worklet'
    let t = primaryAnimation.value
    if (!userGestureInProgress.value) {
      // select another curve, t = xxx
    }
    // StyleObject
    return {}
  }

  const handleSecondaryAnimation: RouteAnimationHandler = () => {
    'worklet'
    let t = secondaryAnimation.value
    if (!userGestureInProgress.value) {
      // select another curve, t = xxx
    }
    // StyleObject
    return {}
  }

  return {
    opaque: true,
    handlePrimaryAnimation,
    handleSecondaryAnimation
  }
}

// 在页面跳转前定义好 routeBuilder
wx.router.addRouteBuilder('customRoute', customRouteBuiler)

// 跳转新页面时,指定对应的 routeType
wx.navigateTo({
  url: 'xxxx',
  routeType: 'customRoute'
})
# 工作原理
以半屏效果为例,路由前后页面记为 A 页、B 页,一个路由的生命周期中,会经历如下阶段:
push阶段 :调用wx.navigateTo,B页自底向上弹出,A页下沉收缩- 手势拖动:在
B页上下滑动时,路由动画随之变化 pop阶段 :调用wx.navigateBack,B页向下关闭,A恢复原样
细分到每个页面,在上述阶段会有以下动画方式
- 进入/退出动画
- 压入/压出动画
- 手势拖动
- 在
push阶段,B页进行的是进入动画,A页进行的是压入动画; - 在
pop阶段,B页进行的是退出动画,A页进行的是压出动画;
可以看到在路由过程中,前后两个页面动画进行了联动。在自定义路由模式下,我们可以对动画各个阶段的时长、曲线、效果以及是否联动进行自定义,以实现灵活多变的页面专场效果。
# 路由控制器
当打开新页面时,框架会为其创建两个 SharedValue 类型的动画控制器 primaryAnimation 和 secondaryAnimation,分别控制进入/退出动画和压入/压出动画。
页面的进入和退出可指定不同的时长,但进度变化始终在 0~1 之间。仍以半屏效果为例,路由前后页面记为 A 页、B 页。
# push 阶段
B页对应的primaryAnimation从0 -> 1变化,做进入动画A页对应的secondaryAnimation从0 -> 1变化,做压入动画
# pop 阶段
B页对应的primaryAnimation从1 -> 0变化,做退出动画A页对应的secondaryAnimation从1 -> 0变化,做压出动画
其中,A 页 secondaryAnimation 的值始终与 B 页 primaryAnimation 的值同步变化。
通常页面的进入和退出可能采用不同的动画曲线,可通过对应的状态变量 primaryAnimationStatus 和 secondaryAnimationStatus 来区分当前处于哪一阶段,ts 定义如下
enum AnimationStatus {
  // 动画停在起点
  dismissed = 0,
  // 动画从起点向终点进行
  forward = 1,
  // 动画从终点向起点进行
  reverse = 2,
  // 动画停在终点
  completed = 3,
}
以 primaryAnimationStatus 为例,页面进入和退出过程中变化情况如下
push阶段:dismissed->forward->completedpop阶段:completed->reverse->dismissed
# 路由手势
在页面推入后,除了调用 wx.navigateBack 接口返回上一级外,还可以通过手势来处理,例如 iOS 上常见的右滑返回。自定义路由模式下,开发者可根据不同的页面转场效果,来选取所需的退出方式,如半屏效果可采用下滑返回。关于手势监听的内容,可参考 手势系统 一章,路由手势仅是在其基础上,补充了几个路由相关的接口。
startUserGesture 和 stopUserGesture 两个函数总是成对调用的,startUserGesture 调用后 userGestureInProgress 的值会加 1。
当开发者自行修改 primaryAnimation 的值来控制路由进度的时候,就需要调用这两个接口。由于手势拖动过程中通常采用不同的动画曲线,可通过 userGestureInProgress 值进行判断。
当手势处理后确定需要返回上一级页面时,调用 didPop 接口,作用等同 wx.navigateBack。
# 路由联动
路由动画过程中,默认前后两个页面是一起联动的,可通过配置项关闭。
canTransitionTo:是否与下一个页面联动,栈顶页面该属性置为false,推入下一页面时,则栈顶页面始终不动canTransitionFrom:是否与前一个页面联动,新推入页面该属性置为false,则栈顶页面始终不动
# 路由上下文对象
由示例模版可见,自定义路由的动画效果就是根据 CustomRouteContext 上下文对象上的路由控制器,编写适当的动画更新函数来实现。
CustomRouteContext 上下文对象还可在页面/自定义组件中通过 wx.router.getRouteContext(this) 读取,进而在手势处理过程中访问,通过对 primaryAnimation 值的改写实现页面手势返回。
小技巧:可在 CustomRouteContext 对象上添加一些私有属性,在页面中进行读取/修改。
# 多类型路由跳转
考虑这样的场景,从页面 A 可能跳转到 B 页和 C 页,但具有不同的路由动画
A->B时,希望实现半屏效果,A需要下沉收缩A->C时,希望采用普通路由,A需要向左移动
跳转下一级页面时的动画由 handleSecondaryAnimation 控制,这样就需要在定义 A 的 CustomRouteBuilder 时考虑所有的路由类型,实现较为繁琐。
基础库 3.0.0 版本起,自定义路由新增 handlePreviousPageAnimation 接口,用于控制上一级页面的压入/压出动画。
const customRouteBuiler = (routeContext: CustomRouteContext) : CustomRouteConfig => {
  const { primaryAnimation } = routeContext

  const handlePrimaryAnimation: RouteAnimationHandler = () => {
    'worklet'
    let t = primaryAnimation.value
    // 控制当前页的进入和退出
  }

  const handlePreviousPageAnimation: RouteAnimationHandler = () => {
    'worklet'
    let t = primaryAnimation.value
    // 控制上一级页面的压入和退出
  }

  return {
    handlePrimaryAnimation,
    handlePreviousPageAnimation
  }
}
A 跳转到 B 时, A 页 secondaryAnimation 的值始终与 B 页 primaryAnimation 的值同步变化。
我们可以在定义 B 的 CustomRouteBulder 时,通过 primaryAnimation 得知当前路由进度,handlePreviousPageAnimation 返回的 StyleObject 会作用于上一级页面。
同时也不再需要提前声明 A 为自定义路由,在此之前 A 跳转 B 希望实现半屏效果时,A 也必须定义为自定义路由。
完整的示例可参考如下代码,借助 handlePreviousPageAnimation 可去掉对 secondaryAnimation 的依赖,简化代码逻辑。
# 实际案例
下面以半屏效果为例,讲解自定义路由的具体实现过程,完整代码见示例代码。

路由前后页面分别记为 A 页和 B 页,需要分别为其注册自定义路由。未注册任何自定义路由效果时,新打开的页面 B 会立即覆盖显示在 A 页上。
# Step-1 页面进入动画
我们先分别简单实现 首页 -> A 页 -> B 页的进入动画,再一步步进行完善。
对于 A 页面,进入方式为自右向左,通过 transform 平移实现。
function ScaleTransitionRouteBuilder(customRouteContext) {
  const {
    primaryAnimation
  } = customRouteContext

  const handlePrimaryAnimation = () => {
    'worklet'
    let t = primaryAnimation.value
    const transX = windowWidth * (1 - t)
    return {
      transform: `translateX(${transX}px)`,
    }
  }
  return {
    handlePrimaryAnimation
  }
}
对于 B 页面,进入方式为自底向上,也是通过 transform 平移实现,但需要对页面大小、圆角进行修改。
const HalfScreenDialogRouteBuilder = (customRouteContext) => {
  const {
    primaryAnimation,
  } = customRouteContext

  const handlePrimaryAnimation = () => {
    'worklet'
    let t = primaryAnimation.value
    // 距离顶部边距因子
    const topDistance = 0.12
    // 距离顶部边距
    const marginTop = topDistance * screenHeight
    // 半屏页面大小
    const pageHeight = (1 - topDistance) * screenHeight
    // 自底向上显示页面
    const transY = pageHeight * (1 - t)
    return {
      overflow: 'hidden',
      borderRadius: '10px',
      marginTop: `${marginTop}px`,
      height: `${pageHeight}px`,
      transform: `translateY(${transY}px)`,
    }
  }

  return {
    handlePrimaryAnimation,
  }
}
页面跳转效果如下,可以看到由于采用线性曲线(未对 t 做任何变换),动画有些呆板,同时未区分进入/退出动画。在 B 页完全进入后,A 页变的不可见。

# Step-2 自定义动画曲线
以 B 页为例,根据 AnimationStatus 值,采用不同的动画曲线,同时设置 opaque 为 false,使得路由动画完成后仍显示 A 页面。
const { Easing, derived } = wx.workelt

const Curves = {
  linearToEaseOut: Easing.cubicBezier(0.35, 0.91, 0.33, 0.97),
  easeInToLinear: Easing.cubicBezier(0.67, 0.03, 0.65, 0.09),
  fastOutSlowIn: Easing.cubicBezier(0.4, 0.0, 0.2, 1.0),
  fastLinearToSlowEaseIn: Easing.cubicBezier(0.18, 1.0, 0.04, 1.0),
}

function CurveAnimation({ animation, animationStatus, curve,reverseCurve }) {
  return derived(() => {
    'worklet'
    const useForwardCurve = !reverseCurve || animationStatus.value !== AnimationStatus.reverse
    const activeCurve = useForwardCurve ? curve : reverseCurve
    const t = animation.value
    if (!activeCurve) return t
    if (t === 0 || t === 1) return t
    return activeCurve(t)
  })
}
const HalfScreenDialogRouteBuilder = (customRouteContext) => {
  const {
    primaryAnimation,
    primaryAnimationStatus,
  } = customRouteContext

  // 1. 页面进入时,采用 Curves.linearToEaseOut 曲线
  // 2. 页面退出时,采用 Curves.easeInToLinear 曲线
  const _curvePrimaryAnimation = CurveAnimation({
    animation: primaryAnimation,
    animationStatus: primaryAnimationStatus,
    curve: Curves.linearToEaseOut,
    reverseCurve: Curves.easeInToLinear,
  })

  const handlePrimaryAnimation = () => {
    'worklet'
    let t = _curvePrimaryAnimation.value
    ... // 其余内容等上面的代码一致
  }

  return {
    opaque: false,
    handlePrimaryAnimation,
  }
}
这里的区别仅在于,当前的进度不再直接读取 primaryAnimation 的值。封装的 CurveAnimation 函数会根据 AnimationStatus 判断是处于进入还是退出状态,从而选择不同的动画曲线。框架提供了多种曲线类型,可进一步参考 worklet.Easing。改进后的页面转场效果如下
# Step-3 页面联动效果
B 页进入时,A 页作压入动画,由 secondaryAnimation 控制。接下来,我们为其添加下沉效果,实现和 B 页的联动。
function ScaleTransitionRouteBuilder(customRouteContext) {
  const {
    primaryAnimation
  } = customRouteContext

  const handlePrimaryAnimation = () => {
    'worklet'
    ...
  }

  const _curveSecondaryAnimation = CurveAnimation({
    animation: secondaryAnimation,
    animationStatus: secondaryAnimationStatus,
    curve: Curves.fastOutSlowIn,
  })

  const handleSecondaryAnimation = () => {
    'worklet'
    let t = _curveSecondaryAnimation.value
    // 页面缩放大小
    const scale = 0.08
    // 距离顶部边距因子
    const topDistance = 0.1
    // 估算的偏移量
    const transY = screenHeight * (topDistance - 0.5 * scale) * t
    return {
      overflow: 'hidden',
      borderRadius: `${ 12 * t }px`,
      transform: `translateY(${transY}px) scale(${ 1 - scale * t })`,
    }
  }

  return {
    handlePrimaryAnimation,
    handleSecondaryAnimation
  }
}
通过对 A 页作 scale 和 translate 变换实现下沉效果。A 页 secondaryAnimation 的值始终与 B 页 primaryAnimation 的值保持同步。

页面是否联动还可通过 canTransitionTo 和 canTransitionFrom 两个属性进行配置,可在开发者工具上修改体验。
# Step-4 手势返回
目前动画效果已经基本实现,还需要最后一步,手势返回。对于半屏效果,我们为 A 页添加右滑返回手势,B 页添加下滑返回手势。
以最常见的右滑返回为例,这里只截取松手后的手势处理部分代码,拖动过程实现较为简单,可参考示例代码。
page({
  handleDragEnd(velocity) {
    'worklet';
    const {
        primaryAnimation,
        stopUserGesture,
        didPop
    } = this.customRouteContext;

    let animateForward = false;
    if (Math.abs(velocity) >= 1.0) {
      animateForward = velocity <= 0;
    } else {
      animateForward = primaryAnimation.value > 0.5;
    }
    const t = primaryAnimation.value;
    const animationCurve = Curves.fastLinearToSlowEaseIn;
    if (animateForward) {
        const duration = Math.min(
          Math.floor(lerp(300, 0, t)),
          300,
        );
        primaryAnimation.value = timing(
          1.0, {
            duration,
            easing: animationCurve,
          },
          () => {
            'worklet'
            stopUserGesture();
          },
        );
    } else {
      const duration = Math.floor(lerp(0, 300, t));
      primaryAnimation.value = timing(
        0.0, {
          duration,
          easing: animationCurve,
        },
        () => {
          'worklet'
          stopUserGesture();
          didPop();
        },
      );
    }
  },
})
首先根据松手时的速度和位置,决定是否要真正返回上一级。
- 向右滑动且速度大于
1 - 或者速度较小时,已拖动超过屏幕
1/2
满足以上条件时,确定返回。通过 timing 接口,为 primaryAnimation 添加过渡动画,使其变化到 0,最后调用 didPop 。否则使其变化到 1,恢复到拖动前的状态。
这里需要注意的是,当需要对 primaryAnimation 值手动修改,自由掌控其过渡方式时,才需要调用 startUserGesture 和 stopUserGesture 接口。
右滑手势已经在示例代码中封装成 swipe-back 组件,开发者可直接使用。下滑手势返回逻辑基本一致,仅一些数值上略有差异。
最后的实现效果如图
# 设置页面透明
一些自定义路由效果下,需要实现页面透明背景,这里对 Skyline 和 webview 模式下背景色的层级关系进行说明。
# 自定义路由下的页面背景色
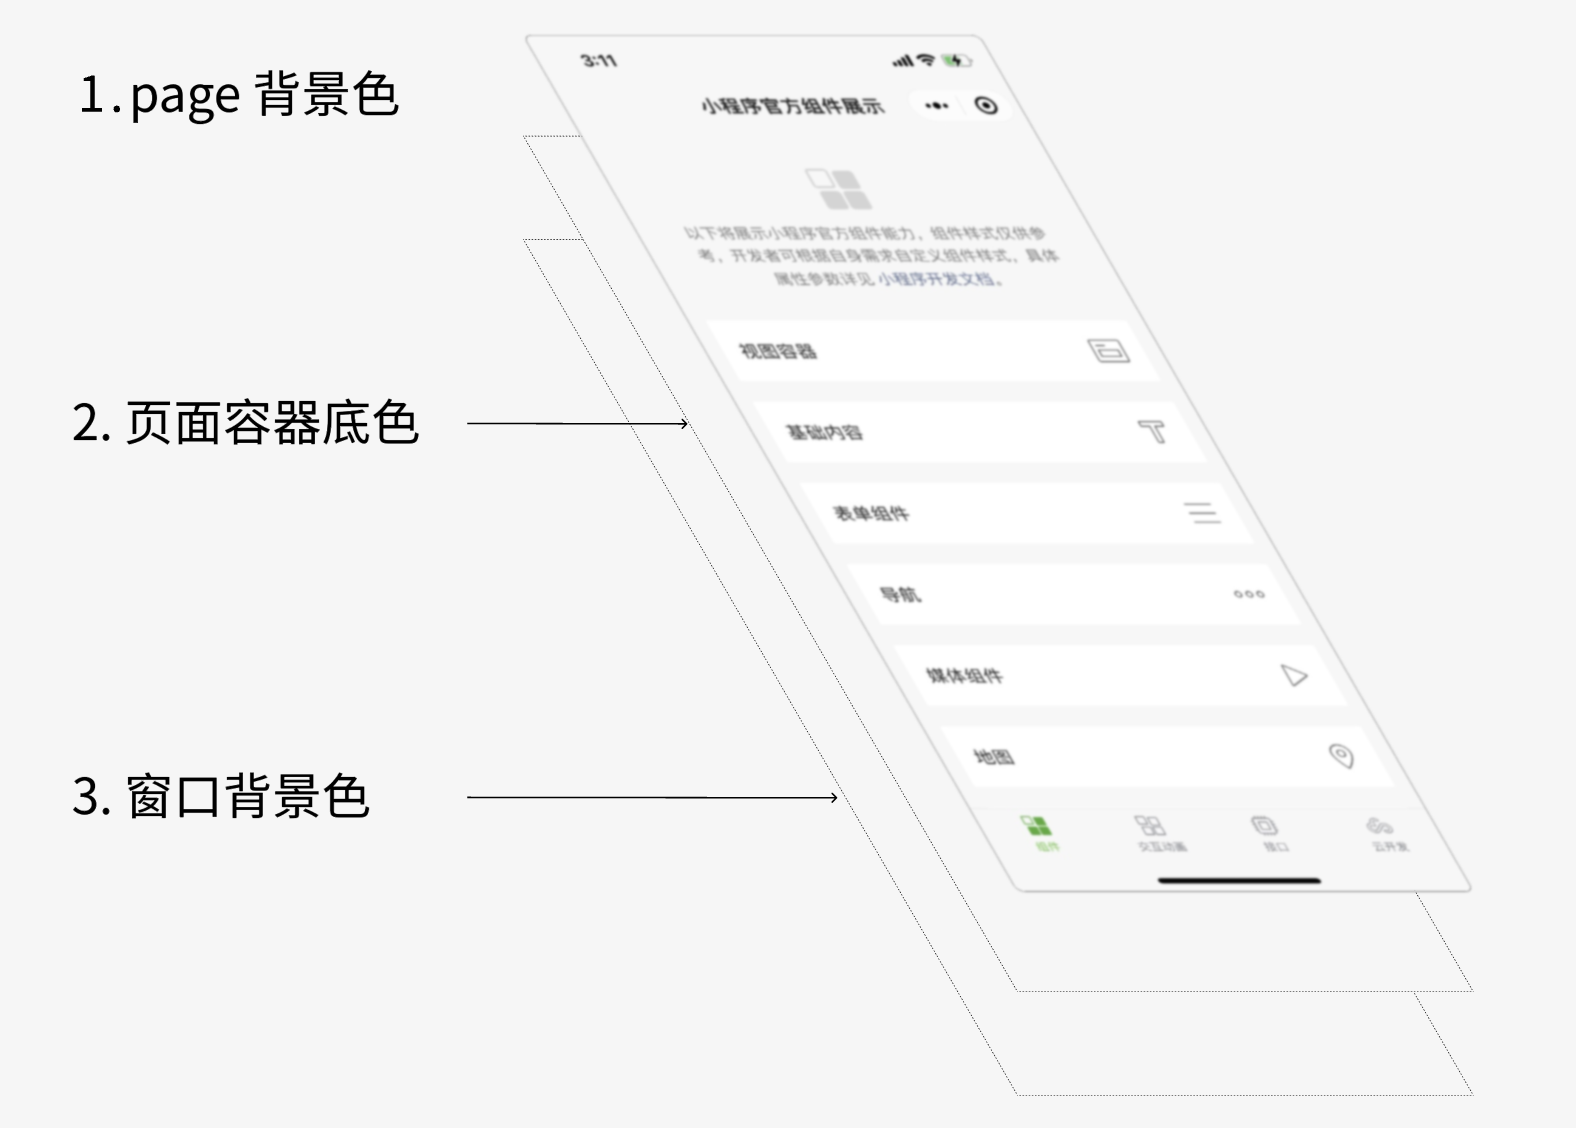
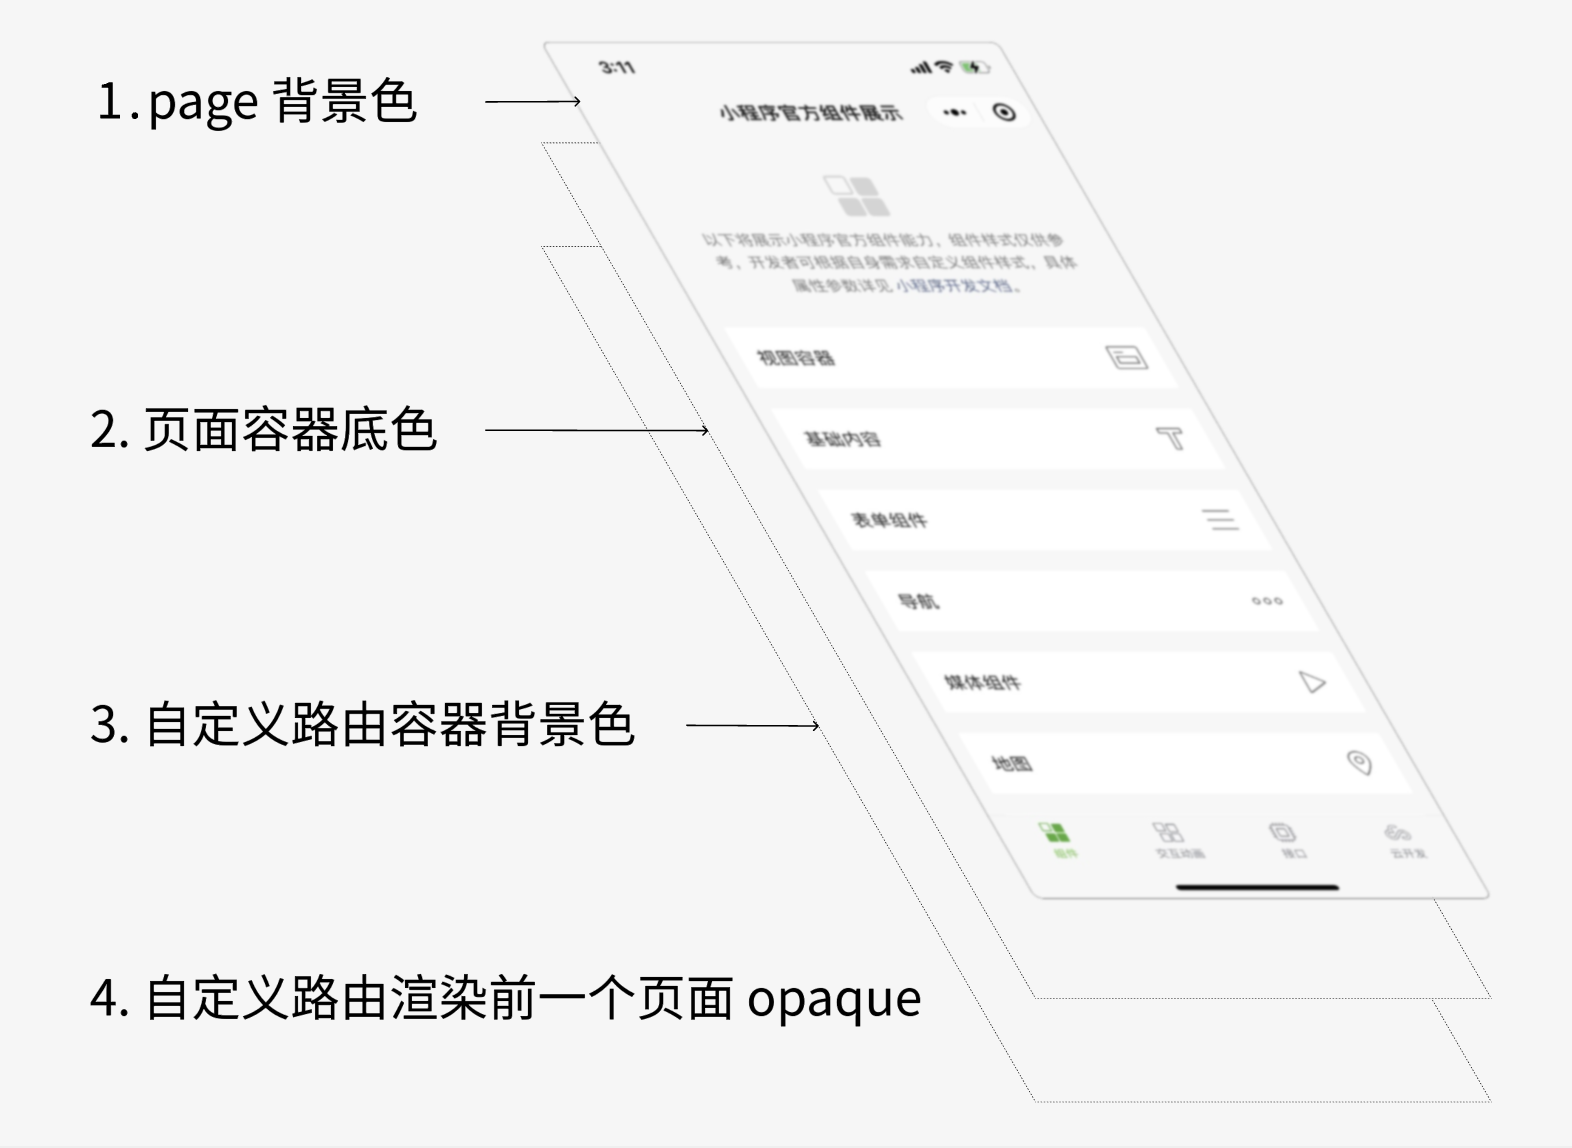
Skyline 模式下使用自定义路由方式跳转页面,页面背景色有如下几层
- 页面背景色:可通过
page选择器在wxss中定义,默认为白色 - 页面容器背景色:可在页面
json文件中通过backgroundColorContent属性定义,支持#RRGGBBAA写法,默认白色 - 自定义路由容器背景色,由路由配置项中返回的
StyleObject控制,默认透明 - 控制是否显示前一个页面,由路由配置项中的
opaque字段控制,默认不显示
当需要设置下一个页面渐显进入时,可简单设置
- 页面背景色透明:
page { background-color: transparent; } - 页面容器背景色透明:
backgroundColorContent: "#ffffff00"
# webview 下的页面背景色
对比看下,webview 模式下的页面背景色
- 页面背景色:可通过
page选择器在wxss中定义,默认为透明 - 页面容器背景色:可在页面
json文件中通过backgroundColorContent属性定义,支持#RRGGBB写法,默认白色 - 窗口背景色:可通过 wx.setBackgroundColor 接口或页面配置修改,默认为白色