# In automated tests, use image contrast ability to illustrate
The image comparison capability is generally used as a complement to the **automated test capability and can be used to compare stable Weixin Mini Program-END]] pages to verify whether the original functionality has been changed when a version is updated by whether the UI is consistent.
# Required reading before use
Before using the image contrast capability, you need to know the following first:
- Use Restrictions : Currently only ** ** and ** Custom tests** Test types to use picture contrast capabilities
- Benchmark picture : The benchmark picture is a template used to compare the picture of the test report, that is, who the picture in the report is compared to
- Comparison rule : After setting the baseline image, when a comparison image is encountered in the report,Images that meet '5 identical' (same Weixin Mini Program AppID, same model, same pagepath, same name, same screenshot type) are only compared.
- Decision method : picture comparison algorithm and select SSIM (default) or visual comparison, later in detail.By default, the whole picture is compared. In order to improve availability, cloud testing also supports comparison of capabilities in regions.
- Impact on test results : When image comparison does not pass, the test results are marked as Does not pass and the problem is classified as Image comparison error / exception
The usage process is detailed below.
# 1. Get a picture
There are very many screenshots in each tape playback and custom test test.Note Only images obtained according to the following guidelines will be used for image comparison :
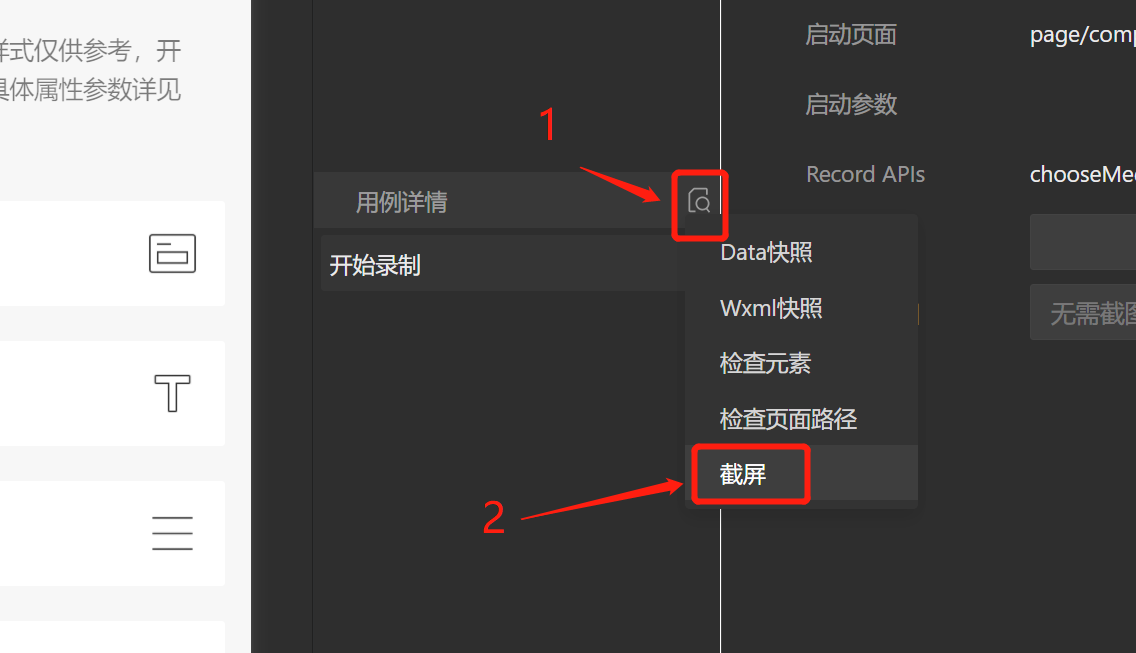
# Record playback
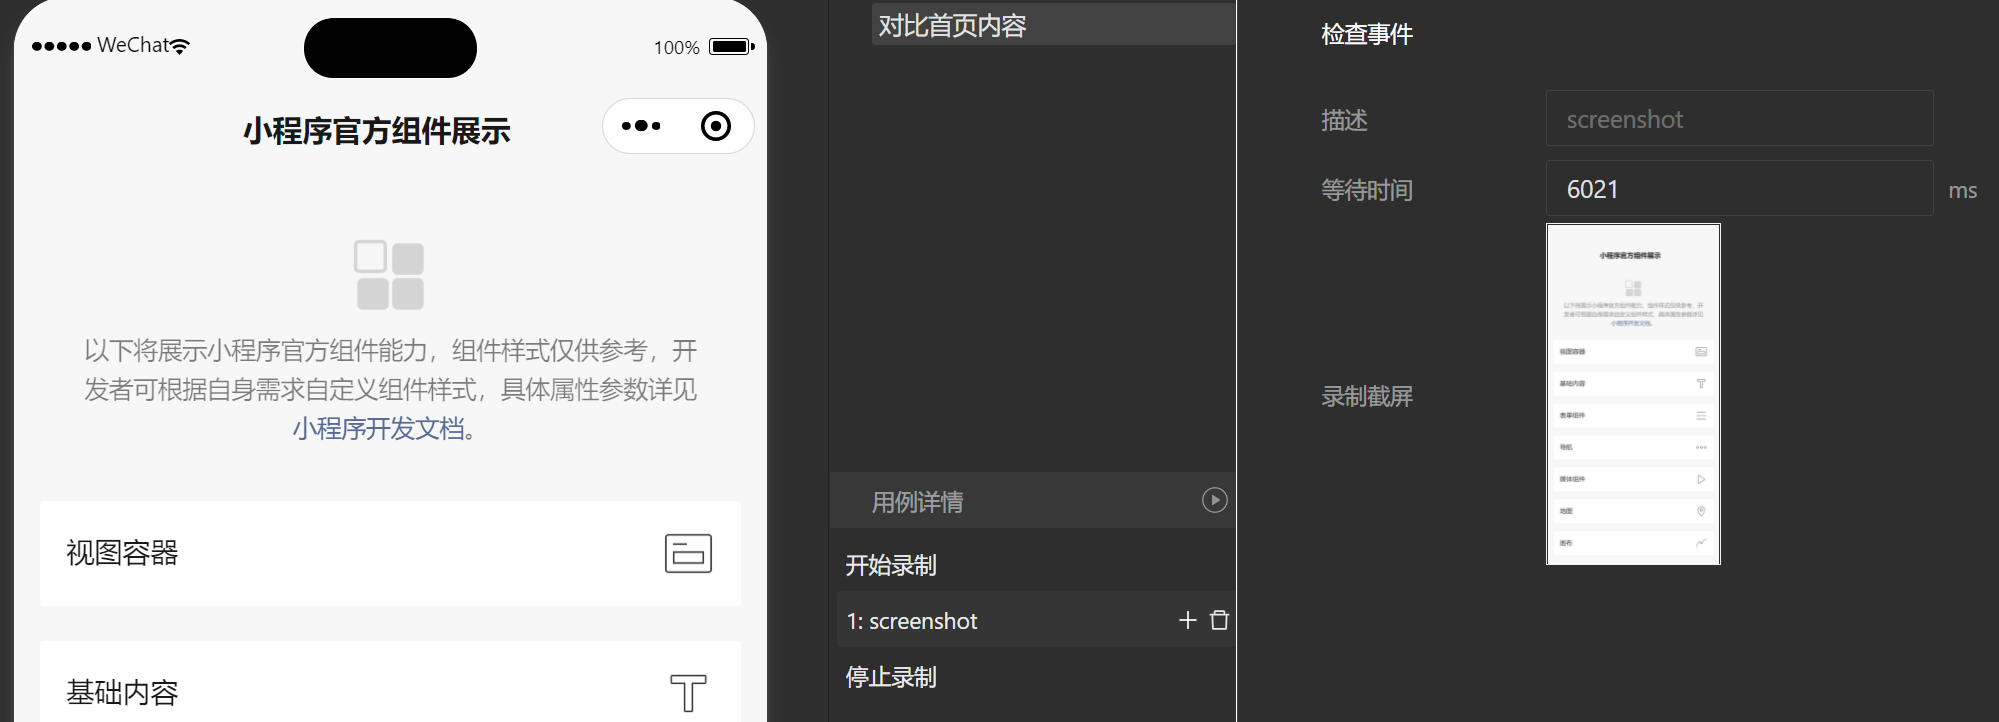
Recording and playback is performed in the developer tool, in the operation, select Take a screenshot , you can capture the image you need to compare.
Particular note:
- Only images obtained through screenshots are added to the image comparison .Other screenshots, such as those in operational steps, do not participate in the comparison.
- If the developer tool doesn't have screen shots, upgrade the version
- Previous recording playback use cases, if they used screenshots, required to resync the use case or to upload the use cases to collect the corresponding picture
# Custom Test (Minium)
Custom tests can be used to specify screenshots in Python code using the capture interface .
Minium is more flexible than recording playback, allowing to capture an entire picture and to take part of an element .
Specifically: In the capture interface, the type of screenshot is determined by the value of the parameterregion:
- Page: Enter the current page instance and take a picture of the page's current screen (note that to improve the success rate of the comparison, the banner at the top of the phone is automatically removed when taking the screenshot, because the time display of the banner interferes with the effect of the screenshot comparison)
- Element: Pass in the concrete element instance, intercept the picture of the element area
- Not incoming: indicates that this screenshot does not require image comparison. Default does not pass in
After the use case for recording playback / Minium is written, it can be submitted to the cloud test. Cloud testing will automatically record the images collected based on the test results
The advantages and disadvantages of the two methods are as follows:
| method | Advantage | shortcoming |
|---|---|---|
| Record playback | The learning threshold is low, it can be recorded by means of a little tap, without writing code | Can only cut the whole picture, not as flexible as Minium |
| Minium | Operationally flexible, supports taking partial elements **** and entire screenshots **and can directly specify relevant information such as ignored areas | Need to write Python3 script, there is a certain learning threshold |
Particular note:
- In subsequent picture comparison, the whole picture can only be compared with the whole picture, and some element screenshots are compared with some element shots.
- In the capture interface, strongly recommends specifying the screenshot file name . The file name is very important , because in the test report comparison rule, screenshots of the same image name on the same page are compared.Suggest a name with relevant meaning and unique
# 2. Determine the baseline picture and the way to compare
# Determine a baseline picture
A baseline image is a comparison source, i.e. solves the problem of which image compares the test results with which image.
By step 1, we have collected a lot of screenshots for comparison.
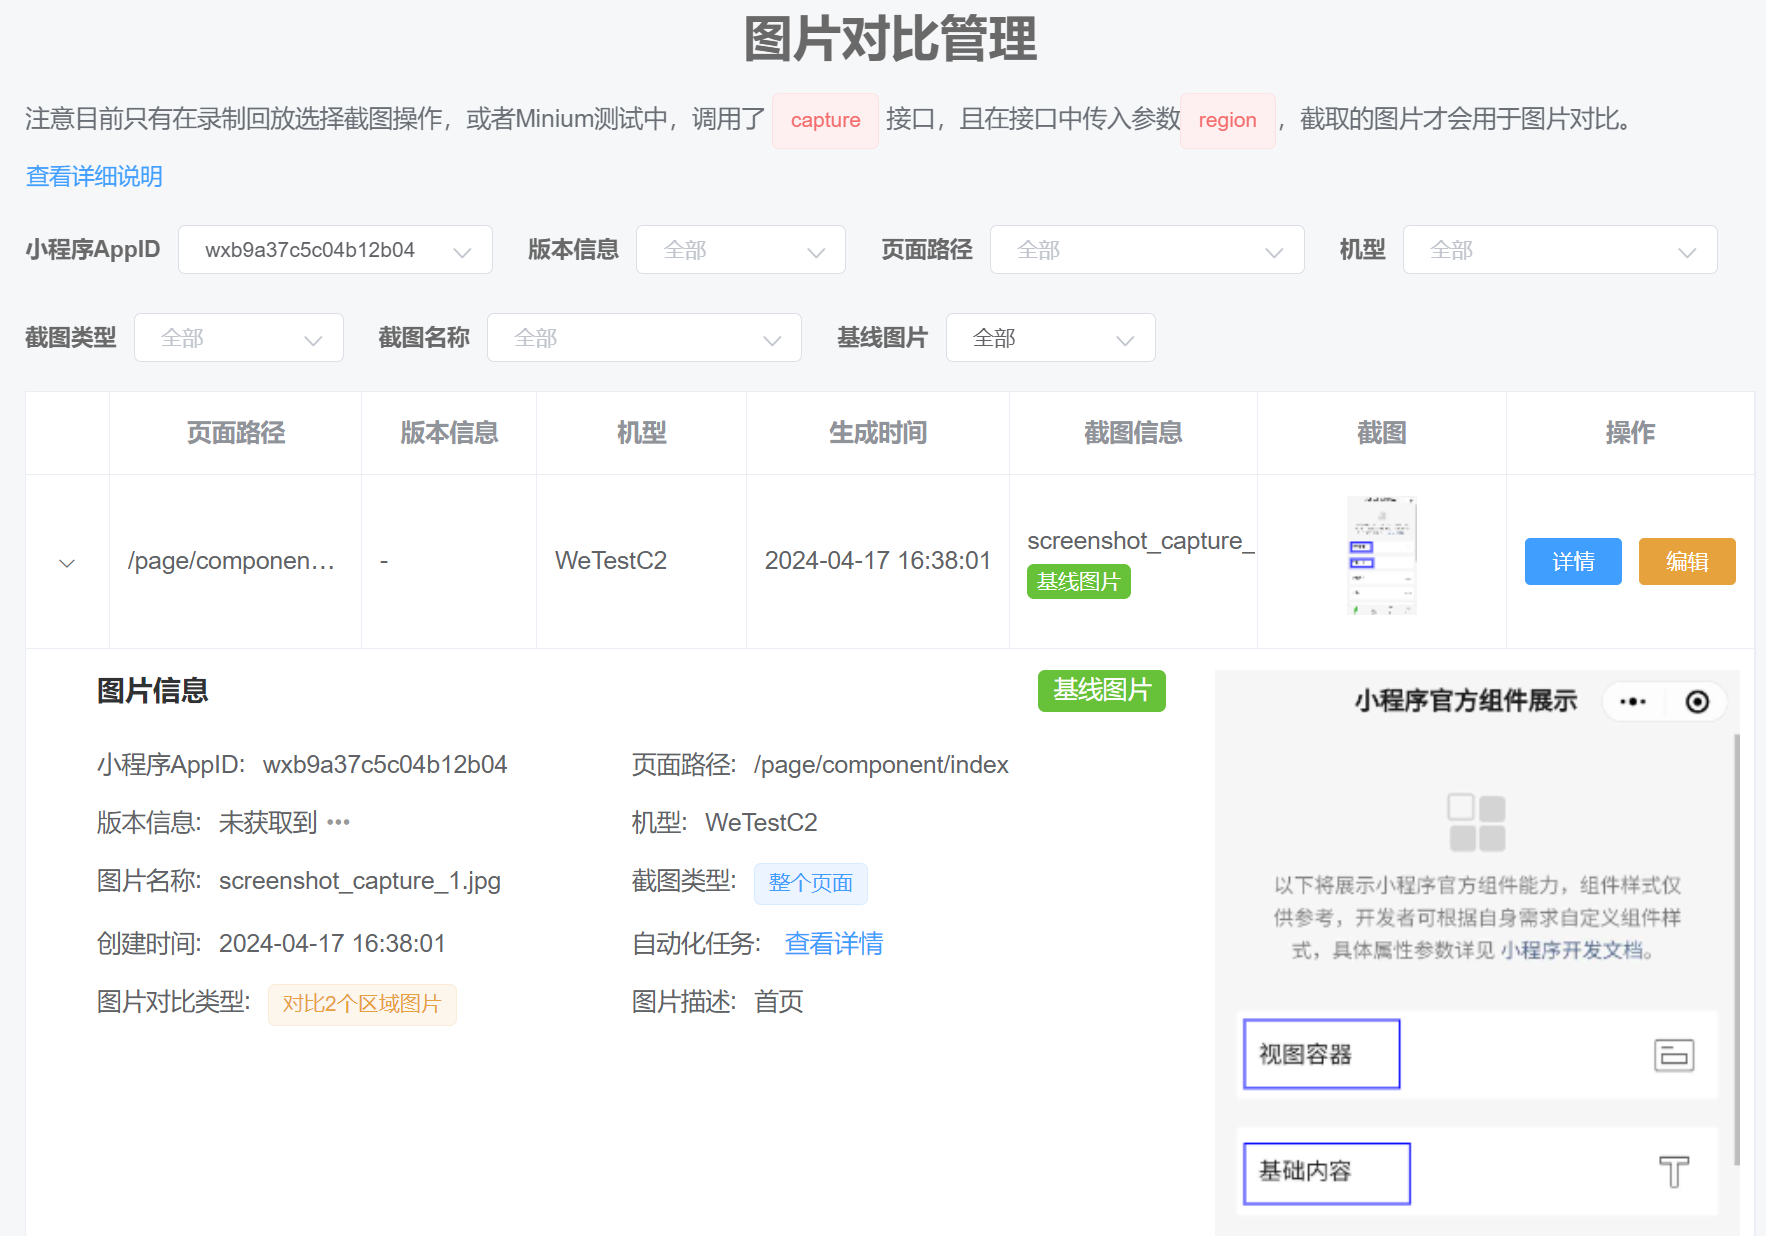
To set up a baseline picture, first click "Project Management" = "Image Contrast Management" in the left navigation bar to go to the Image Contrast Management page
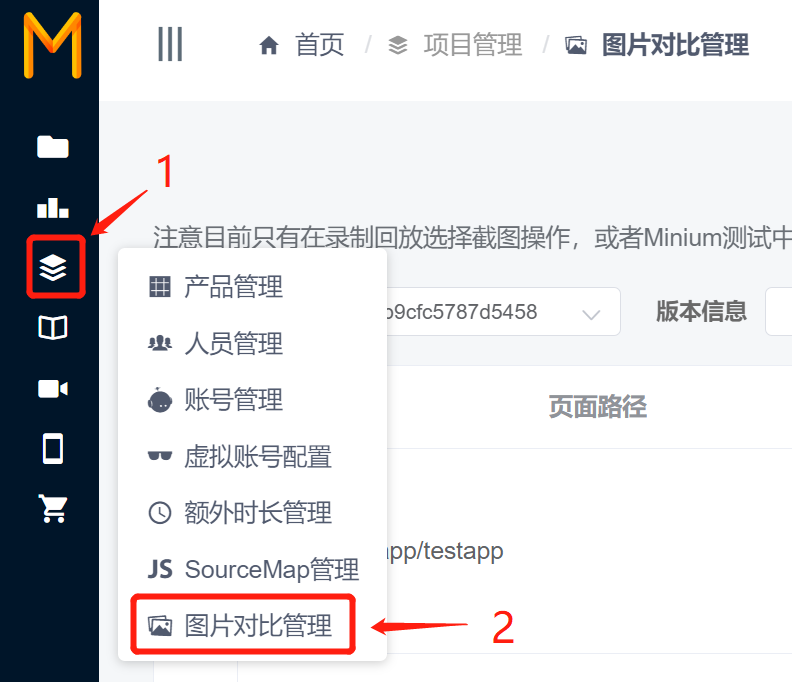
In the Image Contrast Management page, the specified contrast image that has been set in all test reports is displayed.
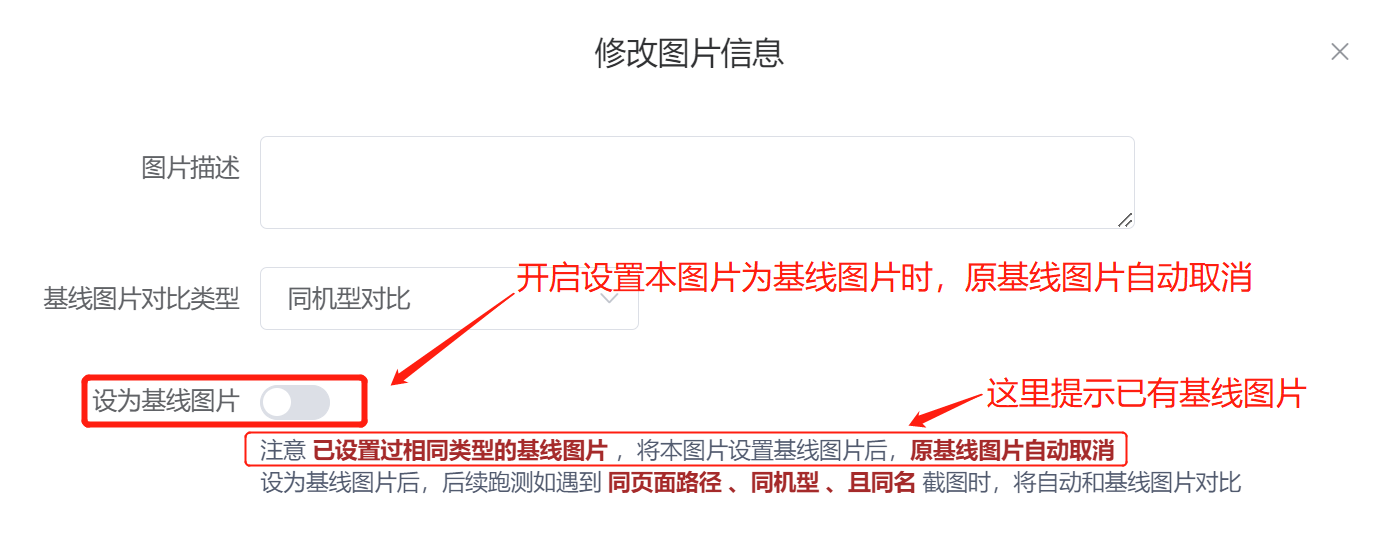
There are a lot of filtering options above, and users can filter according to the pages they need to configure (such as filtering page paths and phone models, etc.), and then set a baseline picture to compare **also supports setting the entire mission image as a baseline image.Convenient for developers to quickly set up, cloud testing also provides a corresponding API interface

Particular note: : For "5 identical" images (same Weixin Mini Program AppID, same model, same pagepath, same name, same screenshot type), There can only be one baseline image . When the current image is set as the baseline image, automatically cancels the original baseline image logo . If you already have a baseline picture, a prompt will be given when you set it up.
# Set how to compare
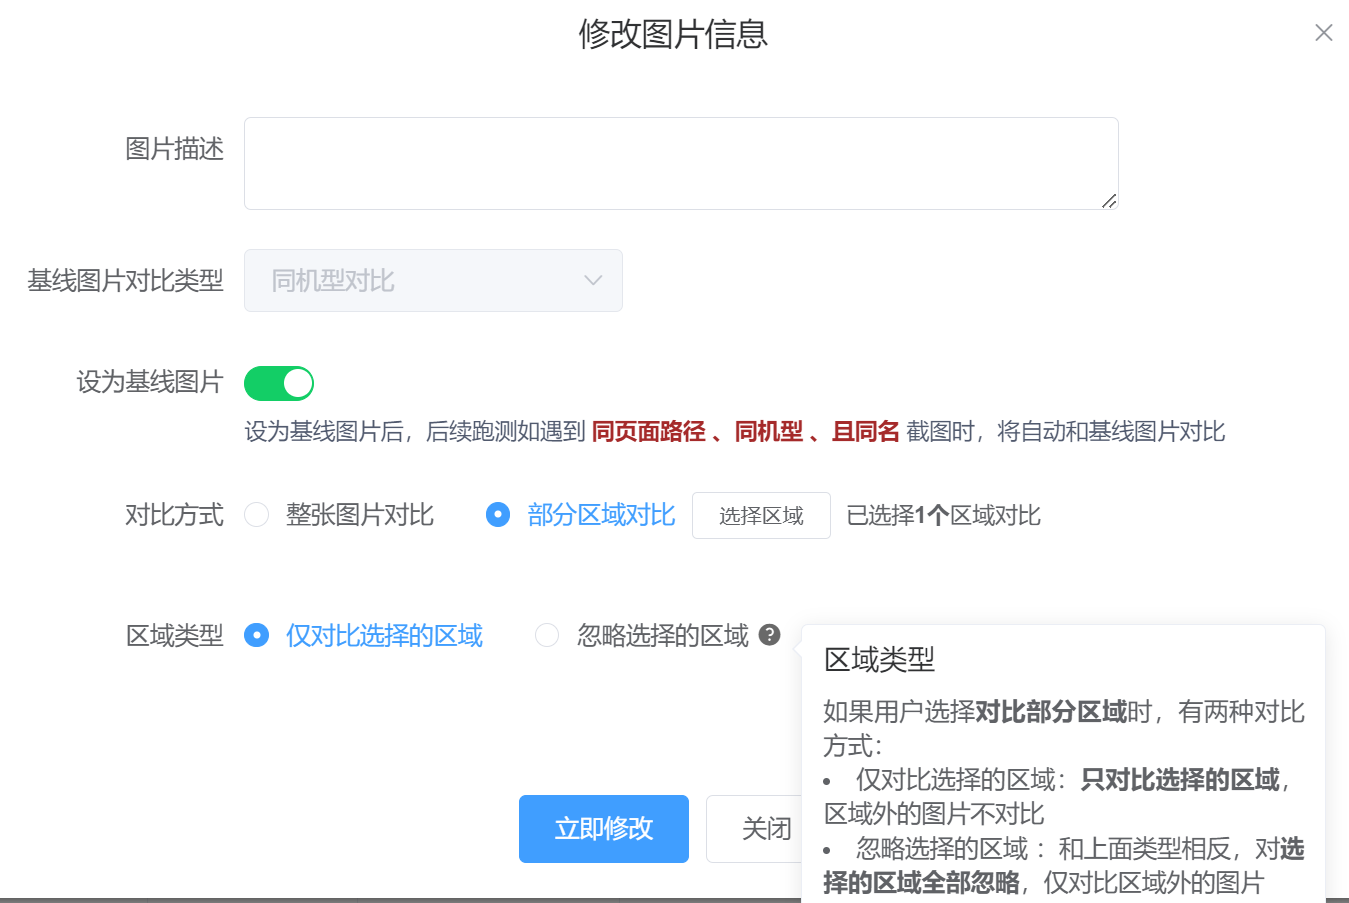
In the above procedure, when setting the baseline picture, the entire picture is compared together by default.In practice, it is difficult to guarantee that the entire Weixin Mini Program page has not changed.Once the page changes a little, the entire picture comparison fails.
In order to improve the usability of the image comparison, you can try the partial area comparison .
Cloud measurement supports two ways of comparing regions:
- Compare only the selected area : Compare only the selected area, no images outside the area
- Ignore selected areas : Contrary to the above type, ignore all selected areas and compare only images outside the area
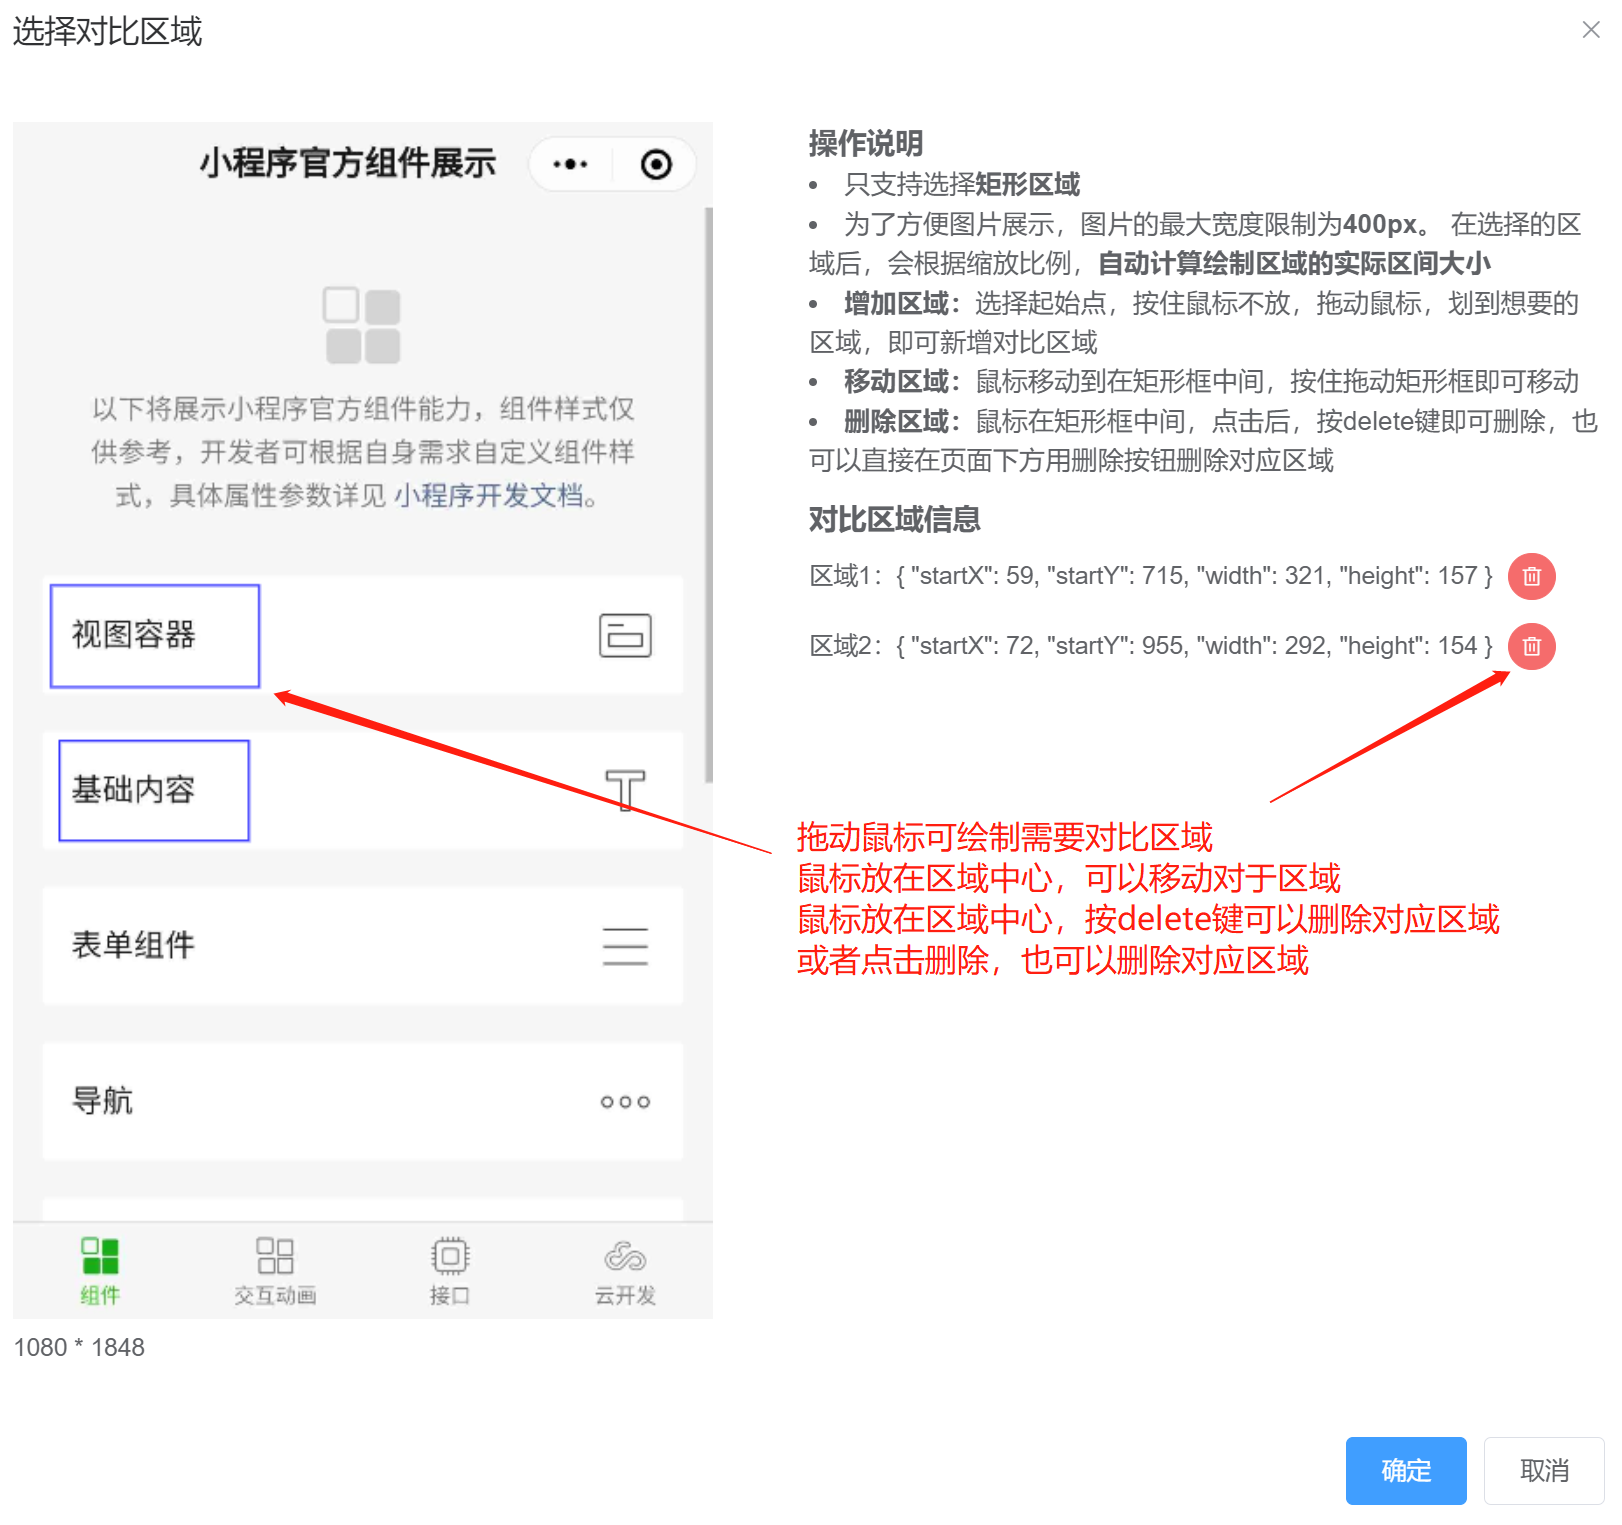
The exact operation is also simple. First, in the contrast type, select "Partial Area Contrast," then click "Select Areas," select the area you need to specify, and finally select the contrast type.
In the window that pops up, there are two main areas. On the left is the picture, and on the right is the operating instructions and comparison area information.
In the picture on the left, you can draw the areas that need contrast simply by dragging the mouse. Here we support:
- Demarcate multiple areas. When you add areas, continue to draw with your mouse.
- Move area: Move the mouse inside the rectangle first, then hold down the drag.
- Delete area: Move the mouse to the rectangle inside, click, and then hold down the delete key to delete. Or use the delete button on the right to delete
Once the selection is complete, remember to click OK, then go back to the Modify Image Information window. Click Modify Now.Note that must click the Modify Now button for this change to take effect .
In addition, if you take a screenshot using Minium, you can directly specify how and where the regions are compared in theregion_infoparameter, as follows:
region_info = {
         "type":   "ignore",  # 对比类型选择忽略部分区域,如果希望仅对比部分区域,type要改为 "focus"
         "rects": rects # 可填多个区域 [[startx1,starty1,endx1,endy1], [startx2,starty2,endx2,endy2]]
         "extra_info": {} , # 补充说明信息,可以在图片对比总览中显示
 }

# region=self.page表示先截取整图,然后再region_info中,具体指定要忽略/对比的区域。注意将xxx.png换成自己的截图名称
self.capture("xxx.png", region=self.page, region_info=region_info)
# 3. Submit the test and view the test report
Once the baseline picture is set, each time an automated task is run, the baseline image is automatically compared to and displayed in the report when five identical baseline conditions are met.
In order to facilitate users to see screenshots of all picture comparisons intuitively, CloudWatch especially added a picture comparison page in the report overview, which can directly view all comparison results.
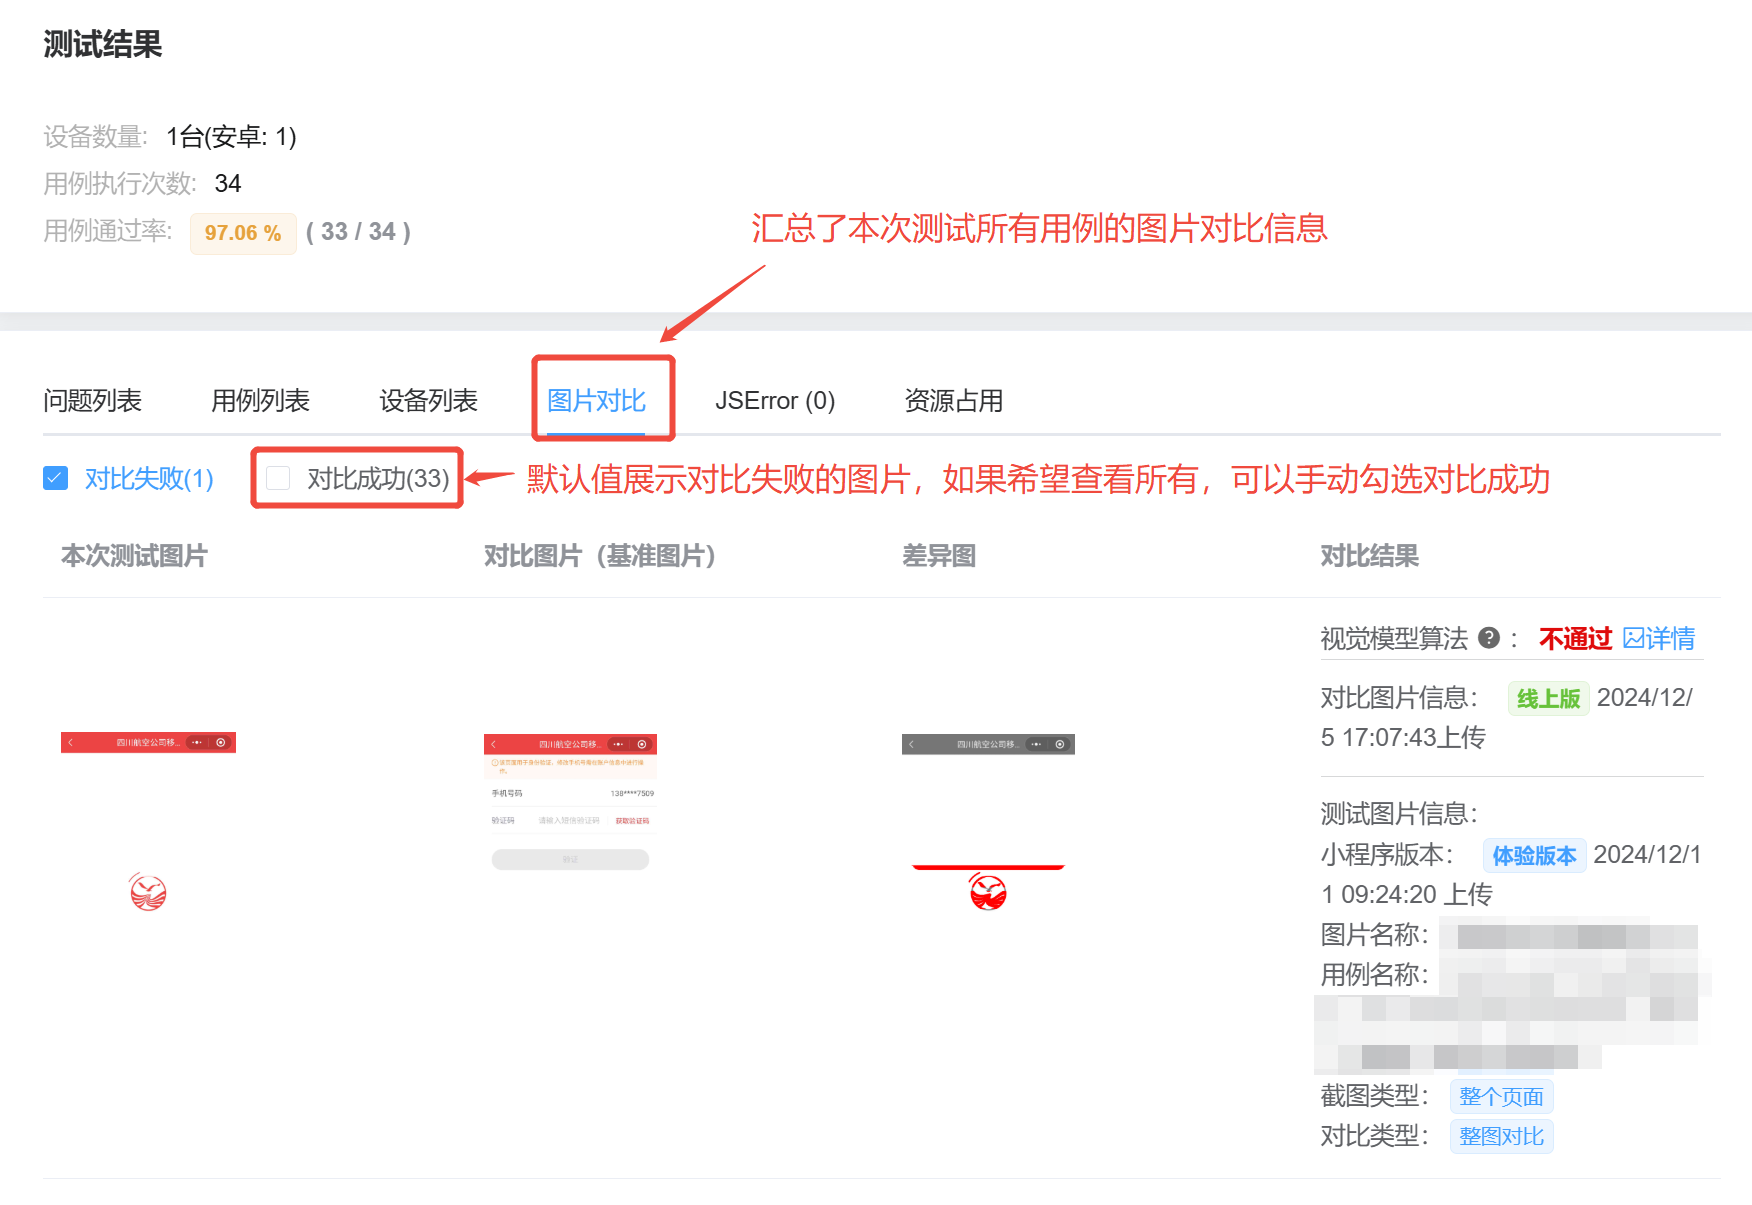
Special note: In the test details, if the picture comparison fails, the test result will be changed to Failed, and the picture comparison failed / abnormal
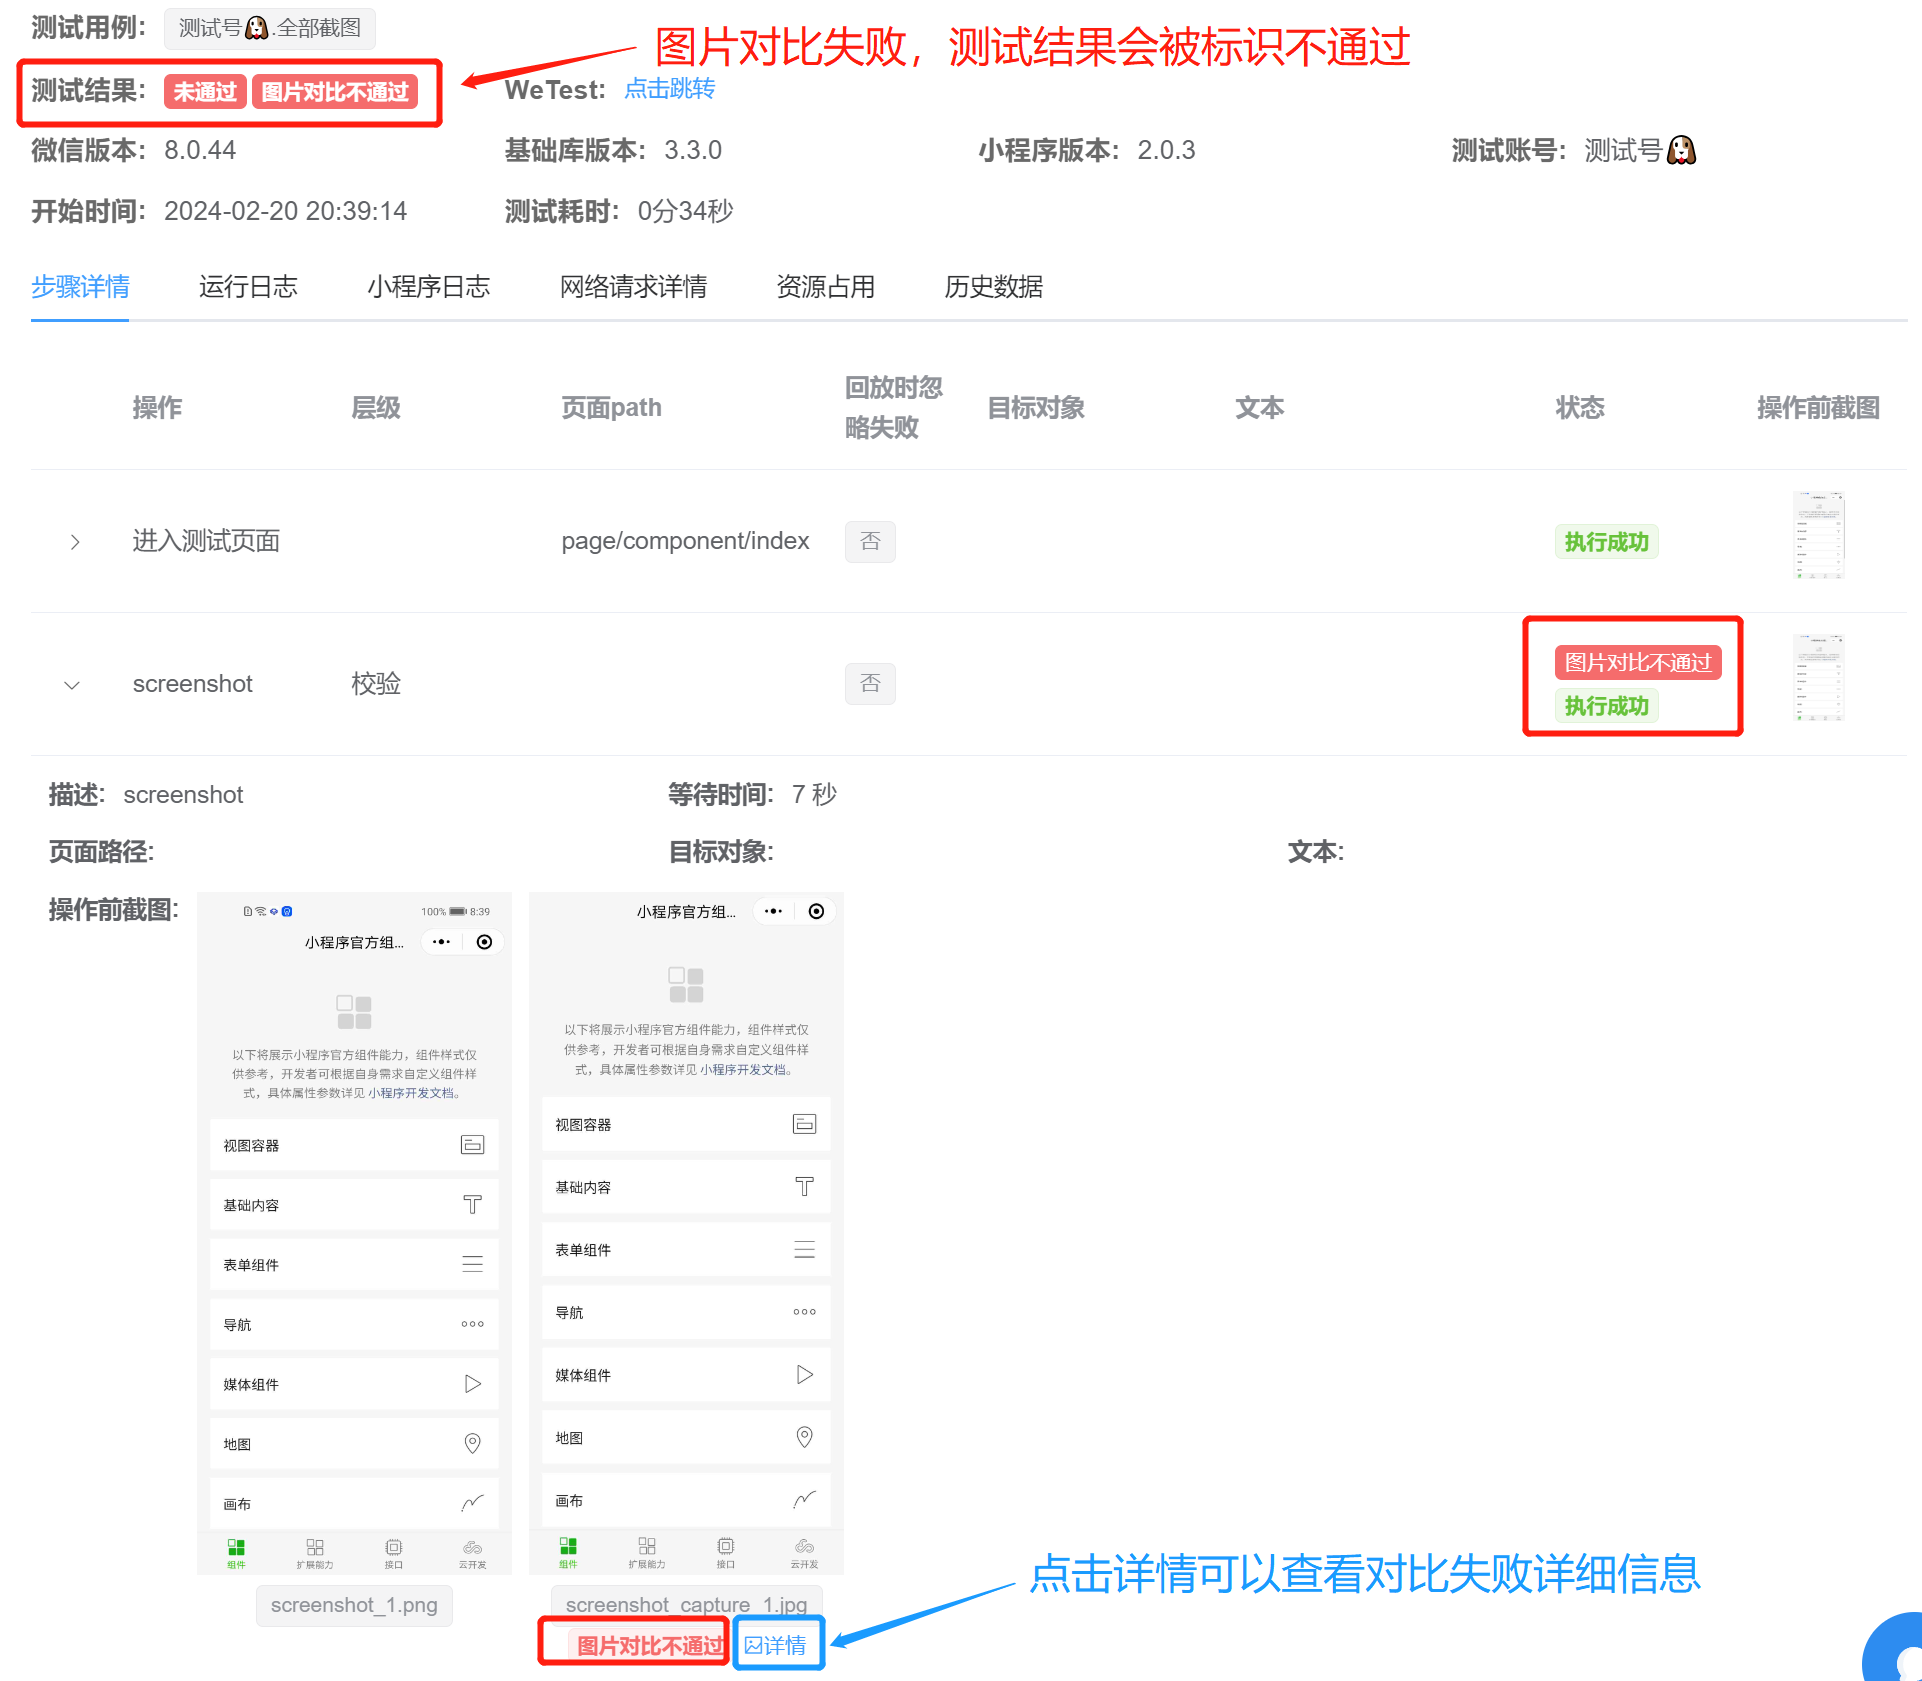
Click on Details to see the detailed results of the comparison failure
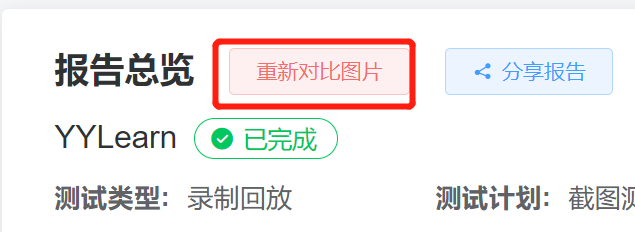
# 4. Update the comparison results
Some users find that the inconsistent comparison is due to the incorrect setting of the baseline picture. In this case, they can first follow step 2, reset the baseline image, and then click "Recontrast picture" in the corresponding Test Report Preview to update the comparison results immediately
Cloud Test also provides a [API interface for re-comparing images, making it easy for users to get through the Devops process
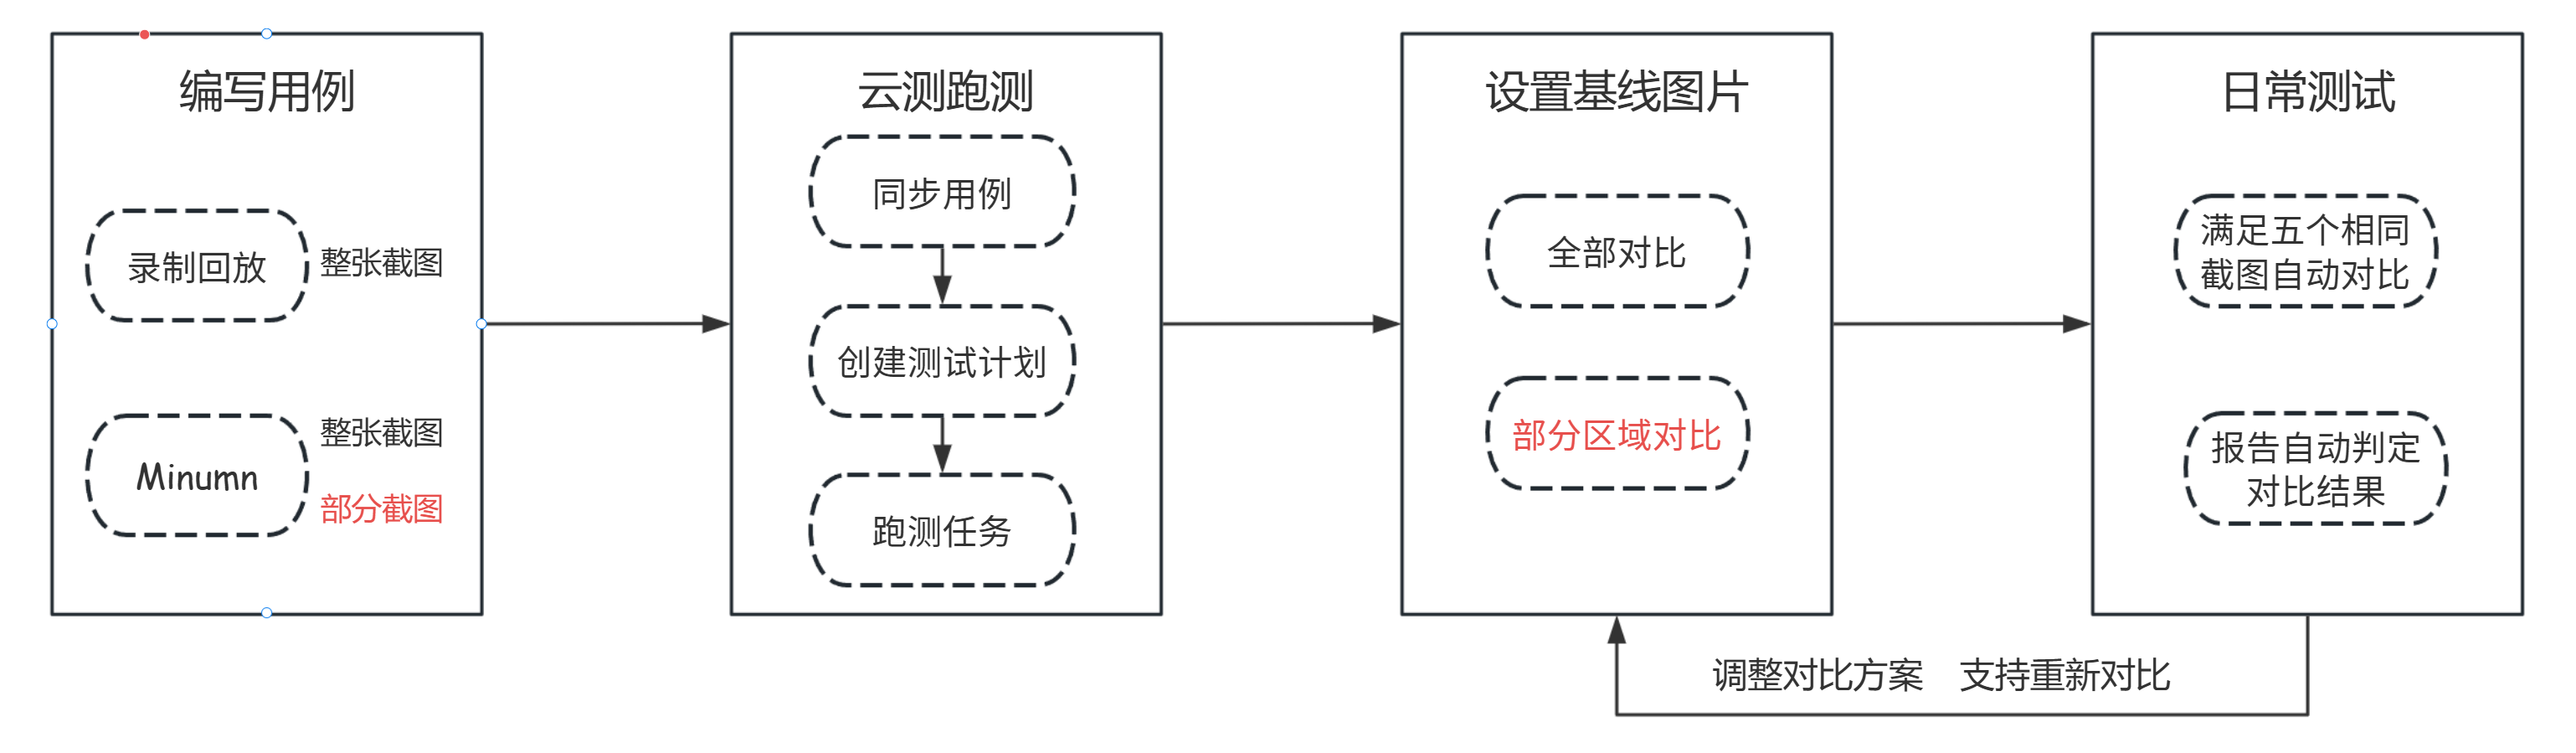
# 5. summary
The summary of the overall comparison process is shown in the following figure
# Start quickly.
The following example Weixin Mini Program as an example, a quick start image comparison
First, in a recording playback, we recorded a use case to verify that the front page is normal. The example use case is simple enough to take a screenshot of the front page. As shown in the chart below
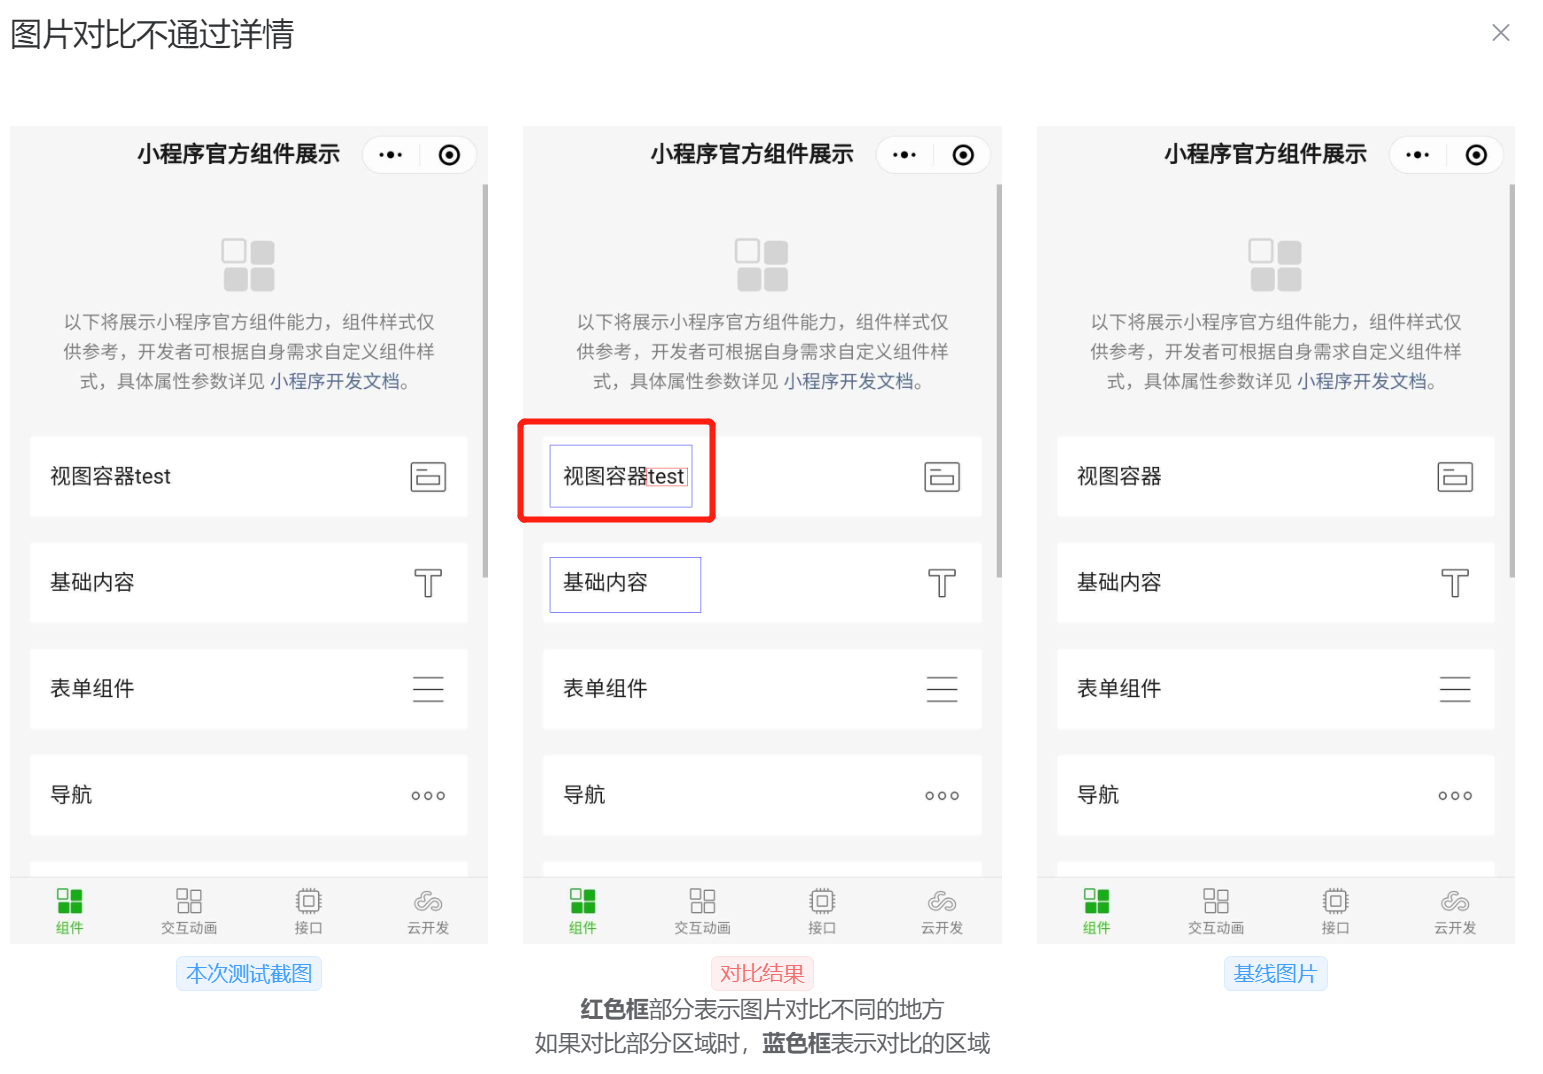
Use cases are synchronized to cloud testing, then a test plan is established, and test tasks are submitted. After the task was completed, we found the image on the Comparable Image Management page. Here I just wanted to compare two of the areas on the front page, so I chose the way to compare some of the sections.
Once the baseline picture is set up, then, in the course of subsequent development, the view container for the front page is modified. When we run the use case again, we can see that this change can be identified by comparing the pictures
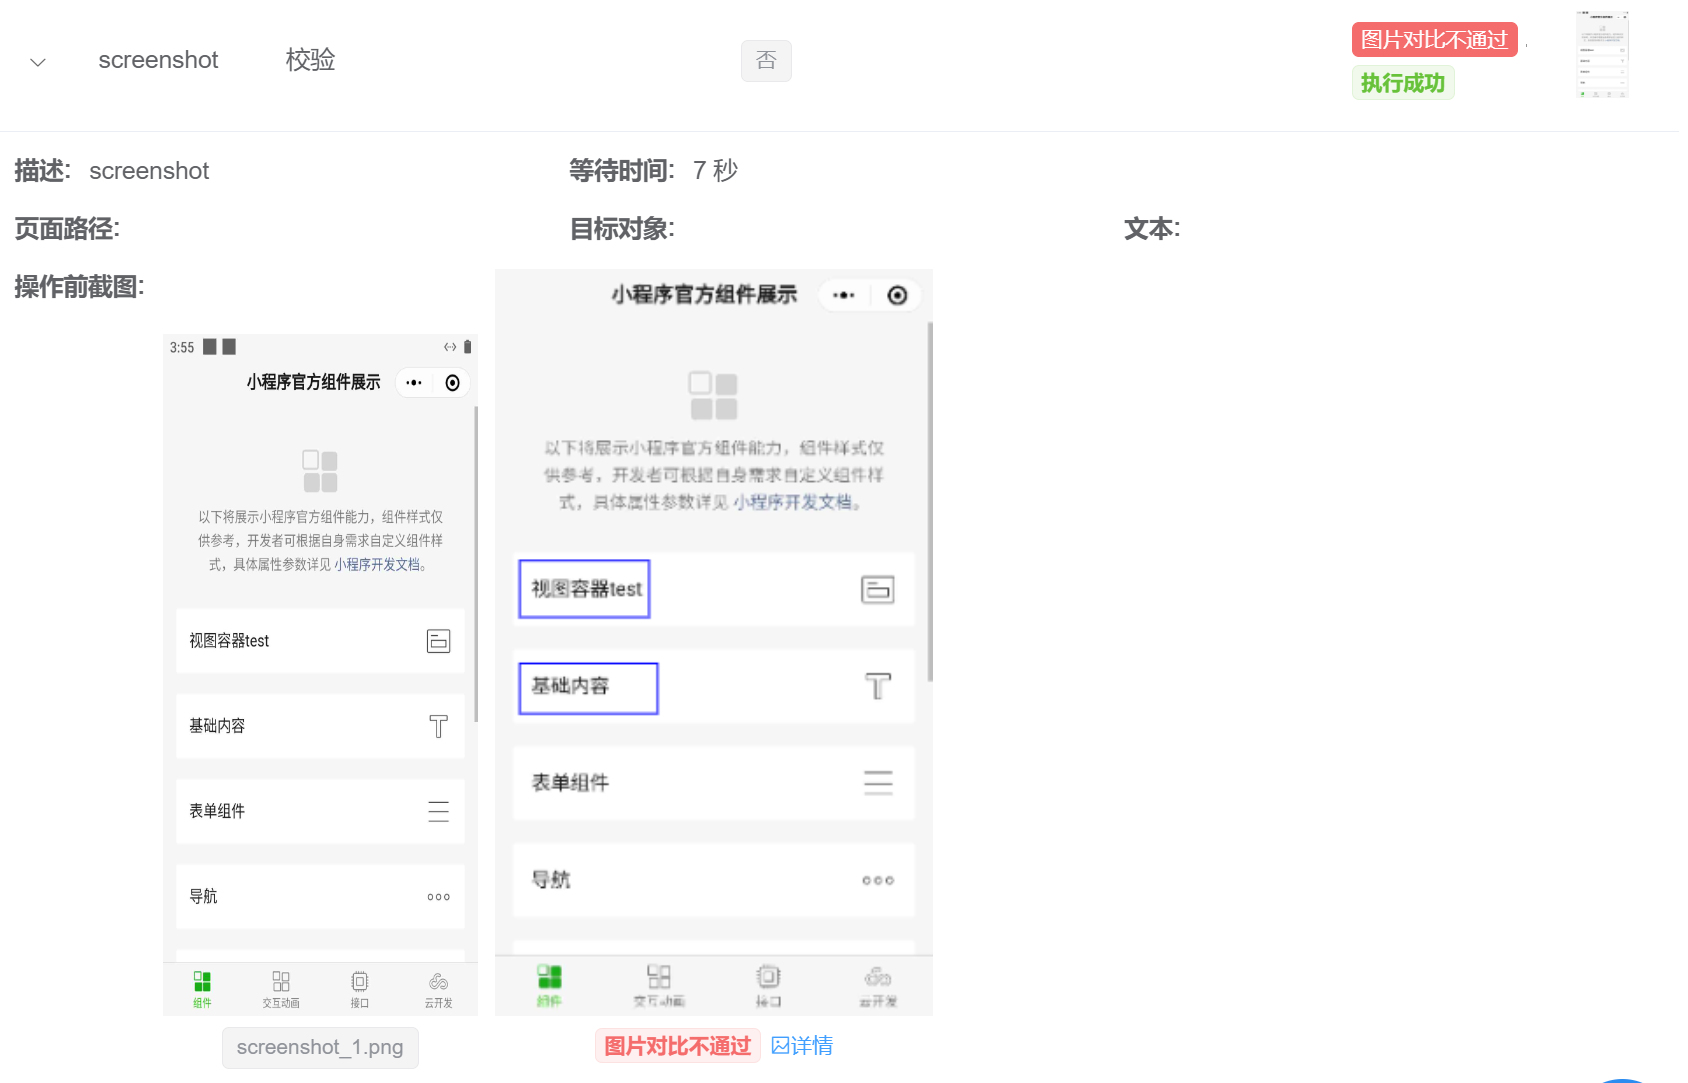
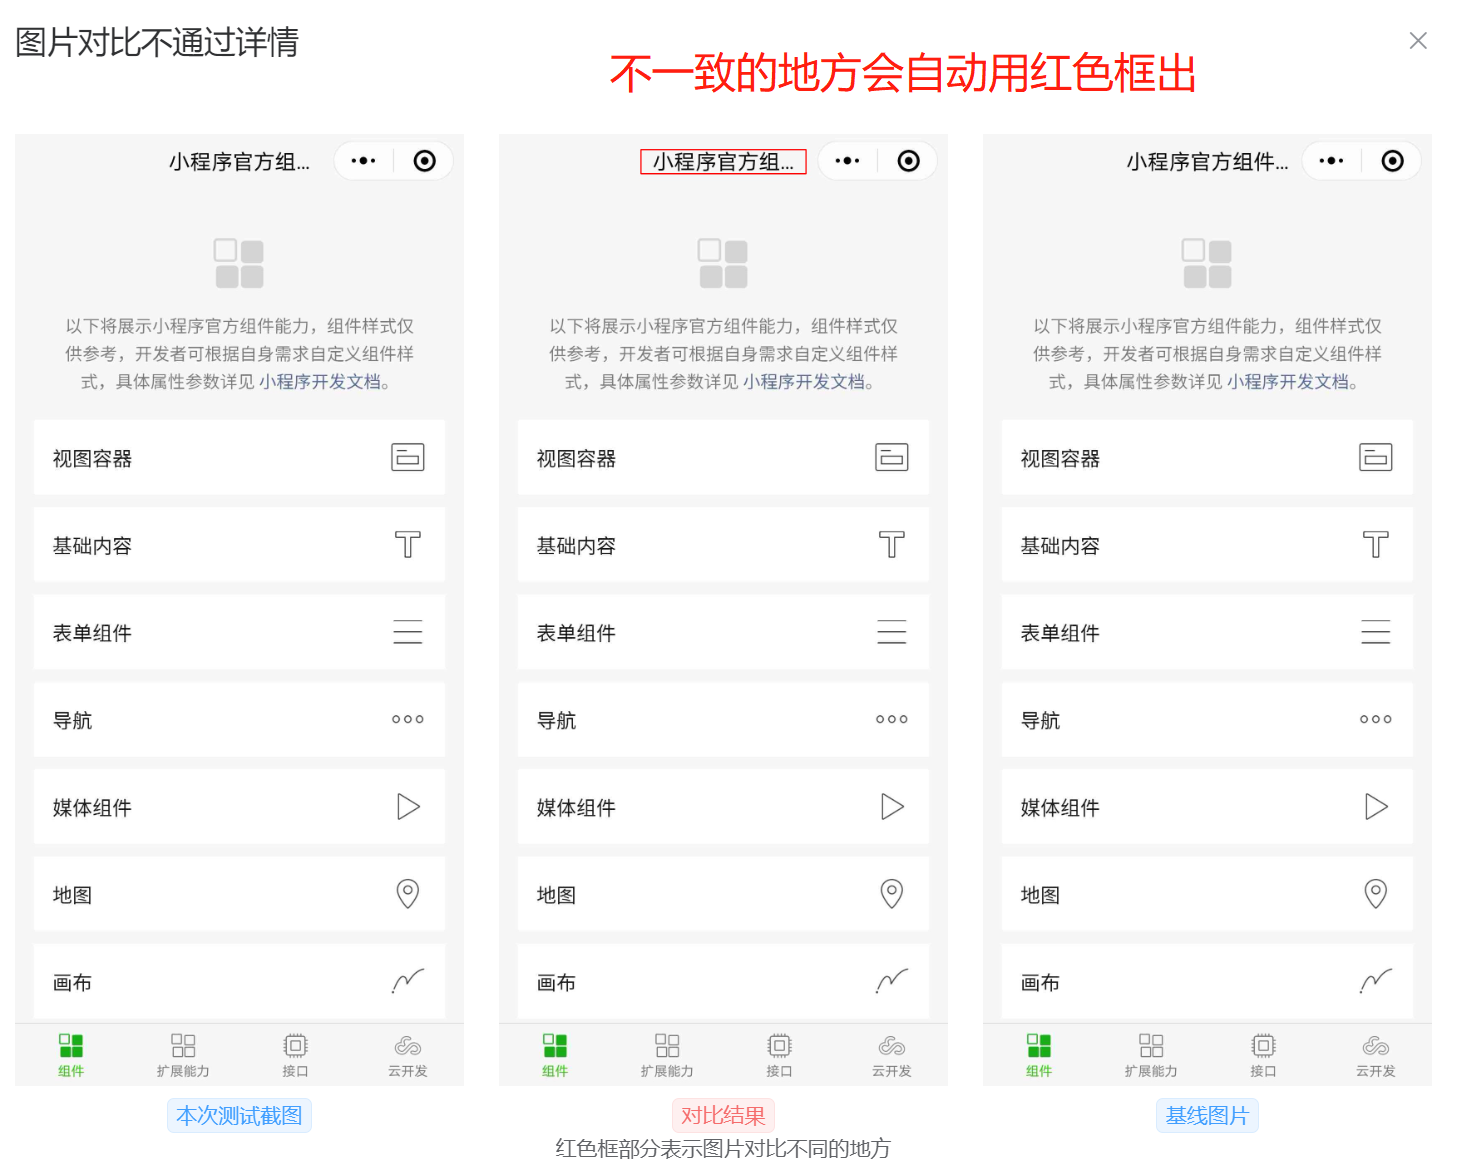
Click the "Details" button to see further details about the different supports. In the comparison results, the comparison chart in the middle already shows the different expenditures in red boxes.
Tips: If the picture is not clear enough, you can click to see the larger picture
# Common problem
# 1. My two test pictures and benchmark pictures look the same. Why is cloud test recognition different? Isn't that a miscalculation?
The default picture comparison is based on the SSIM score, and if the score is less than 1, it is judged as not passed.
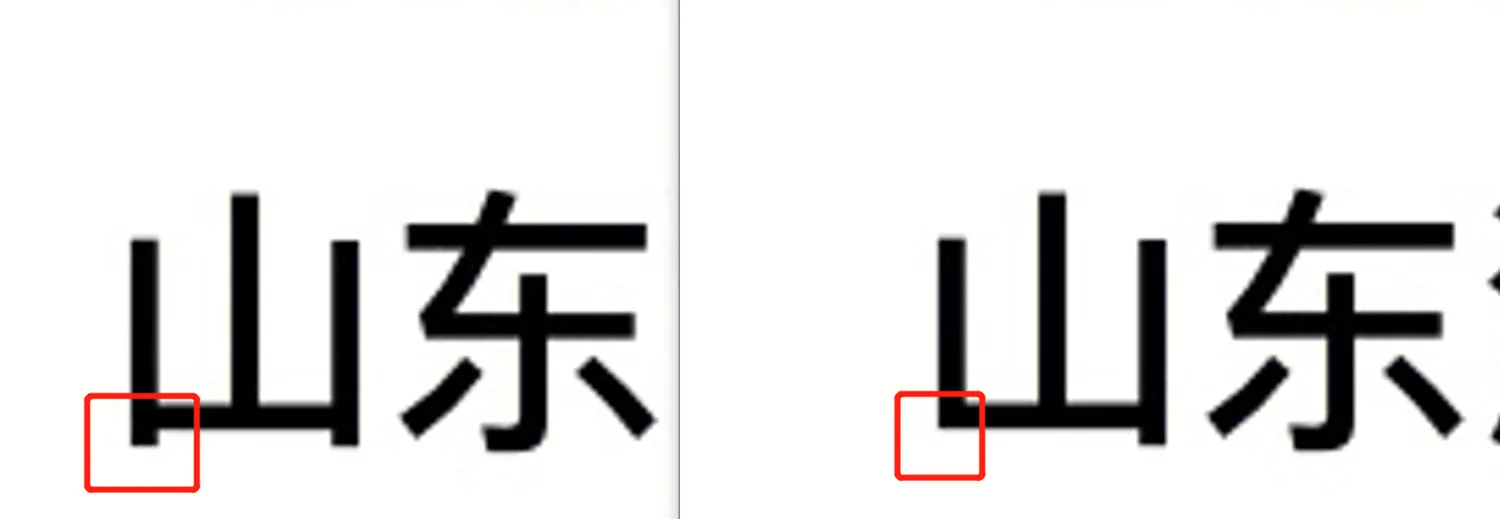
However, due to the mobile phone operating system and display screen technology, the same model, the same Weixin Mini Program page, at different times when the screenshot pixels will have subtle differences, leading to the human eye looks like the picture is the same,
But the SSIM algorithm is sensitive to these differences and will fail to judge the comparison, resulting in "misjudgment."
As shown in the figure below, the same "mountain" word, under the same model, the results of the running test will have a slight difference, which in fact does not affect the user's use, but the SSIM algorithm will judge as the comparison does not pass.
In order to solve this problem, cloud testing provides two solutions:
# A. In the SSIM algorithm configuration, add ignore regions and Gaussian fuzzy features
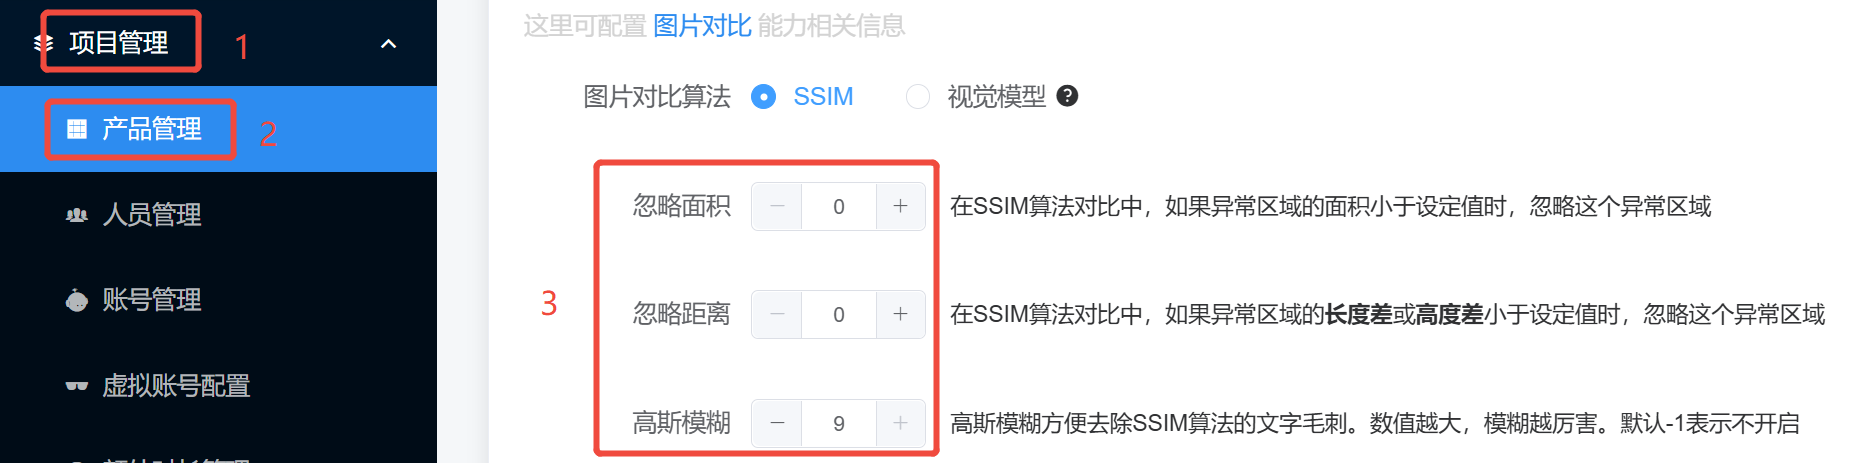
In order to solve these burr problems, the SSIM algorithm in cloud measurement, adding ignore region and Gaussian fuzzy ability.Users can configure it in Project Management > Product Management
- Ignore areas: You can configure ignoring area and ignoring distance. When the difference is found to be smaller than the set threshold, it can be judged to be the same. For example, when configuring the ignored area to be 200, indicating that the area of the difference area is less than 200, it is considered that the difference can be ignored less than 200 and treated as the same. Not turned on by default
- Gaussian fuzzy: The Gaussian principle of fuzzy is to make a picture "fuzzy" a little, so that some small hair spurs can be blurred away. The greater the ambiguity set, the more ambiguous it is. Not turned on by default
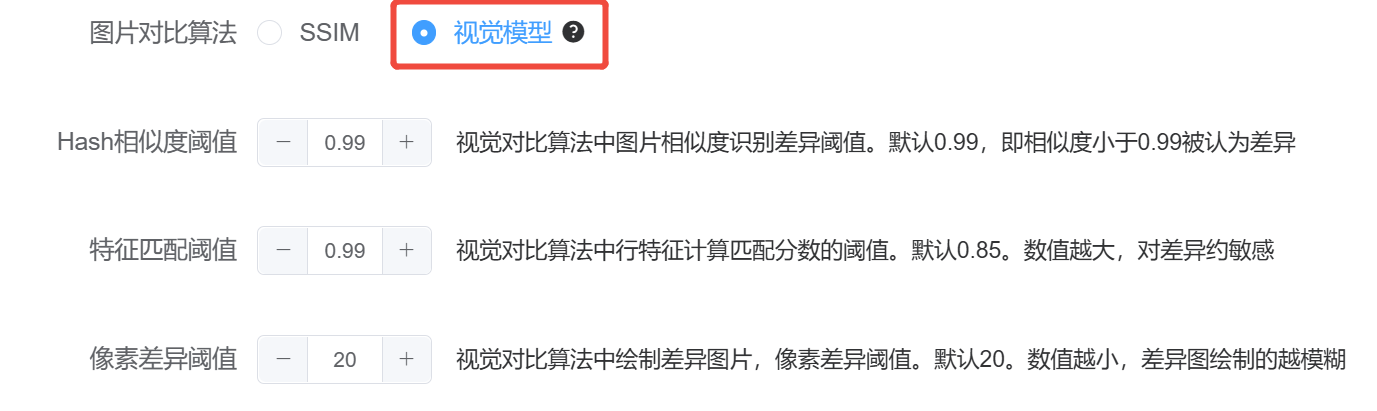
# B. Using Visual Contrast Algorithms
The cloud test also integrates the open source visual comparison algorithm into the cloud test, which can better solve the problem of SSIM misjudgment, and can "incrementally" display the difference area.
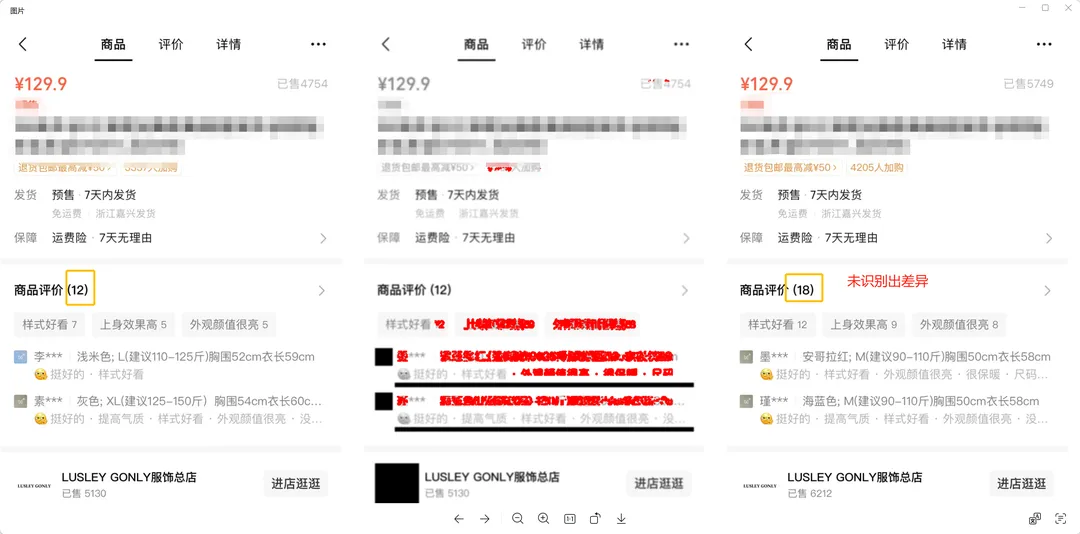
But the algorithm compresses each line of data, and when the differences are relatively small, they cannot be correctly identified. For example, the figure below fails to identify differences in the number of product evaluations.
Similar to the configuration of the SSIM algorithm, the visual comparison algorithm is also configured in "item management" = > "product management"
# More References
# I need help.
If you have any suggestions or needs, welcome to need help page, scan the code to join the cloud test official enterprise micro group, contact the group main feedback.