# Animation window
# Create AnimationClip resources and corresponding components
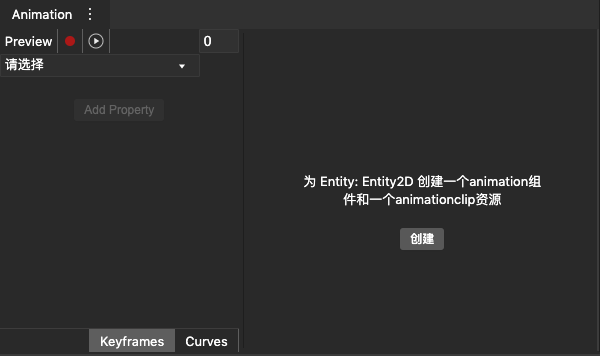
The steps to create AnimationClip resources and instances are as follows:
- Open the Animation window (new tab -> Animation).
- Select a node in the scene or Hierarchy. If the node does not have Animation or Animator components, the prompt as shown above will appear in the Animation window.
- Click Create, a dialog box for creating AnimationClip resources will pop up. You can select the storage location of the resource and fill in the file name.
- Click OK to create an AnimationClip resource. If the 2d node is selected, an Animation component will be created on the node; if the 3d node is selected, an Animator component will be created on the node.
# Window introduction
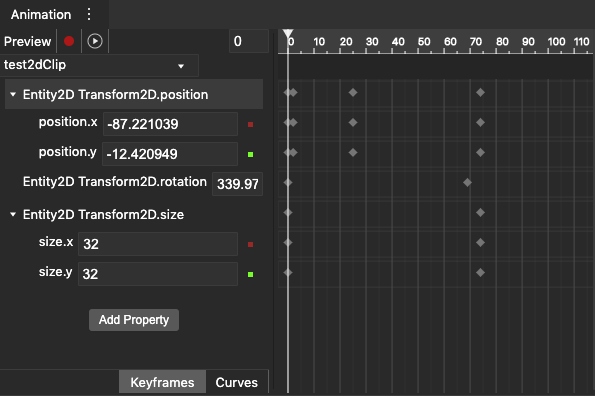
The left side of the panel has the following functions:
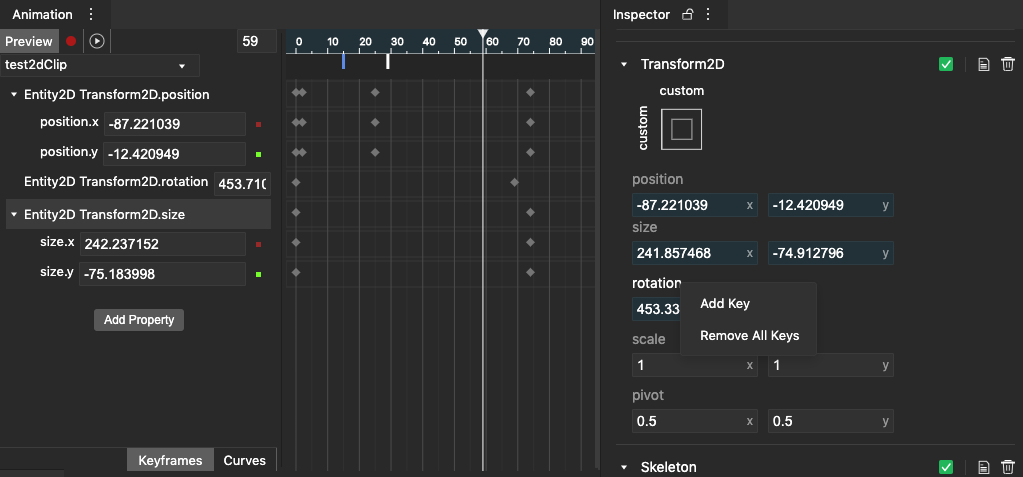
- Preview: Click this button to make the animation enter the active state, and the animation is in the current frame. In the active state, you can right-click the property Add Key in the Inspector window to perform k frames.
- Red circle button: Click to make the animation enter the recording state, and the animation is also active during the recording state.
- Play button: Click to play animation.
- Frame number: Display the frame of the current animation.
- Animation clip selection box: select Animation component or all animation clips in Animator component.
- Attribute list: Below the animation clip selection box, a list of all attributes controlled in the animation clip is displayed.
- Add Property button: After clicking it, a property selection box will pop up, and you can add properties to the animation clip.
- KeyFrames: The key frames of all attributes are displayed on the right side of the panel.
- Curves: The curve of the selected attribute is displayed on the right side of the panel.
The right side of the panel has the following functions:
- Frame number indicator: Drag the frame number indicator to make the animation in the state of the currently indicated frame, and the animation will enter the active state after dragging.
- When KeyFrames is selected: key frames of all attributes are displayed, and you can drag\copy\paste\add\delete keyframes.
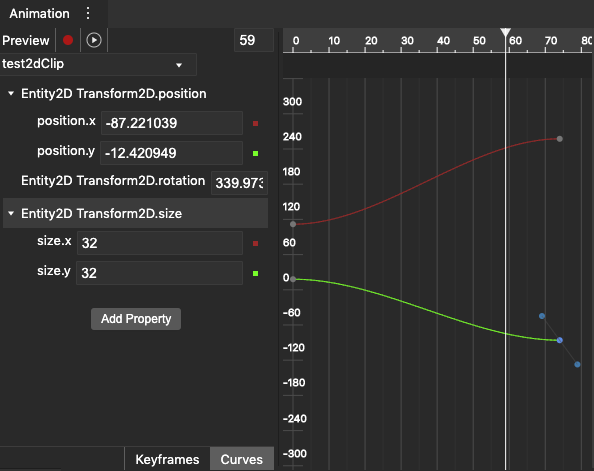
- When Curves is selected: The key frame curve of the selected attribute is displayed, and the value of the key frame, inTangent and outTangent can be adjusted by dragging.
# Edit animation
# Keyframe editing
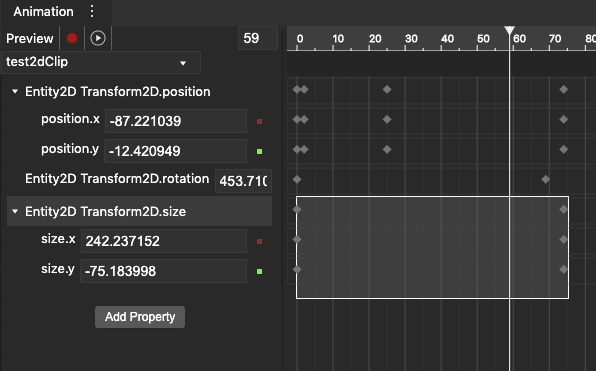
Support selecting and dragging key frames to modify the time of key frames.
right click: -Add Key: Add key frame -Remove Key: Delete key frame
hot key: -ctrl + c: copy key frame -ctrl + v: Paste key frame -ctrl + backspace: delete key frame -ctrl + z: Go back and modify
As shown in the figure below, multiple key frames can be selected for editing at the same time.
# Curve Edit
As shown in the figure below, the key frame curve of the selected attribute is displayed. You can drag and adjust the position of the key frame and the values of inTangent and outTangent. InTangent and outTangent determine the slope trend of the curve.
# Activation status
In the active state, the area of the timeline will turn blue, and the attributes that have been recorded in the movie clip in the Inspector will also turn blue. At this time, you can right-click on the properties in the Inspector to add and delete key frames. As shown below
# Recording status
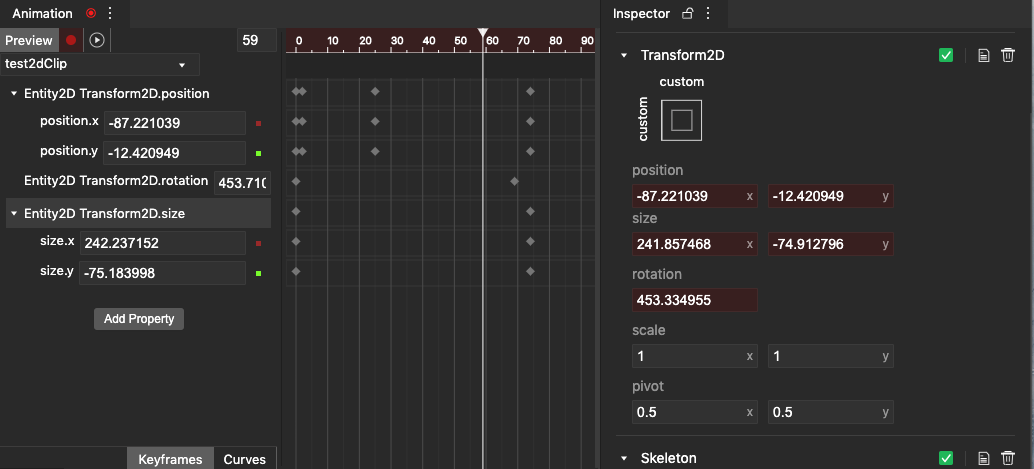
In the activated state, the area of the time axis will turn red, and the attributes that have been recorded in the animation clip in the Inspector will also turn red. At this time, if you modify the attribute value in the Inspector or modify the Transform of the node through the Gizmo in the scene, the key frame will be automatically added.
# Support the attribute data type of k frame
-number -boolean -Vector2 -Vector3 -Vector4 -Color -Quaternion
Animation clips can also control the attributes in the script component. You need to declare animatable in the decorator when defining the attributes, as shown in the following sample code
@engine.decorators.serialize("testScript")
export default class testScript extends engine.Script {
  @engine.decorators.property({
    type:'number',
    animatable: true,
  })
  public age: number = 0
}
# Animation event
Animation events can support user-defined event callback methods at any point in time when the animation is played.
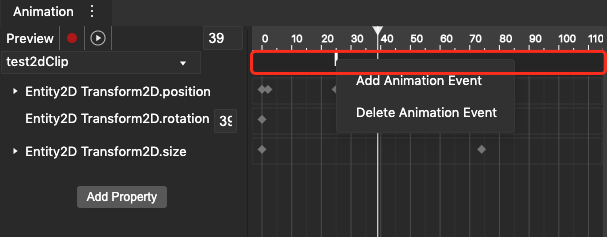
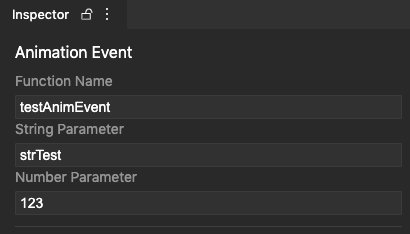
Right-click the area shown in the figure above to create an animation event for the animation clip. Drag the animation event to adjust the time point when it is triggered. Select the animation event, there will be three properties in the Inspector as shown below:
-Function Name: The name of the callback method. The callback method should be defined in the script component, and the script component should be on the same node as the Animation component or the Animator component. -**String Parameter: ** String parameter, an attribute of the callback method input parameter -Number Parameter: Number parameter, an attribute in the parameter of the callback method
Example:
import engine from "engine";

@engine.decorators.serialize("testScript")
export default class testScript extends engine.Script {
  public testAnimEvent(e: engine.AnimationEvent) {
    console.log(e.stringParameter, e.numberParameter)
  }
}