# Weixin Mini Program AI Usage Guide
# start
Weixin Mini Program The AI General Interface is a set of general-purpose AI model inference solutions provided by a Mini Program official, which internally utilizes a well-optimized, self-developed inference engine and supports inference on CPU, GPU, and NPU devices. Instead of focusing on internal implementations and model conversion, Mini Program developers simply provide a trained ONNX model, and Mini Programs internally automatically convert the user's ONNX model to a model format recognized by the self-developed inference engine and complete the inference.
This guide will demonstrate how to use the Weixin Mini Program AI inference capabilities to complete a classification task from scratch.The data collected in real-time by the camera is converted into input for AI inference through simple preprocessing. After the inference is completed, a simple post-processing step is applied to the model's output, resulting in the final classification result, which is then displayed on the page.
The example uses the mobileNetV2 model provided by the official ONNX modelzoo.Relevant models can be obtained from official github ;The pre- and post-processing used in the example is also consistent with the official imagenet_validation given by ONNX.
# 1 Create a session
First we need to create a session for inference. Here we use a floating point model downloaded from official github ,Select precisionLevel 0, so that when the session runs, fp16 will automatically be selected to store the results of the intermediate tensor, will also be calculated with fp16, and will open Winograd for fp16 calculations, and open approximate math calculations. We chose not to use quantitative reasoning, not to use NPU. None of the settings are required to create a session, except that you must provide the parameter model to specify the ONNX model path.
In general, the lower the precisionLevel used, the faster the inference, but there may be a loss of precision. Therefore, it is recommended that developers prioritize using lower accuracy when the effects meet the requirements to improve inference speed and save energy.
In addition to creating a session using the wx.createInferenceSession () interface, here we add two events to the session to listen for errors or completion of creation. onLoad () In the function we set an isReady variable to record the initial completion of the session, which can be used for inference.
// Here modelPath is the required ONNX model. Note that model currently only recognizes files with.onnx suffix as parameters.
const modelPath = `${wx.env.USER_DATA_PATH}/mobilenetv2-12.onnx`;

this.session = wx.createInferenceSession({
    model: modelPath,
    /* 0: 最低精度  使用 fp16 存储浮点,fp16 计算,Winograd 算法也采取 fp16 计算,开启近似 math 计算
       1: 较低精度  使用 fp16 存储浮点,fp16 计算,禁用 Winograd 算法,开启近似 math 计算
       2: 中等精度  使用 fp16 存储浮点,fp32 计算,开启 Winograd,开启近似 math 计算
       3: 较高精度  使用 fp32 存储浮点,fp32 计算,开启 Winograd,开启近似 math 计算
       4: 最高精度  使用 fp32 存储浮点,fp32 计算,开启 Winograd,关闭近似 math 计算

       通常更高的精度需要更长的时间完成推理
    */
    precisionLevel : 0,
    allowNPU : false,     // 是否使用 NPU 推理,仅针对 IOS 有效
    allowQuantize: false, // 是否产生量化模型
    });

// Listening for error events
session.onError((error) => {
  console.error(error);
});

// Listen to the model load to complete the event
session.onLoad(() => {
  console.log('session load')
});
# 2session reasoning
# 2.1 Dealing with data collected by cameras
First we create a camera context and call onCameraFrame to capture frames. The classifier here encapsulates the inference session related calls, and the full code can refer to the demo example. OnCameraFrame continuously collects the camera image, and if our session is successfully initialized and the previous frame of inference task is completed, it passes the camera data to perform a new inference task.
    const context = wx.createCameraContext(this);

    const listener = context.onCameraFrame(frame => {

        const fps = this.fpsHelper.getAverageFps();
        console.log(`fps=${fps}`);

        if (this.classifier && this.classifier.isReady() && !this.predicting) {
           this.executeClassify(frame);
        }
    });
# 2.2 Pre-processing of data collected by the camera
The frame returned by OnCameraFrame contains the attributes width, height, and data, which represent the width, height, and pixel data of the two-dimensional image, respectively. Where the data is an ArrayBuffer, the storage data type is Uint8, and the stored data format is rgba.For more information about onCameraFrame, see CameraContext.onCameraFrame .
For frame content, we first perform a preprocessing operation to convert it into model input.
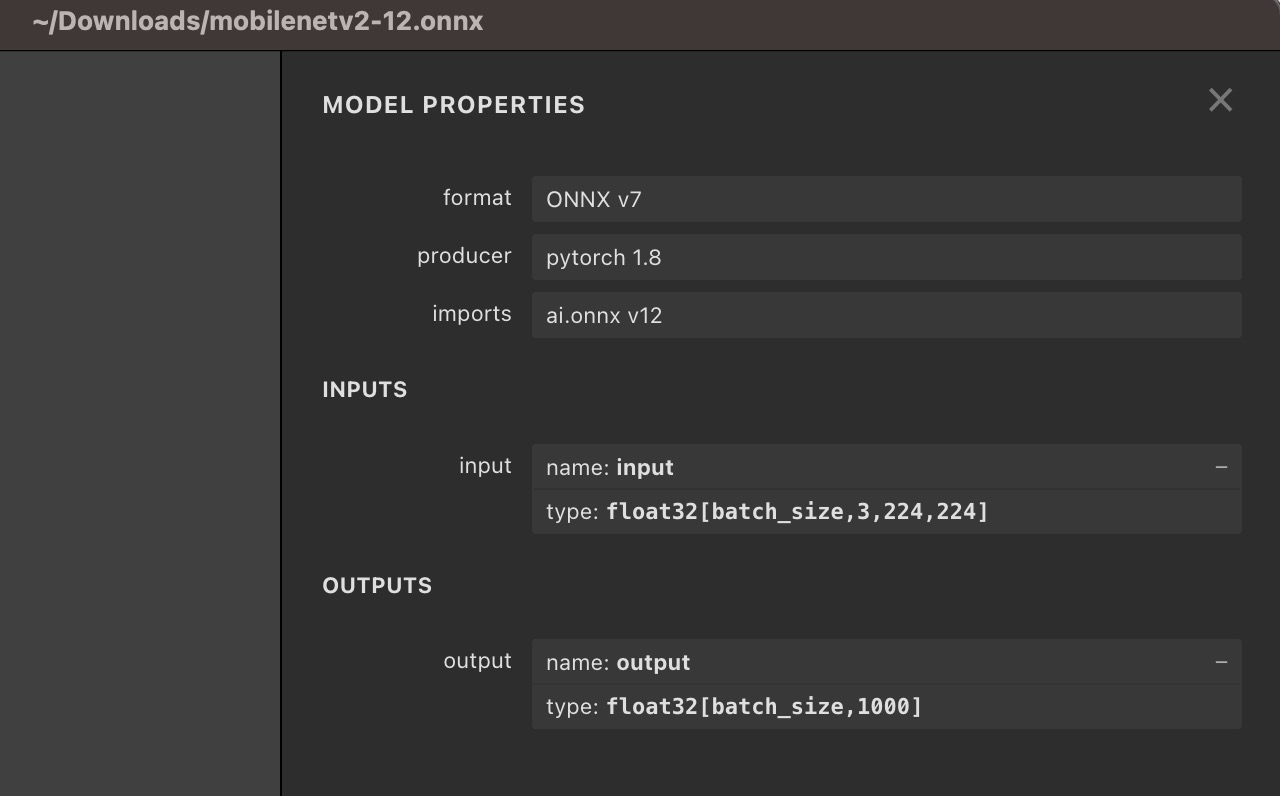
Opening the ONNX file with Netron, we can see the description of the input and output of mobileNet.As you can see, the input size for this model is [1,3,224,224] and the data type is float32.
In order to convert the frame captured by the camera into the data required for the model, we need to discard the alpha channel information, convert the data from NHWC to NHCHW, resize the frame's width and height to 224 x 224, and complete the normallize operation.
The following code completes all the pre-processing through js, converting the camera capture to frame into model input dstInput.
The frame is the data collected by the camera.var dstInput = new Float32Array(3*224*224);
  /* 原始输入为 rgba uint8 数据, 目标为 nchw float32 数据

     将camera 采集数据缩放到模型的 input 大小, 将 uint8 数据转换成 float32,
     并且从 NHWC 转换到 NCHW
  */
  preProcess(frame, dstInput) {

    return new Promise((resolve, reject) =>
    {
      const origData = new Uint8Array(frame.data);

      const hRatio = frame.height / modelHeight;

      const wRatio = frame.width / modelWidth;


      const origHStride = frame.width * 4;
      const origWStride = 4;

      const mean = [0.485, 0.456, 0.406]

      // Reverse of std = [0.229, 0.224, 0.225]
      const reverse_div = [4.367, 4.464, 4.444]
      const ratio = 1 / 255.0

      const normalized_div = [ratio / reverse_div[0], ratio * reverse_div[1], ratio * reverse_div[2]];

      const normalized_mean = [mean[0] * reverse_div[0], mean[1] * reverse_div[1], mean[2] * reverse_div[2]];

      var idx = 0;
      for (var c = 0; c < modelChannel; ++c)
      {
        for (var h = 0; h < modelHeight; ++h)
        {
          const origH = Math.round(h * hRatio);

          const origHOffset = origH * origHStride;

          for (var w = 0; w < modelWidth; ++w)
          {
            const origW = Math.round(w * wRatio);

            const origIndex = origHOffset + origW * origWStride + c;

            const val = origData[origIndex] * (normalized_div[c]) - normalized_mean[c];

            dstInput[idx] = val;

            idx++;
          }
        }
      }

      resolve();
    });
  }
# 2.3 Model reasoning
After simple pre-processing of the data collected by the camera, we can use it to set the input and model reasoning. We construct an xInput using the dstInput obtained by the preprocessing, and pass this xInput to session.run as input for model inference.
const xinput = {
    shape: [1, 3, 224, 224],  // 输入形状 NCHW 值
    data: dstInput.buffer,    // 为一个 ArrayBuffer
    type: 'float32',          // 输入数据类型
};

this.session.run({
    // 这里 "input" 必须与 ONNX 模型文件中的模型输入名保持严格一致
    "input": xinput,
})
.then((res) => {

    // 这里使用 res.outputname.data
    // 其中 outputname 需要严格与 ONNX 模型文件中的模型输出名保持一致
    let num = new Float32Array(res.output.data)
The results of the run are obtained through res.output.
It should be noted that the input / output here is not fixed in all models and needs to be strictly corresponding to the input and output names in the specific ONNX file.
Back to the description of the mobilenet model that Netron saw earlier: we can see that the model has an input called "input," and an output called "output."So when we set the input,session.run ({"input": xinput}), "input"Is the input name in the ONNX model. When there are more than one input, we use thesession.run ({"input1": xxx, "input2": xxx})To set data on the inputs in the model named "input1" and "input2" respectively.Similarly, when we get the output of the model,res.outputrefers to getting the output with the name "output."
Whether it is the input or output Tensor of the model, it is an Object that contains three attributes: shape, type and data. The data is an ArrayBuffer.
# 2.4 Post-processing
This example is relatively simple for post-processing. After obtaining the model output, we use an argMax operation to calculate the Index of the classification with the highest score, and convert this Index to the class represented.
let num = new Float32Array(res.output.data)

var maxVar = num[0];

var index = 0;

for (var i = 1; i < num.length; ++i)
{
if (maxVar < num[i])
{
    maxVar = num[i]
    index = i
}
}

this.getClass(index);
# 3 Operational effects
Scan the QR code below, then click on the interface - General AI Reasoning Capabilities - mobileNet, to view the running results.

运行 demo,可以看到摄像头在采集同时,将会实时地将分类结果写回到页面下方。

完整 demo 请参考 官方github小程序示例
# List of Arithmetic Support
For more operator support, please refer to operator support list