# Body detection
VisionKit provides body detection capabilities starting with version 2.28.0 of the base library.Human 3D keypoint detection is available from version 8.1.0 of WeChat > = as an extended capability interface for Body detection.
# Method Definition
There are two ways to use body detection, one is to input a static picture for detection, and the other is to detect through a camera.
# 1. Static Image Detection
Input an image via the VKSession.detectBody interface . The algorithm detects the human body in the image and then outputs the captured human key point information via the VK Session.on interface .
Example code:
const session = wx.createVKSession({
  track: {
    body: { mode: 2 } // mode: 1 - 使用摄像头;2 - 手动传入图像
  },
})

// In static image detection mode, every time the detectBody interface is tuned, an updateAnchors event is triggered.
session.on('updateAnchors', anchors => {
    this.setData({
        anchor2DList: anchors.map(anchor => {
            points: anchor.points, // 关键点坐标
            origin: anchor.origin, // 识别框起始点坐标
            size: anchor.size // 识别框的大小
        }),
    })
})

// You need to call start once to start
session.start(errno => {
  if (errno) {
    // 如果失败,将返回 errno
  } else {
    // 否则,返回null,表示成功
    session.detectBody({
      frameBuffer, // 图片 ArrayBuffer 数据。待检测图像的像素点数据,每四项表示一个像素点的 RGBA
      width, // 图像宽度
      height, // 图像高度
      scoreThreshold: 0.5, // 评分阈值
      sourceType: 1 //图片来源, 默认为1, 0表示输入图片来自于视频的连续帧
    })
  }
})
# 2. Detection via camera in real time
The algorithm detects the human posture in the camera in real time, and outputs the detected human key points in real time through the VKSession.on interface .
Example code:
const session = wx.createVKSession({
  track: {
    body: { mode: 1 } // mode: 1 - 使用摄像头;2 - 手动传入图像
  },
})

// When the human body is detected, the updateAnchors event is triggered continuously (once per frame) in the camera real-time detection mode
session.on('updateAnchors', anchors => {
    this.data.anchor2DList = []
    this.data.anchor2DList = this.data.anchor2DList.concat(anchors.map(anchor => {
        points: anchor.points,
        origin: anchor.origin,
        size: anchor.size
    }))
})

// The removeAnchors event is triggered when the body leaves the camera
session.on('removeAnchors', () => {
  console.log('removeAnchors')
})

// You need to call start once to start
session.start(errno => {
  if (errno) {
    // 如果失败,将返回 errno
  } else {
    // 否则,返回null,表示成功
  }
})
# 3. Turn on 3D keypoint detection
To enable 3D keypoint detection of the human body, the static image mode only needs to add theopen3dfield to the 2D call, as follows
// Static Picture Mode calls
session.detectBody({
      ...,           // 同2D调用参数
      open3d: true,  // 开启人体3D关键点检测能力,默认为false
    })
The real-time mode adds a 3D switch update function to the 2D call, as follows
// Camera calls in real-time mode
session.on('updateAnchors', anchors => {
  this.session.update3DMode({open3d: true})  // 开启人体3D关键点检测能力,默认为false
  ...,  // 同2D调用参数
})
# Output instructions
# Location Dxplaination
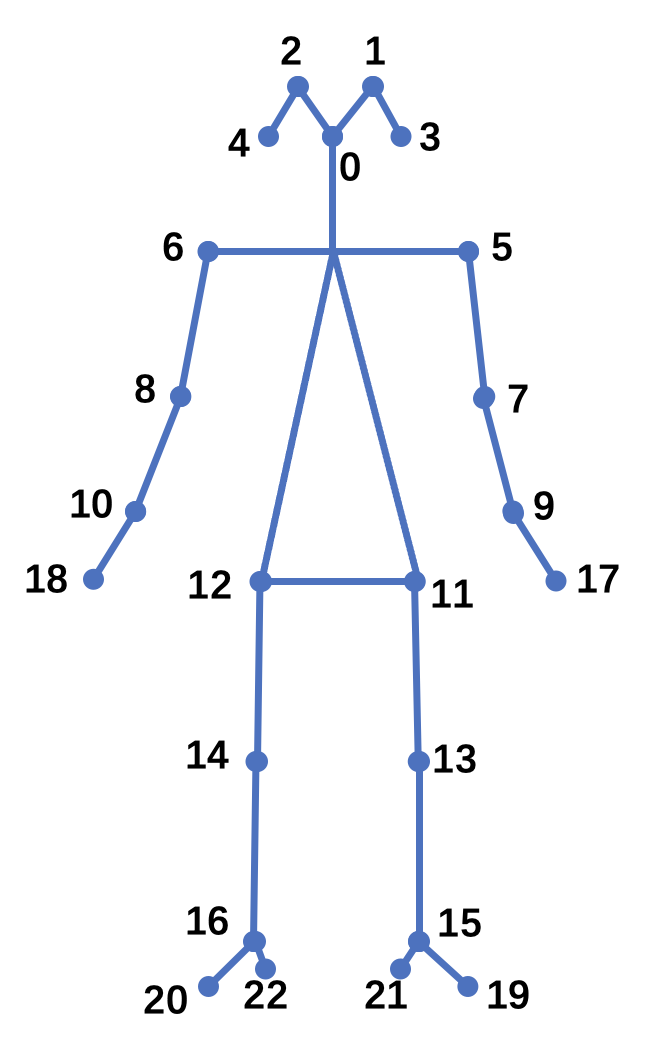
The human 2D key points are defined as 23 points, as shown in the figure below.
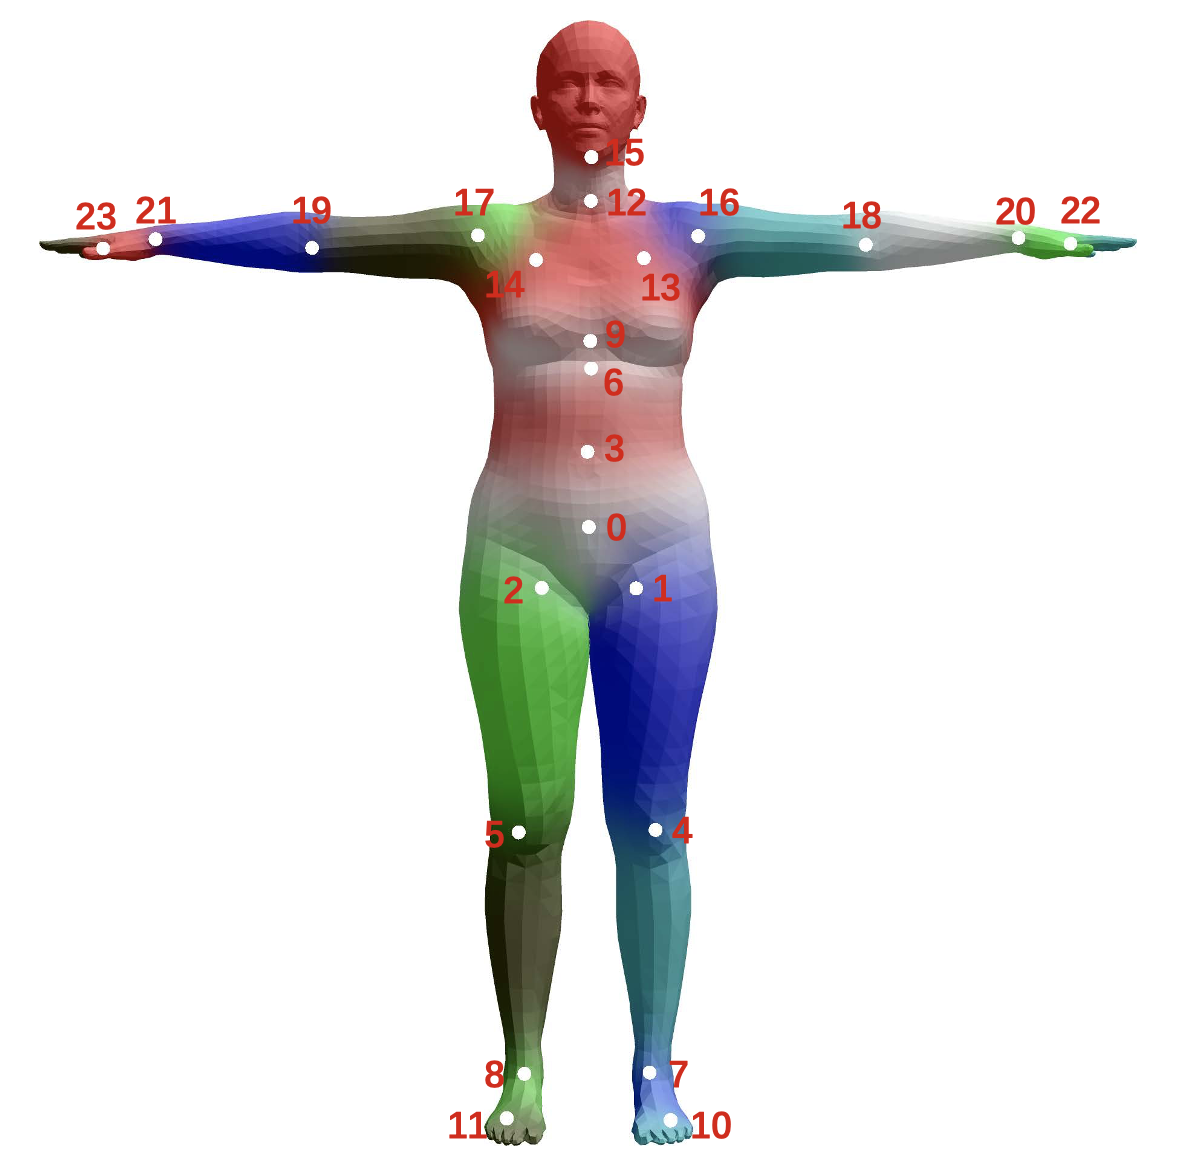
The 3D key point of the human body is defined as the SMPL-24 point joint, as shown in the figure below.
# Human testing
Human testing output fields include
struct anchor
{
  points,    // 人体2D关键点在图像中的(x,y)坐标
  origin,    // 人体检测框的左上角(x,y)坐标
  size,      // 人体检测框的宽和高(w,h)
  score,     // 人体检测框的置信度
  confidence // 人体关键点的置信度
}
# Human 3D Key Points
After the human 3D key point detection capability is turned on, the human 2D and 3D key point information can be obtained.
struct anchor
{
  ...,               // 人体检测2D输出信息
  points3d,          // 人体3D关键点的(x,y,z)3D坐标
  camExtArray,       // 相机外参矩阵,定义为[R, T \\ 0^3 , 1], 使用相机内外参矩阵可将3D点位投影回图像
  camIntArray        // 相机内参矩阵,参考glm::perspective(fov, width / height, near, far);
}
# Example of application scenarios
- A portrait collage.
- Transboundary detection.
- Population flow statistics.