# Custom routing
Weixin Mini Program uses multipleWebViewarchitecture, the form of jump between pages is very simple, can only be animated from right to left.The nativeAppanimation forms are varied, such as bouncing from the bottom, page sinking, half screen and so on.
SkylineIn the rendering engine, the page has two rendering modes:WebViewandSkyline, which are distinguished by therendererfield in the page configuration.When you jump between consecutiveSkylinepages , you can implement custom routing effects.
# Effects display
Below is the half-screen page effect, click to see more examples of Skyline .
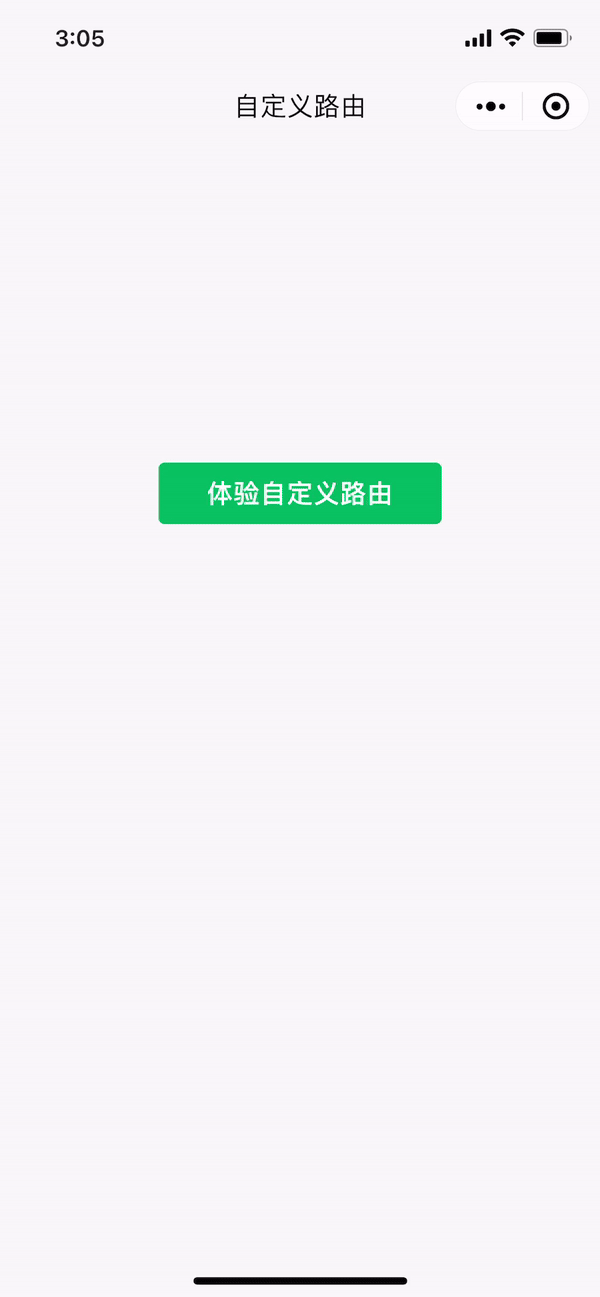
Scan the code to open Weixin Mini Program sample, interactive animation - basic components - custom routing can be experienced.
# How to use it
It is recommended to read the chapters worklet animation and gesture system first, which are the basics of custom routing.
# Interface Definition
Custom interfaces for routing
- Page Jump wx.navigateTo
- Routing context object wx.router.getRouteContext
- Register custom routing wx.router.addRouteBuilder
type AddRouteBuilder = (routeType: string, routeBuilder: CustomRouteBuilder) => void

type CustomRouteBuilder = (routeContext: CustomRouteContext, routeOptions: Record<string, any>) => CustomRouteConfig

interface SharedValue<T> {
  value: T;
}

interface CustomRouteContext {
  // 动画控制器,影响推入页面的进入和退出过渡效果
  primaryAnimation: SharedValue<number>
  // 动画控制器状态
  primaryAnimationStatus: SharedValue<number>
  // 动画控制器,影响栈顶页面的推出过渡效果
  secondaryAnimation: SharedValue<number>
  // 动画控制器状态
  secondaryAnimationStatus: SharedValue<number>
  // 当前路由进度由手势控制
  userGestureInProgress: SharedValue<number>
  // 手势开始控制路由
  startUserGesture: () => void
  // 手势不再控制路由
  stopUserGesture: () => void
  // 返回上一级,效果同 wx.navigateBack
  didPop: () => void
}

interface CustomRouteConfig {
  // 下一个页面推入后,不显示前一个页面
  opaque?: boolean;
  // 是否保持前一个页面状态
  maintainState?: boolean;
  // 页面推入动画时长,单位 ms
  transitionDuration?: number;
  // 页面推出动画时长,单位 ms
  reverseTransitionDuration?: number;
  // 遮罩层背景色,支持 rgba() 和 #RRGGBBAA 写法
  barrierColor?: string;
  // 点击遮罩层返回上一页
  barrierDismissible?: boolean;
  // 无障碍语义
  barrierLabel?: string;
  // 是否与下一个页面联动,决定当前页 secondaryAnimation 是否生效
  canTransitionTo?: boolean;
  // 是否与前一个页面联动,决定前一个页 secondaryAnimation 是否生效
  canTransitionFrom?: boolean;
  // 处理当前页的进入/退出动画,返回 StyleObject
  handlePrimaryAnimation?: RouteAnimationHandler;
  // 处理当前页的压入/压出动画,返回 StyleObject
  handleSecondaryAnimation?: RouteAnimationHandler;
  // 处理上一级页面的压入/压出动画,返回 StyleObject 基础库 <3.0.0> 起支持
  handlePreviousPageAnimation?: RouteAnimationHandler;
  // 页面进入时是否采用 snapshot 模式优化动画性能 基础库 <3.2.0> 起支持
  allowEnterRouteSnapshotting?: boolean
  // 页面退出时是否采用 snapshot 模式优化动画性能 基础库 <3.2.0> 起支持
  allowExitRouteSnapshotting?: boolean
  // 右滑返回时,可拖动范围是否撑满屏幕,基础库 <3.2.0> 起支持,常用于半屏弹窗
  fullscreenDrag?: boolean
  // 返回手势方向 基础库 <3.4.0> 起支持
  popGestureDirection?: 'horizontal' | 'vertical' | 'multi'
}

type RouteAnimationHandler = () => { [key: string] : any}
# Default routing configuration
const defaultCustomRouteConfig = {
  opaque: true,
  maintainState: true,
  transitionDuration: 300,
  reverseTransitionDuration: 300,
  barrierColor: '',
  barrierDismissible: false,
  barrierLabel: '',
  canTransitionTo: true,
  canTransitionFrom: true,
  allowEnterRouteSnapshotting: false,
  allowExitRouteSnapshotting: false,
  fullscreenDrag: false,
  popGestureDirection: 'horizontal'
}
# Example Template
The following is an example template for registering custom routing (no gesture processing added). See the example code for the full implementation of half-screen routing.
const customRouteBuiler = (routeContext: CustomRouteContext) : CustomRouteConfig => {
  const {
    primaryAnimation,
    secondaryAnimation,
    userGestureInProgress
  } = routeContext

  const handlePrimaryAnimation: RouteAnimationHandler = () => {
    'worklet'
    let t = primaryAnimation.value
    if (!userGestureInProgress.value) {
      // select another curve, t = xxx
    }
    // StyleObject
    return {}
  }

  const handleSecondaryAnimation: RouteAnimationHandler = () => {
    'worklet'
    let t = secondaryAnimation.value
    if (!userGestureInProgress.value) {
      // select another curve, t = xxx
    }
    // StyleObject
    return {}
  }

  return {
    opaque: true,
    handlePrimaryAnimation,
    handleSecondaryAnimation
  }
}

// Define the routeBuilder before the page jump
wx.router.addRouteBuilder('customRoute', customRouteBuiler)

// When you jump to a new page, specify the corresponding routeType
wx.navigateTo({
  url: 'xxxx',
  routeType: 'customRoute'
})
# Working principle
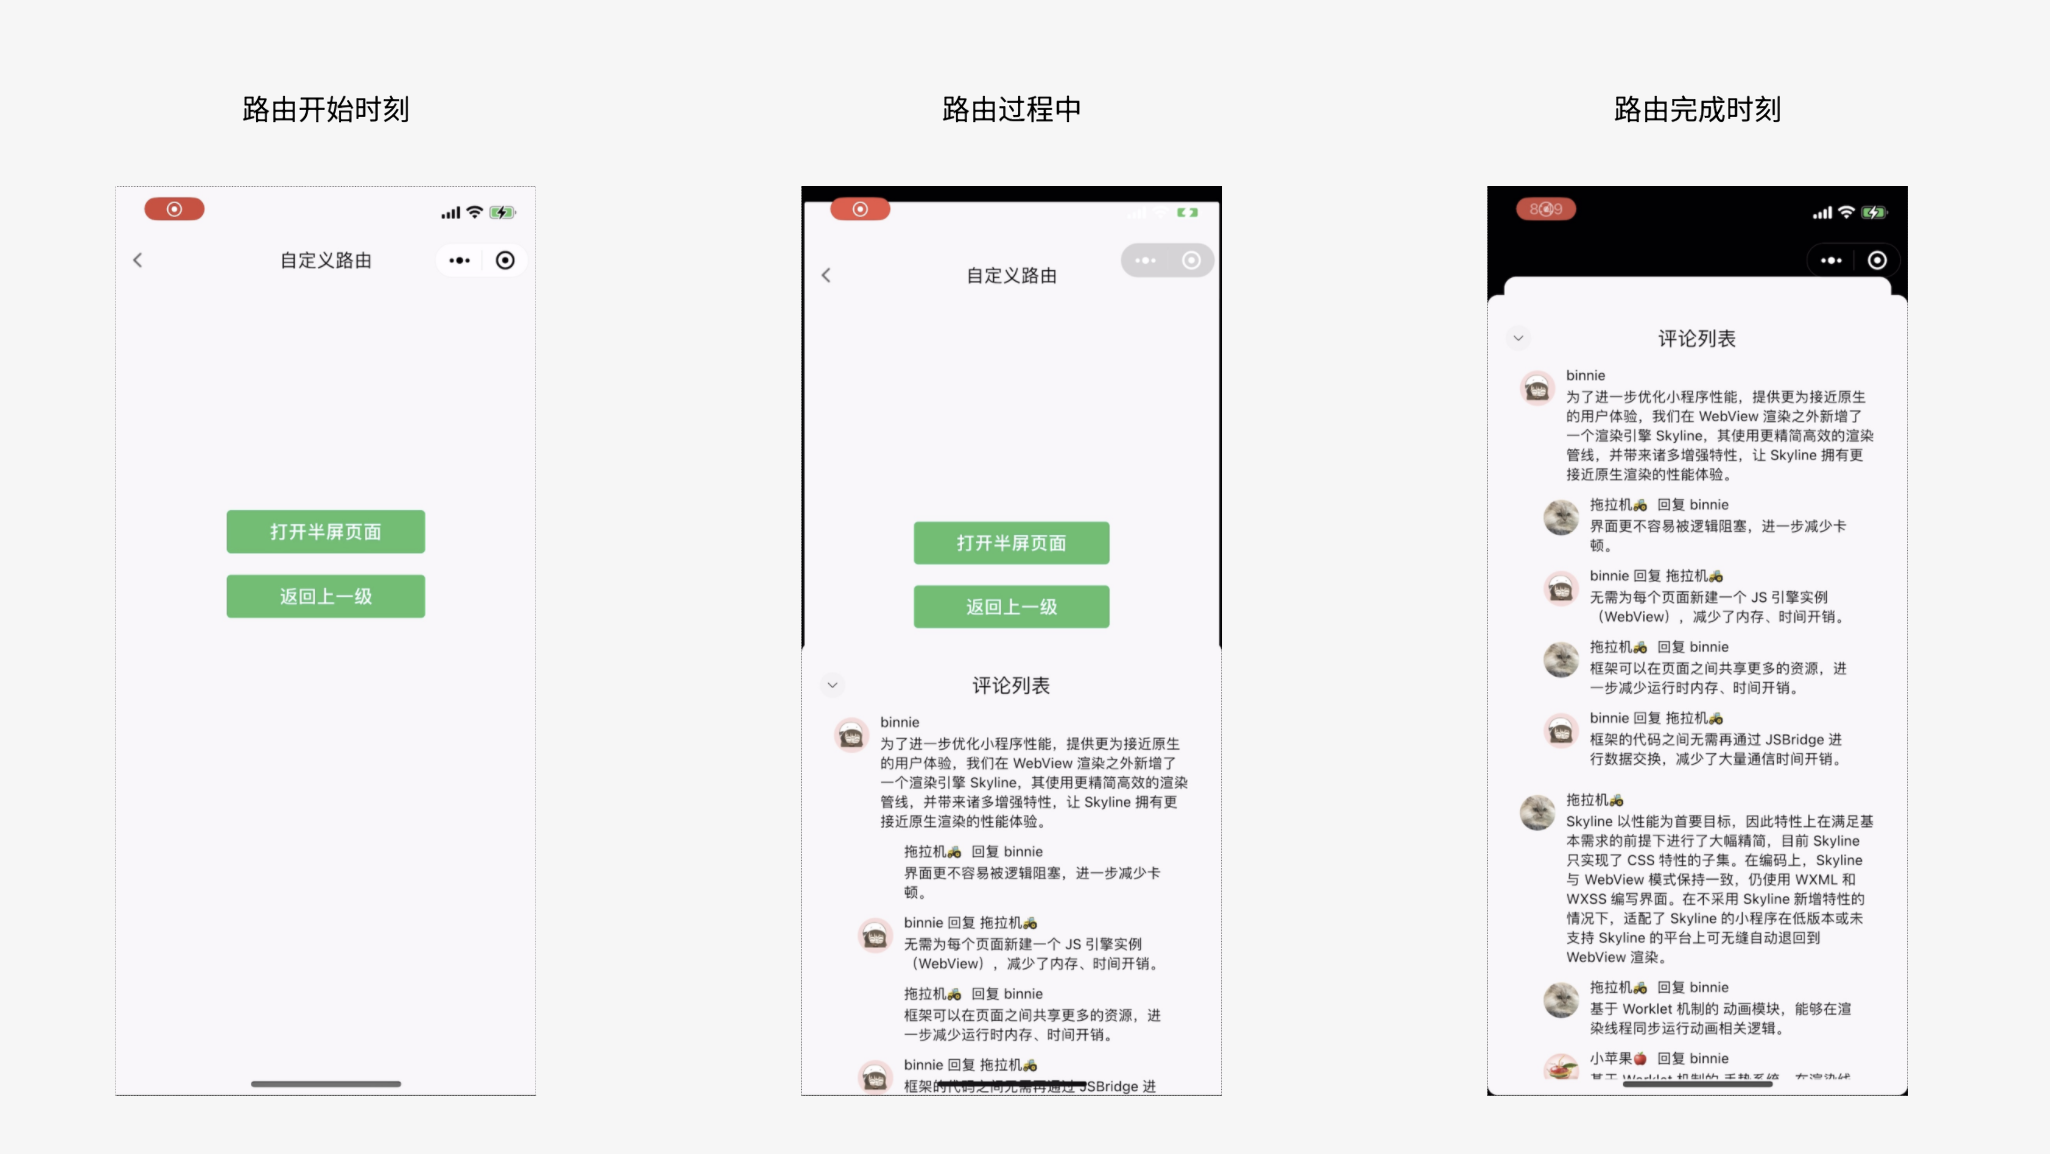
In the case of a semi-screen effect, the pages before and after a routing are remembered asApage, andBpage. In the life cycle of a routin, the following phases occur:
PushPhase: Callwx.navigateTo,B``Apage sinks and shrinks- Gesture drag: Route animation changes as you swipe up and down the
Bpage PopStage: Callwx.navigateBack,BPage down close,A
Segmented into each page, there will be the following animations at the above stage
- Enter / exit animation
- Press in / out animation
- Gesture to move
- During the
pushphase, theBpage performs an entry animation, while theApage performs a push animation; - In the
popphase, theBpage performs an exit animation, and theApage does a press animation;
You can see that the two front and back page animations interact during the routing process. Under custom routing mode, we can customize the length, curves, effects, and whether or not the stages of animation are connected to achieve flexible and variable page-specific effects.
# Routing Controller
When a new page is opened, the framework creates two animation controllers ofSharedValuetypesprimaryAnimationand`` secondaryAnimation`, control entry / exit animation and press in / press out animation, respectively.
The entry and exit of the page can be specified at different times, but the progress is always between0 and 1.Still half screen effect as an example, before and after the routing page recorded asApage,Bpage.
# Push thephase
Bpage corresponding toprimaryAnimationfrom0 - > 1Change, do it into animationApage corresponding tosecondaryAnimationfrom0 - > 1Change, make a push into animation
# Popstage
Bpage corresponding toprimaryAnimationfrom1 - > 0Change, do an exit animationApage corresponding tosecondaryAnimationfrom1 - > 0Change, make a push to make an animation
Wherein,A页secondaryAnimation的值始终与B页primaryAnimation的值同步变化。
In general, the entry and exit of a page may use different animation curves, which can be determined by the corresponding state variablesprimaryAnimationStatusandsecondaryAnimationStatusto distinguish which stage is currently in,tsare defined as follows
enum AnimationStatus {
  // 动画停在起点
  dismissed = 0,
  // 动画从起点向终点进行
  forward = 1,
  // 动画从终点向起点进行
  reverse = 2,
  // 动画停在终点
  completed = 3,
}
TakeprimaryAnimationStatusas an example, the process of page entry and exit changes as follows
PushPhase:dismissed->forward->completedPopStage:completed->reverse->dismissed
# Routing gestures
After a page is pushed, in addition to calling thewx.navigateBackinterface to return a higher level, this can be done by gestures, such as the common right-swipe return oniOS.In custom routing mode, developers can choose the exit method they want based on different page turnover effects, such as a half-screen effect using a slide back.For the content of gesture listening, refer to the gesture system chapter, where routing gestures supplement several routing-related interfaces.
StartUserGestureandstopUserGesturesBoth functions are always called in pairs,startUserGesTUREafter calling]]userGestureInProgressadds1.
When the developer changes the value ofprimaryAnimationto control the routing progress, the two interfaces are called.Since different animation curves are usually used during gesture dragging, theuserGestureInProgressvalue can be determined.
When the gesture processing determines that you need to return to the previous page, call thedidPopinterface, which is equivalent towx.navigateBack。
# Routing connectivity
During the routing animation, the front and back pages are by default linked together and can be closed by a configuration item.
CanTransitionTo: whether to link with the next page, the top page of the stack This property is set tofalse,When you push to the next page, the top page does not moveCanTransitionFrom: Whether to link with the previous page, the new push page The property is set tofalse,The top page does not move at all.
# Routing context objects
As visible from the example template, the animated effect of custom routing is achieved by writing the appropriate animation update function based on the routing controller on theCustomRouteContextcontext object.
CustomRouteContextContext objects are also available in the page / custom component viawx.router.getRouteContext (this)Read, then accessed during gesture processing, and rewrite theprimaryAnimationvalue to achieve page gesture return.
Tip: You can add some private properties to theCustomRouteContextobject to read / modify in the page.
# Multiple types of routing jumps
Consider a scenario where you might jump from pageAto pageBand pageCwith different routing animations
A->BWhen you want to achieve half screen effect,Aneed to sink and shrinkA->CWhen you want to use normal routing,Aneeds to move to the left
Animation when jumping to the next page byhandleSecondaryAnimationControl, which requires consideration of all routing types when definingACustomRouteBuilder`is cumbersome to implement.
Base library3.0.0version, custom routing newhandlePreviousPageAnimationInterface for controlling the upstream / outstream animation of the upper level page.
const customRouteBuiler = (routeContext: CustomRouteContext) : CustomRouteConfig => {
  const { primaryAnimation } = routeContext

  const handlePrimaryAnimation: RouteAnimationHandler = () => {
    'worklet'
    let t = primaryAnimation.value
    // 控制当前页的进入和退出
  }

  const handlePreviousPageAnimation: RouteAnimationHandler = () => {
    'worklet'
    let t = primaryAnimation.value
    // 控制上一级页面的压入和退出
  }

  return {
    handlePrimaryAnimation,
    handlePreviousPageAnimation
  }
}
AJump toB,AThe value of pagesecondaryAnimationalways changes in synchrony with the value of pageB.
We can know the current routing progress when definingBCustomRouteBulderbyprimaryAnimation. handlePreviousPageAnimationThe returnStyleObject`acts on the previous page.
It is also no longer necessary to declareAas a custom route in advance, beforeAJumpBWhen you want to achieve a half-screen effect,Amust also be defined as a custom routing.
The complete example can be found in the following code, with the help ofhandlePreviousPageAnimationYou can remove the dependency onsecondaryAnimationand simplify code logic.
Preview the effect in the developer tool
# Practical cases
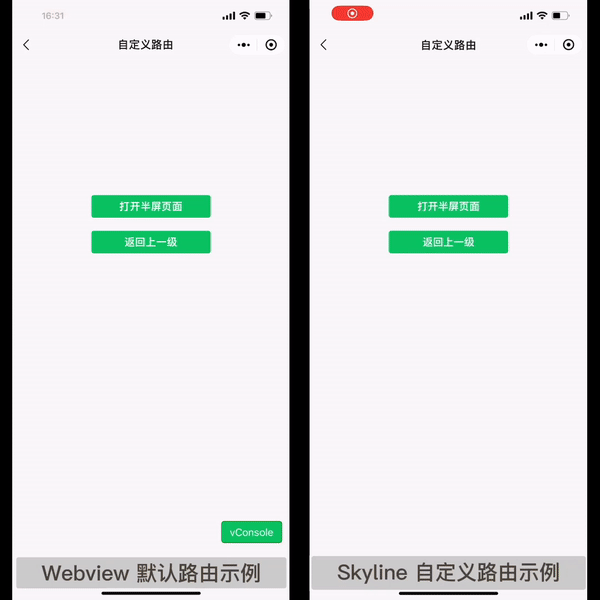
The implementation of custom routing is explained below, using the half-screen effect as an example. See the example code for the full code.
 The pages before and after the routing are remembered as
Apages andBpages, and you need to register a custom routing for each of them. When no custom routing effects are registered, the newly opened pageBimmediately overlays the pageA.
# Step-1 page into animation
We first simplely implement the entry animation of the Home Page ->Apage ->Bpage, and improve it step by step.
ForApage, entry is from right to left, bytransform.
function ScaleTransitionRouteBuilder(customRouteContext) {
  const {
    primaryAnimation
  } = customRouteContext

  const handlePrimaryAnimation = () => {
    'worklet'
    let t = primaryAnimation.value
    const transX = windowWidth * (1 - t)
    return {
      transform: `translateX(${transX}px)`,
    }
  }
  return {
    handlePrimaryAnimation
  }
}
ForBpages, the way to enter is bottom up, also viatransformflattening, but the page size and rounded corners need to be modified.
const HalfScreenDialogRouteBuilder = (customRouteContext) => {
  const {
    primaryAnimation,
  } = customRouteContext

  const handlePrimaryAnimation = () => {
    'worklet'
    let t = primaryAnimation.value
    // 距离顶部边距因子
    const topDistance = 0.12
    // 距离顶部边距
    const marginTop = topDistance * screenHeight
    // 半屏页面大小
    const pageHeight = (1 - topDistance) * screenHeight
    // 自底向上显示页面
    const transY = pageHeight * (1 - t)
    return {
      overflow: 'hidden',
      borderRadius: '10px',
      marginTop: `${marginTop}px`,
      height: `${pageHeight}px`,
      transform: `translateY(${transY}px)`,
    }
  }

  return {
    handlePrimaryAnimation,
  }
}
The page bounce effect is as follows. You can see that due to the use of a linear curve (without any conversion oft), the animation is somewhat dull and does not distinguish between the entry / exit animation.After theBpage is fully entered, theApage becomes invisible.
# Step-2 Custom Animated Curves
Take theBpage as an example, using different animation curves depending on theAnimationStatusvalue, while settingopaqueto [[TAG-2-]]false, so that theApage is displayed after the route animation is completed.
const { Easing, derived } = wx.workelt

const Curves = {
  linearToEaseOut: Easing.cubicBezier(0.35, 0.91, 0.33, 0.97),
  easeInToLinear: Easing.cubicBezier(0.67, 0.03, 0.65, 0.09),
  fastOutSlowIn: Easing.cubicBezier(0.4, 0.0, 0.2, 1.0),
  fastLinearToSlowEaseIn: Easing.cubicBezier(0.18, 1.0, 0.04, 1.0),
}

function CurveAnimation({ animation, animationStatus, curve,reverseCurve }) {
  return derived(() => {
    'worklet'
    const useForwardCurve = !reverseCurve || animationStatus.value !== AnimationStatus.reverse
    const activeCurve = useForwardCurve ? curve : reverseCurve
    const t = animation.value
    if (!activeCurve) return t
    if (t === 0 || t === 1) return t
    return activeCurve(t)
  })
}
const HalfScreenDialogRouteBuilder = (customRouteContext) => {
  const {
    primaryAnimation,
    primaryAnimationStatus,
  } = customRouteContext

  // 1. 页面进入时,采用 Curves.linearToEaseOut 曲线
  // 2. 页面退出时,采用 Curves.easeInToLinear 曲线
  const _curvePrimaryAnimation = CurveAnimation({
    animation: primaryAnimation,
    animationStatus: primaryAnimationStatus,
    curve: Curves.linearToEaseOut,
    reverseCurve: Curves.easeInToLinear,
  })

  const handlePrimaryAnimation = () => {
    'worklet'
    let t = _curvePrimaryAnimation.value
    ... // 其余内容等上面的代码一致
  }

  return {
    opaque: false,
    handlePrimaryAnimation,
  }
}
The only difference here is that the current progress no longer directly reads the value ofprimaryAnimation.The encapsulatedCurveAnimationfunction selects different animation curves based onAnimationStatusto determine whether they are in or out of state.The framework provides a variety of curve types that can be further referenced to worklet.Easing .The improved page turnover effect is as follows
# Step-3 Page Linkage Effect
B When thepage enters,Apage is pressed animation, controlled bysecondaryAnimation.Next, we add a sink effect to it to achieve linkage with theBpage.
function ScaleTransitionRouteBuilder(customRouteContext) {
  const {
    primaryAnimation
  } = customRouteContext

  const handlePrimaryAnimation = () => {
    'worklet'
    ...
  }

  const _curveSecondaryAnimation = CurveAnimation({
    animation: secondaryAnimation,
    animationStatus: secondaryAnimationStatus,
    curve: Curves.fastOutSlowIn,
  })

  const handleSecondaryAnimation = () => {
    'worklet'
    let t = _curveSecondaryAnimation.value
    // 页面缩放大小
    const scale = 0.08
    // 距离顶部边距因子
    const topDistance = 0.1
    // 估算的偏移量
    const transY = screenHeight * (topDistance - 0.5 * scale) * t
    return {
      overflow: 'hidden',
      borderRadius: `${ 12 * t }px`,
      transform: `translateY(${transY}px) scale(${ 1 - scale * t })`,
    }
  }

  return {
    handlePrimaryAnimation,
    handleSecondaryAnimation
  }
}
The sinking effect is achieved by transformingApage intoscaleandtranslate.The value ofApagesecondaryAnimationis always synchronized with the value ofB]] page [[tag-5-END]] primaryAnimation.
 Whether pages are connected can also be configured by the
canTransitionToandcantransitionFromproperties, which can modify the experience on developer tools.
# Step-4 Gesture Return
At present, the animation effect has basically been achieved, and a final step, the gesture return, is required.For half-screen effects, we add right-click back gestures toApages, and slide back gestures forBpages.
In the case of the most common right-swipe return, for example, only the portion of the gesture processing code after the hand is loosened is intercepted here, and the drag process is simpler to implement, referencing the example code.
page({
  handleDragEnd(velocity) {
    'worklet';
    const {
        primaryAnimation,
        stopUserGesture,
        didPop
    } = this.customRouteContext;

    let animateForward = false;
    if (Math.abs(velocity) >= 1.0) {
      animateForward = velocity <= 0;
    } else {
      animateForward = primaryAnimation.value > 0.5;
    }
    const t = primaryAnimation.value;
    const animationCurve = Curves.fastLinearToSlowEaseIn;
    if (animateForward) {
        const duration = Math.min(
          Math.floor(lerp(300, 0, t)),
          300,
        );
        primaryAnimation.value = timing(
          1.0, {
            duration,
            easing: animationCurve,
          },
          () => {
            'worklet'
            stopUserGesture();
          },
        );
    } else {
      const duration = Math.floor(lerp(0, 300, t));
      primaryAnimation.value = timing(
        0.0, {
          duration,
          easing: animationCurve,
        },
        () => {
          'worklet'
          stopUserGesture();
          didPop();
        },
      );
    }
  },
})
First, decide whether you want to really go back to the higher level based on the speed and location when you let go.
- Swipe to the right and faster than
1 1 / 2
When the above conditions are met, return is confirmed.Through thetiminginterface, add transition animation toprimaryAnimationto0, last calldidPop.Otherwise change it to1and revert to the pre-drag state.
It is important to note here that when theprimaryAnimationWhen thevalue is manually modified and free to control its transition, the interfacesstartUserGestureandstopUserGesturesare called.
The swipe right gesture has been encapsulated in the sample code as a swipe-back`component that developers can use directly.The return logic of the slide gesture is basically the same, with only a slight difference in some numerical values.
The final implementation is as shown

# Set up a transparent page
Some custom routing effects require page transparent backgrounds. Here is a explaination of the hierarchy of background colors inSkylineandwebviewmodes.
# Customize the page background color under routing
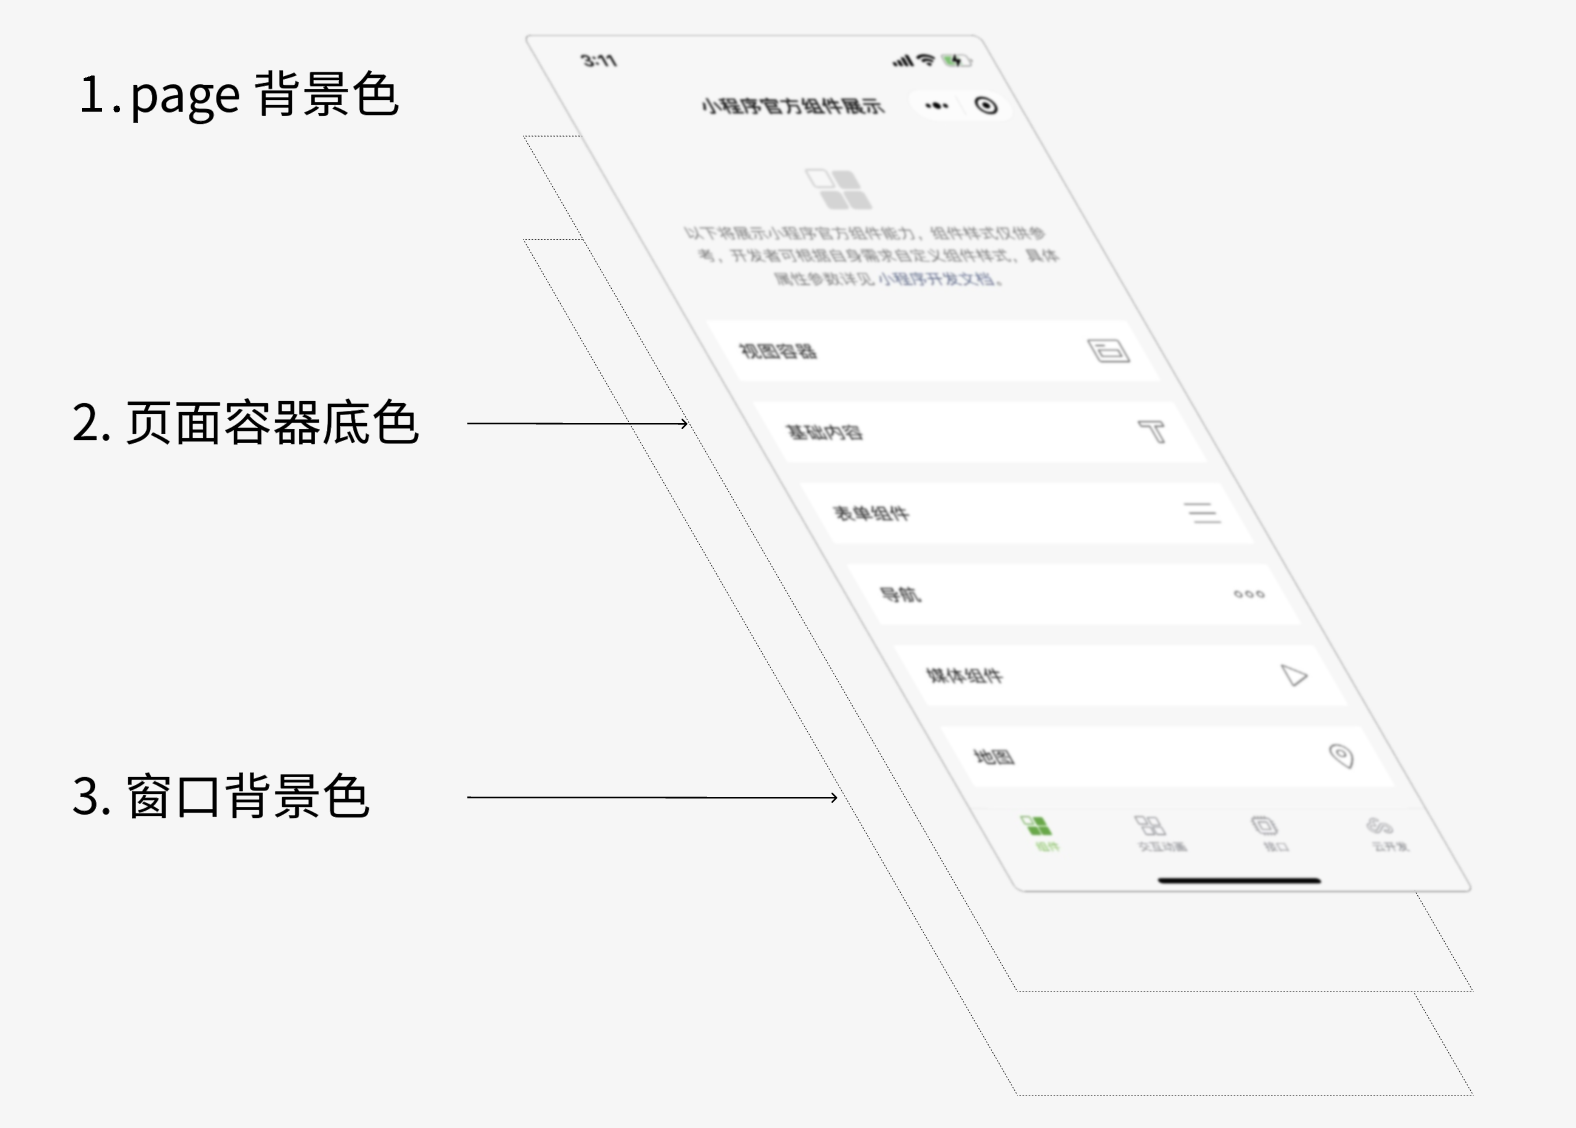
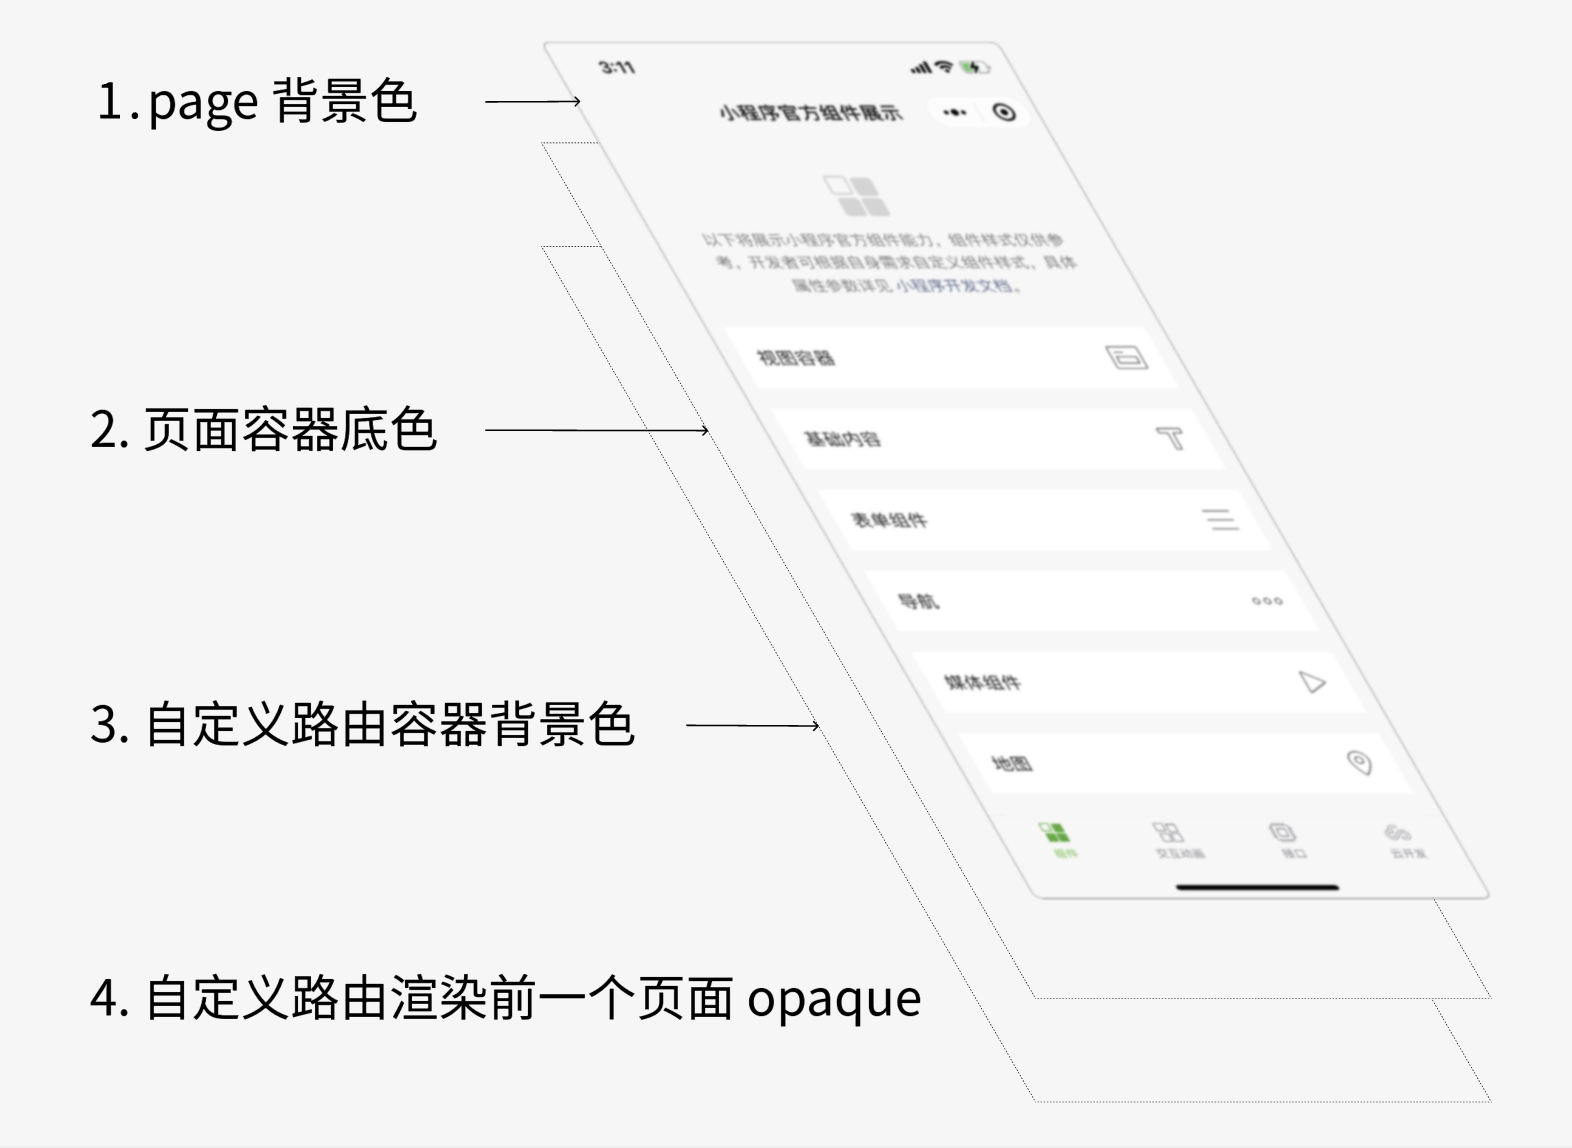
Skylinemode uses custom routing to jump the page, the page background has the following layers
- Page backview: Can be defined in
pageselector inwxss, white by default - Page container backview: Available in the page
jsonfile bybackgroundColorContentAttribute definition, supports# RRGGBBAA, default white - Custom route container backview, controlled by the
StyleObjectreturned in the route configuration entry, transparent by default - Controls whether or not the previous page is displayed, controlled by the
opaquefield in the routing configuration item, not displayed by default
 When you need to set the next page to appear progressively, you can simply set it
- Page background-color transparent:
page {background-color: transparent; } - Page container backview transparent:
backgroundColorContent: "# ffffff00"
View examples of custom routing page displays
# Backview of the page under webview
In contrast,webview
- Page backview: Can be defined in
pageselector in [[TAG-1START]] wxss`, transparent by default - Page container backview: Available in the page
jsonfile bybackgroundColorContentAttribute definition, supports# RRGGBBwriting, default white - Window backview: Can be modified by wx.setBackgroundColor interface or page configuration, default to white