# start
**Xr-frame ** is a set of Weixin Mini Program official XR / 3D application solutions based on hybrid solutions that are nearly native, effective, easy to use, scalable, incremental, and following small-scale development standards.
In this chapter, we'll take you from the beginning to build an XR Weixin Mini Program with it.
This article is just a starting guide. For more information, see component framework documentation.
⚠️
xr-frameIn the base libraryv2.32.0begins to be basically stable and is released as an official release, but some features are still being developed. See [limitations and outlook]].
# Create a new XR component
First create the project, let's select the Weixin Mini Program project:
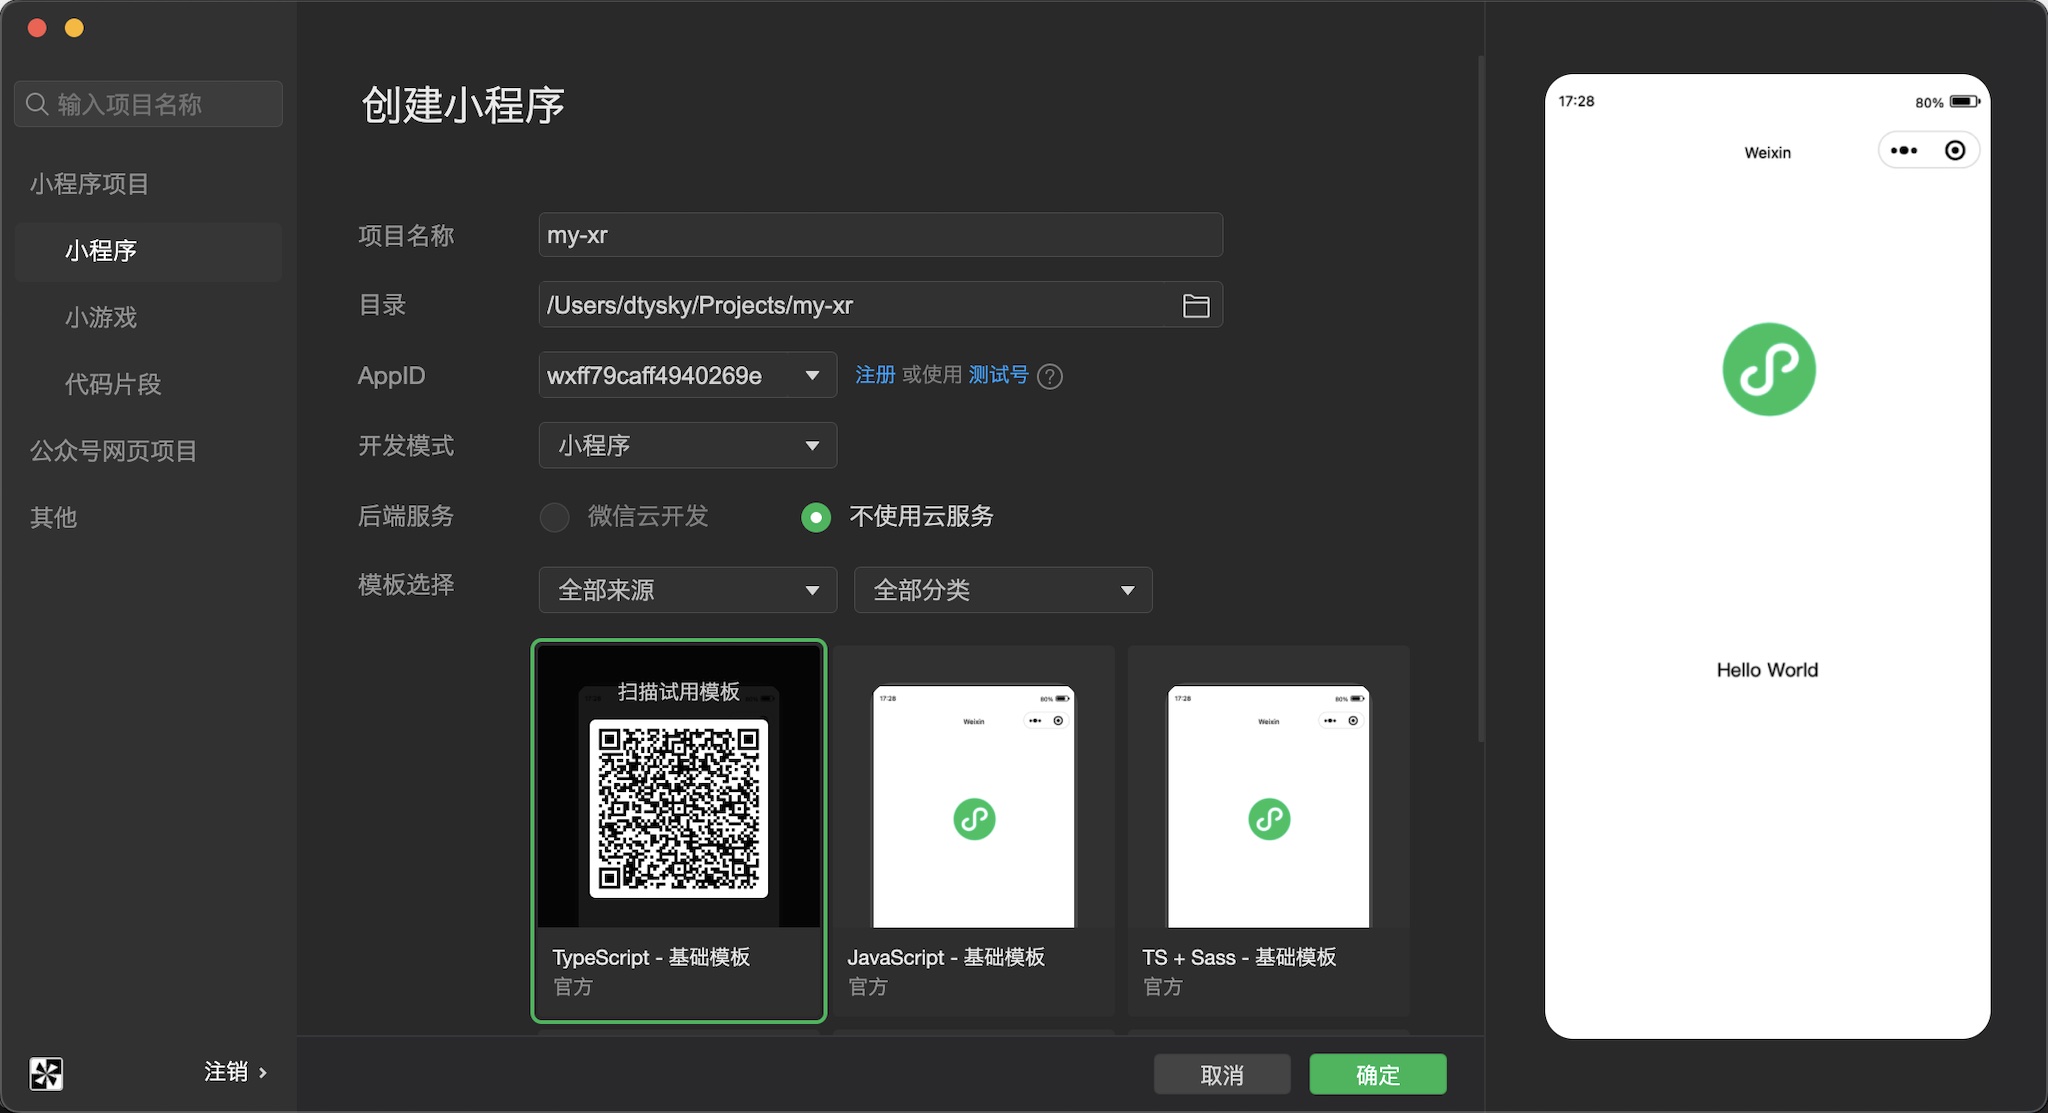
After that start withapagejsonadd a line configuration:"lazyCodeLoading": "requiredComponents".Then create the component folder, create a new component, and modify the contents of the component:
index.json:
{
  "component": true,
  "renderer": "xr-frame",
  "usingComponents": {}
}
index.wxml:
<xr-scene>
  <xr-camera clear-color="0.4 0.8 0.6 1" />
</xr-scene>
Inindex.json, we specify that the renderer for this component isxr-frame;Inindex.wxml, we create a scenexr-scene,And under it added a cameraxr-camera.

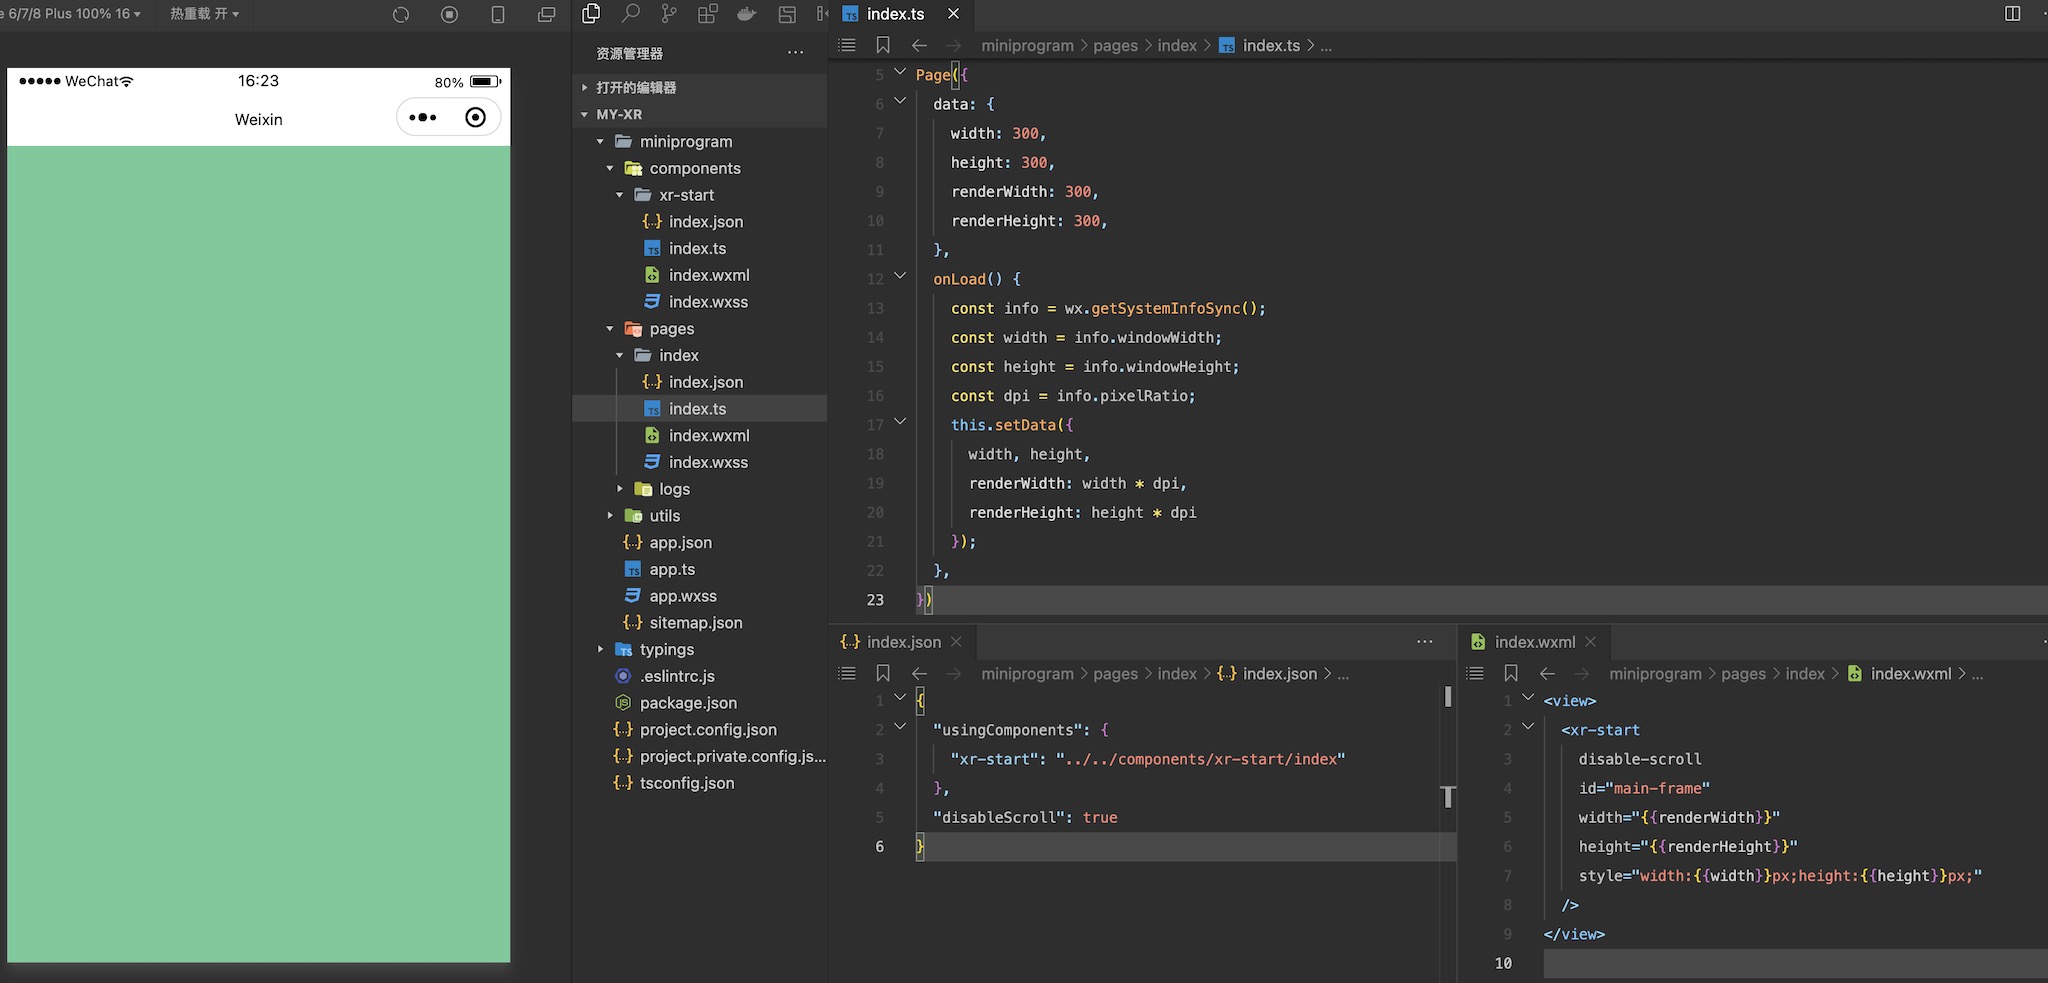
# Use this component in a page
Once you have created the component, you can use it in your page. Let's go topages / indexand modify itsjson,wxmlandtsdocuments:
Injson:
{
  "usingComponents": {
    "xr-start": "../../components/xr-start/index"
  },
  "disableScroll": true
}
In thetsscript:
Page({
  data: {
    width: 300,
    height: 300,
    renderWidth: 300,
    renderHeight: 300,
  },
  onLoad() {
    const info = wx.getSystemInfoSync();
    const width = info.windowWidth;
    const height = info.windowHeight;
    const dpi = info.pixelRatio;
    this.setData({
      width, height,
      renderWidth: width * dpi,
      renderHeight: height * dpi
    });
  },
})
Inwxml:
<view>
  <xr-start
    disable-scroll
    id="main-frame"
    width="{{renderWidth}}"
    height="{{renderHeight}}"
    style="width:{{width}}px;height:{{height}}px;"
  />
</view>
Here we set the width and height of thexr-framecomponent in the script, and pass in thewxml,In this context, the components referenced injsonare rendered. The current effect is as follows. The entire canvas is cleared by the clearing color set onxr-camera:
# Add an object
Next we add an object to the field, usingxr-meshand the built-in geometry data and materials to create a cube:
<xr-scene>
  <xr-mesh node-id="cube" geometry="cube" />
  <xr-camera clear-color="0.4 0.8 0.6 1" position="0 1 4" target="cube" camera-orbit-control />
</xr-scene>
Here we assign the object anode-id,As an index of nodes, and then modify thexr-camerapositionand`` target,Let it always look at the cube, and finally add thecamera-orbit-controlattribute to the camera, so that we can control the camera.
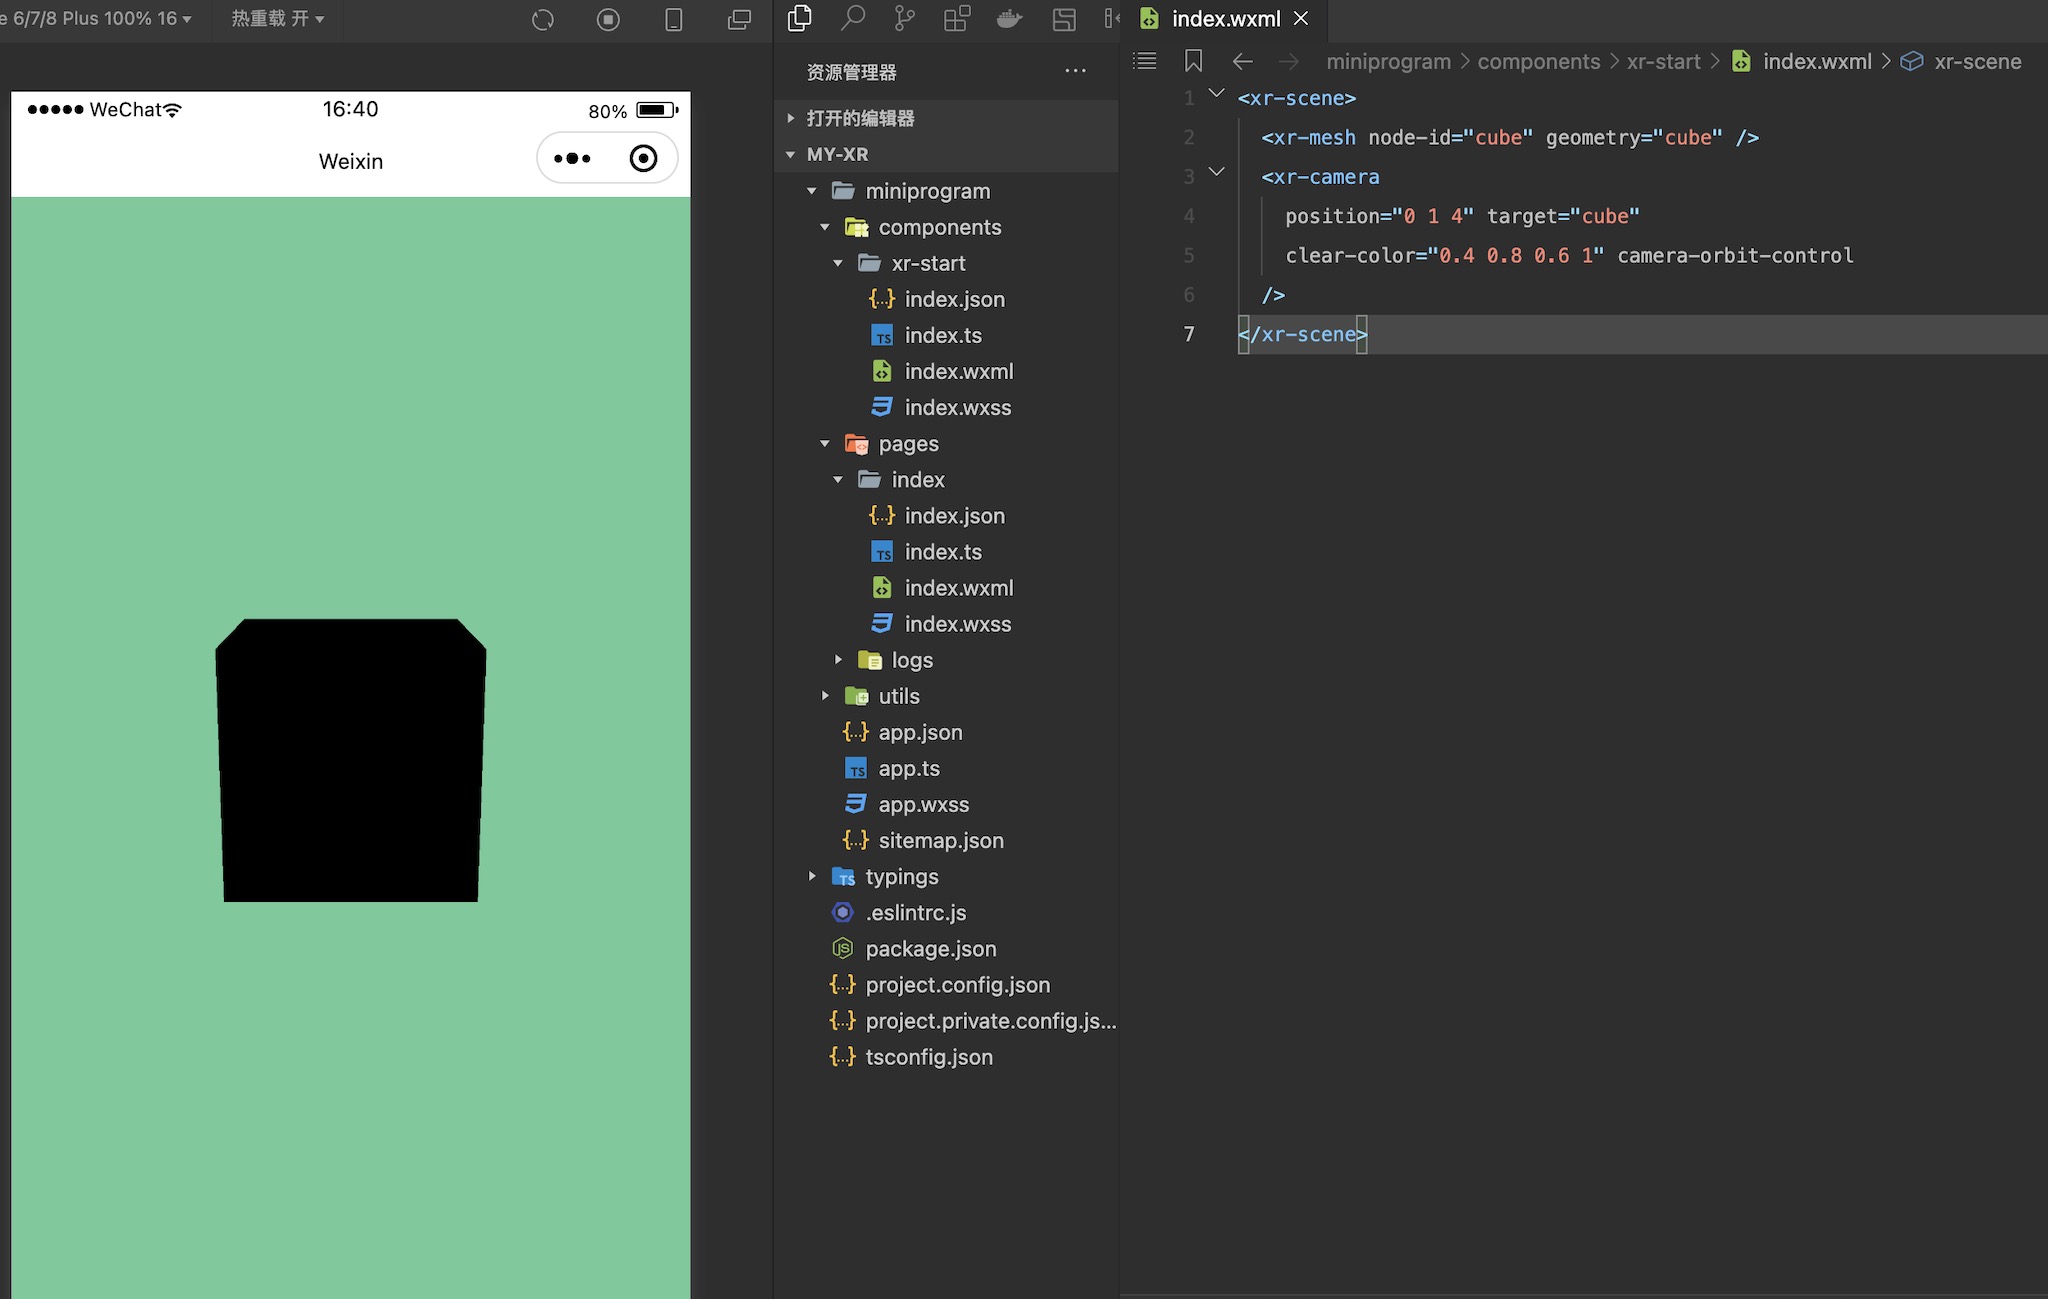
At this point, a cube is rendered, but... why is it black?
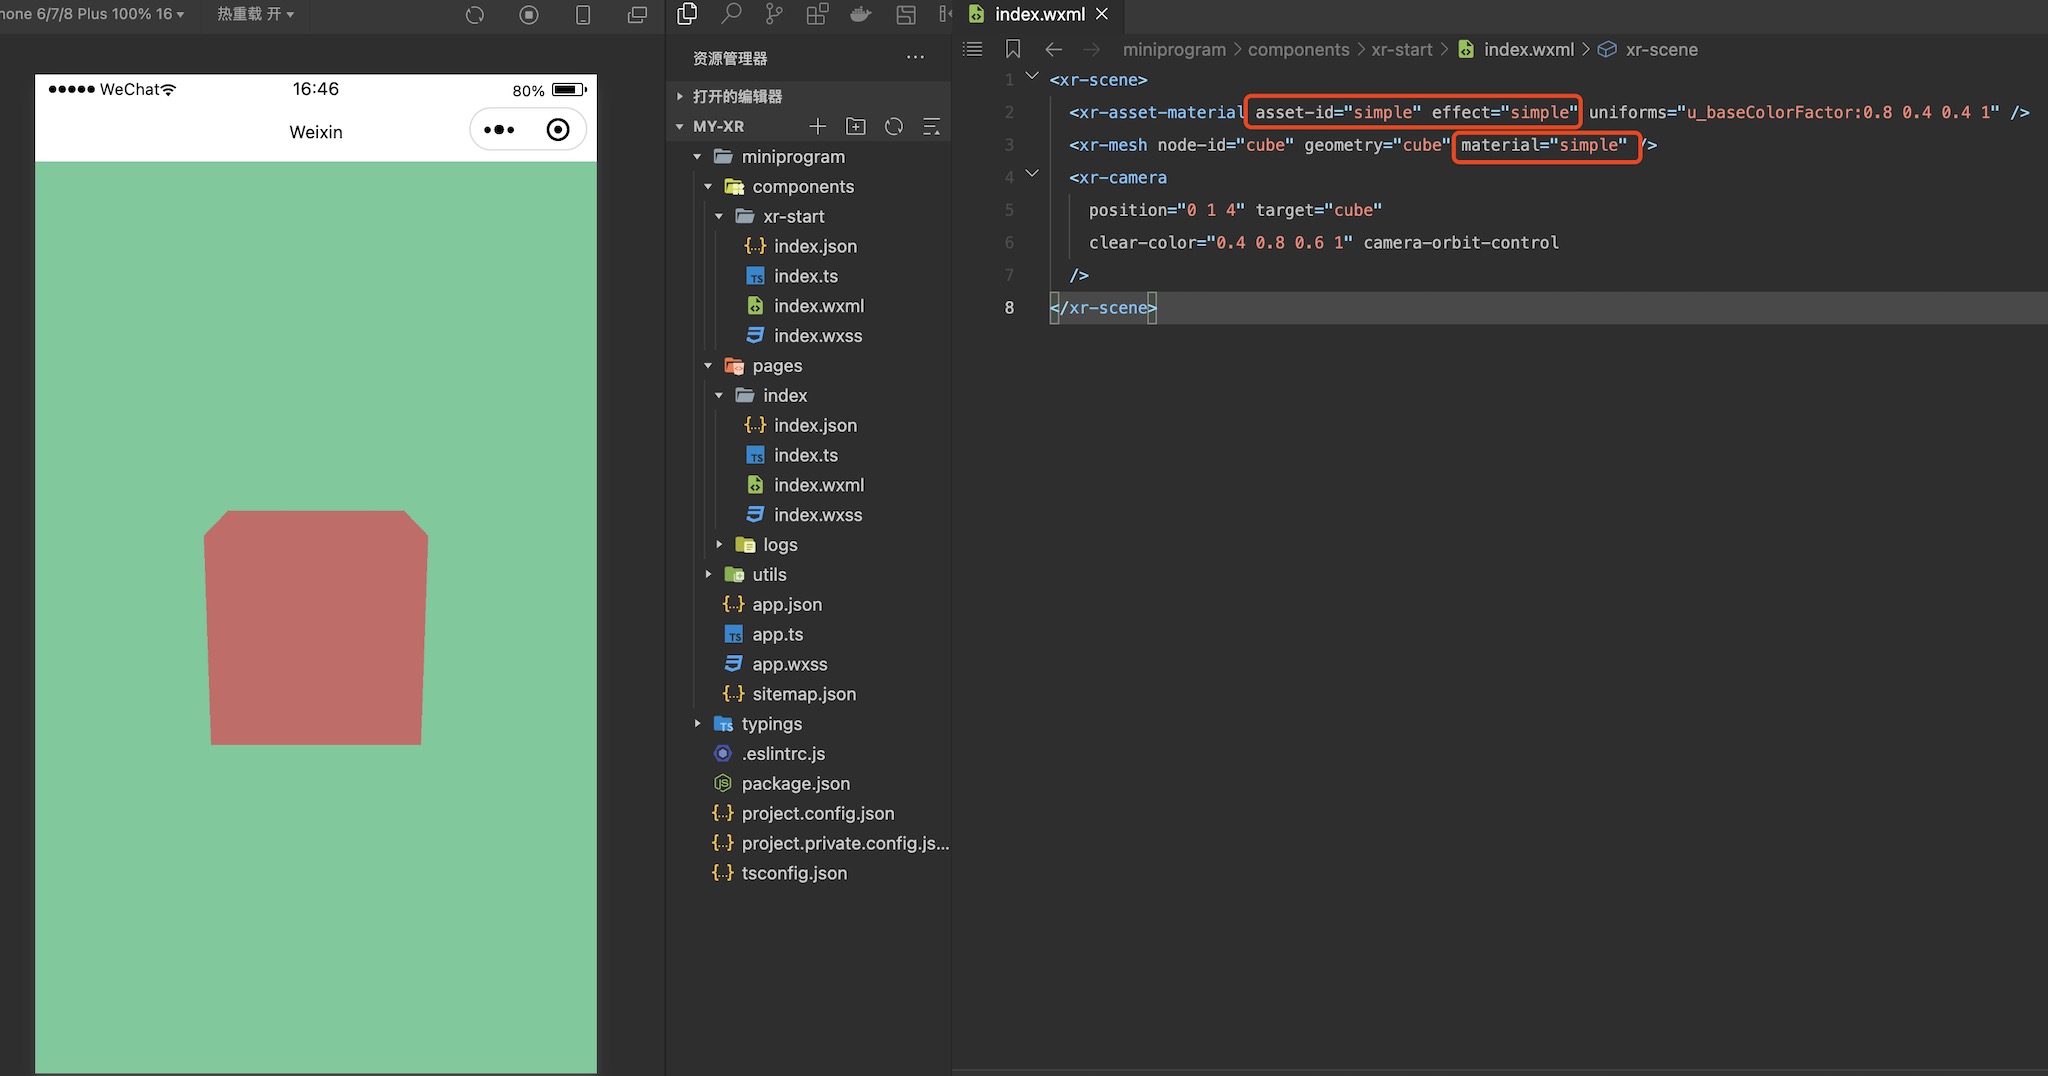
# Bring some color and light
The object is black because when we do not specify the material forxr-mesh,Using the default material based on the PBR effect, light is required. There are two ways to solve this problem. One is for objects that do not require light. You can usesimplematerial. Here we introduce a material definition:
<xr-asset-material asset-id="simple" effect="simple" uniforms="u_baseColorFactor:0.8 0.4 0.4 1" />
<xr-mesh node-id="cube" geometry="cube" material="simple" />
The effect is as follows:
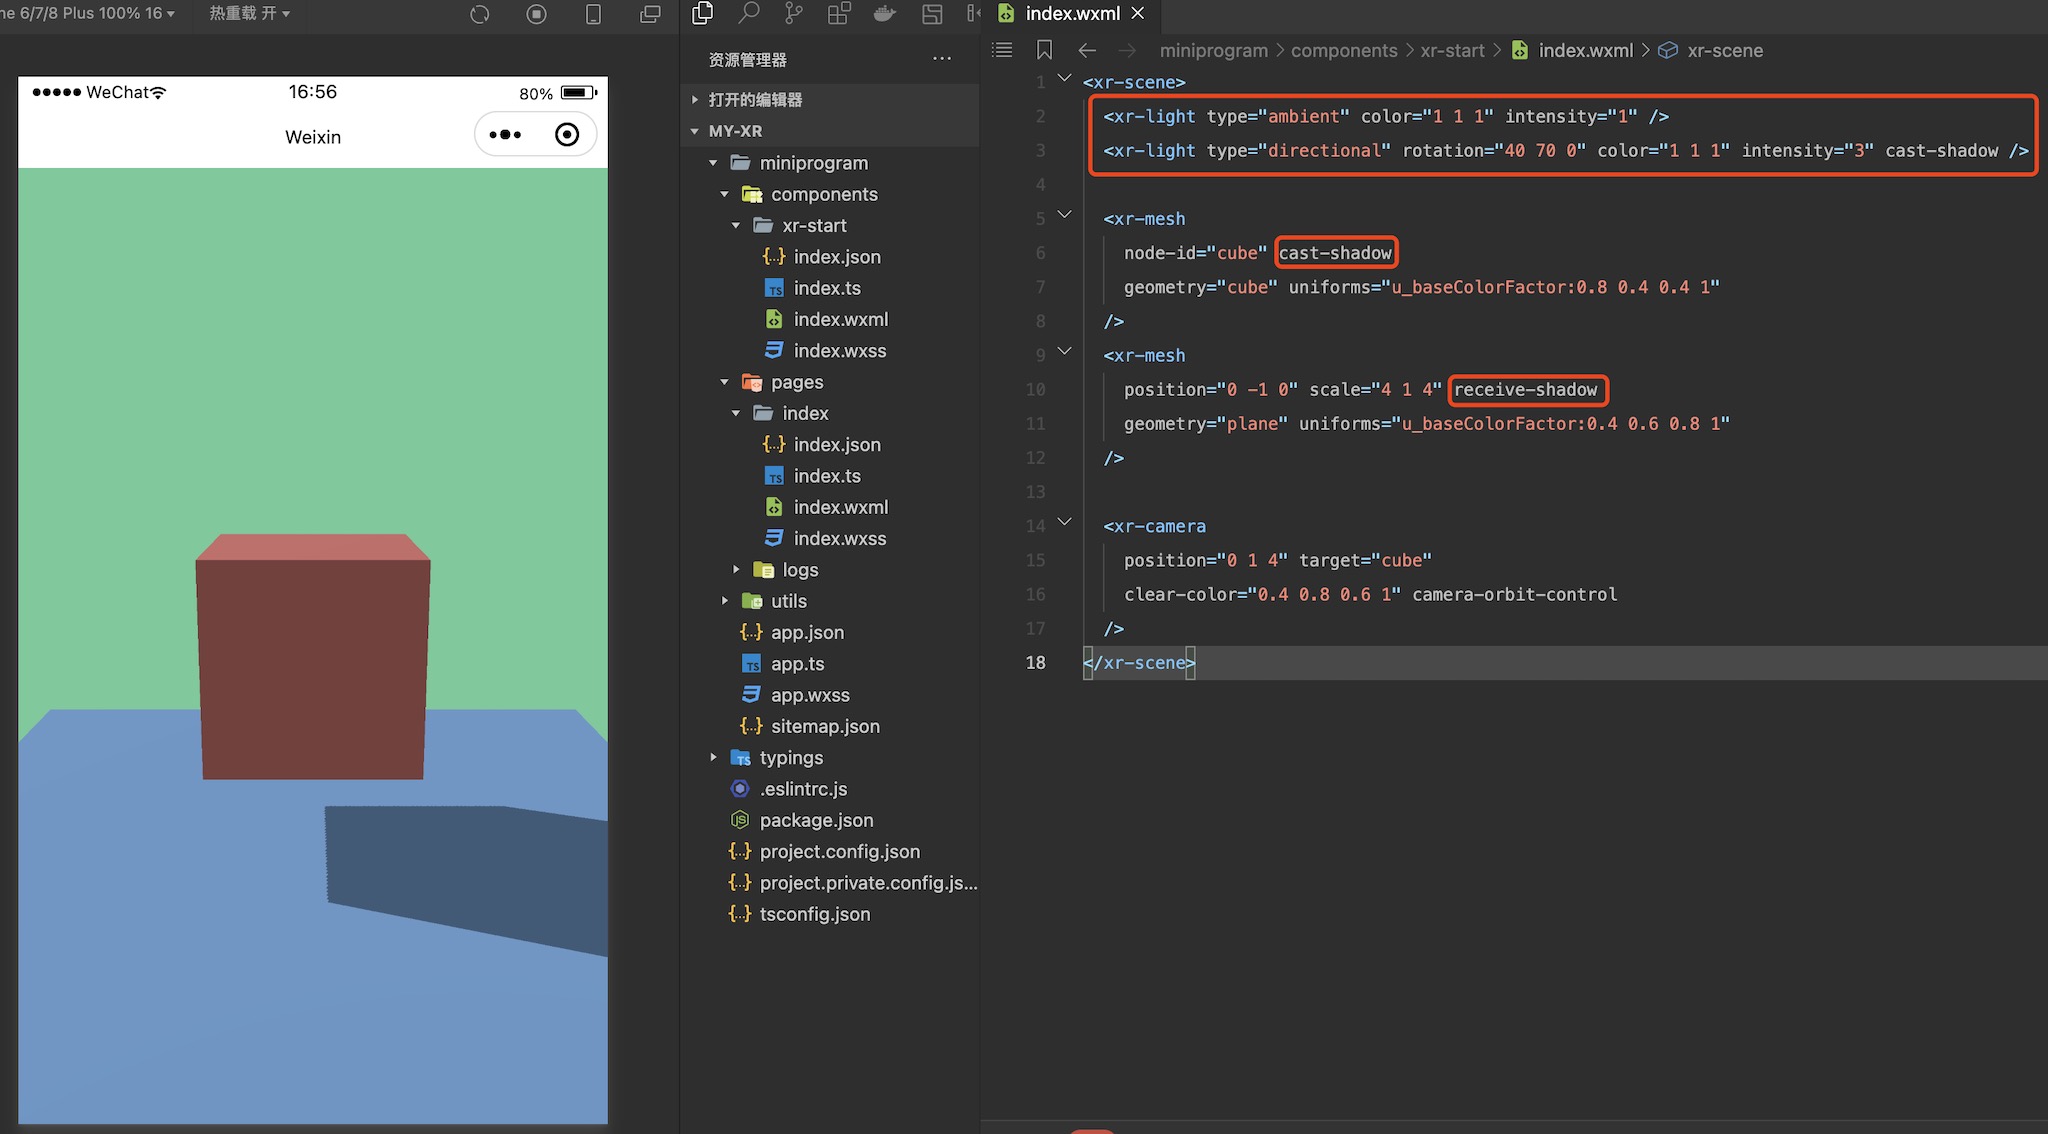
Although this can solve some problems, most of the time we still need light. So let's change the material back and add some light:
<xr-light type="ambient" color="1 1 1" intensity="1" />
<xr-light type="directional" rotation="40 70 0" color="1 1 1" intensity="3" cast-shadow />

<xr-mesh
  node-id="cube" cast-shadow
  geometry="cube" uniforms="u_baseColorFactor:0.8 0.4 0.4 1"
/>
<xr-mesh
  position="0 -1 0" scale="4 1 4" receive-shadow
  geometry="plane" uniforms="u_baseColorFactor:0.4 0.6 0.8 1"
/>
Here we add an ambient light and a main parallel light, adjusting the brightness and direction,A new object is added at the same time, and the shadow is turned on bycaster-shadowandreceive-shadowof each component, with the following effect:
# A little bleak, plus the image.
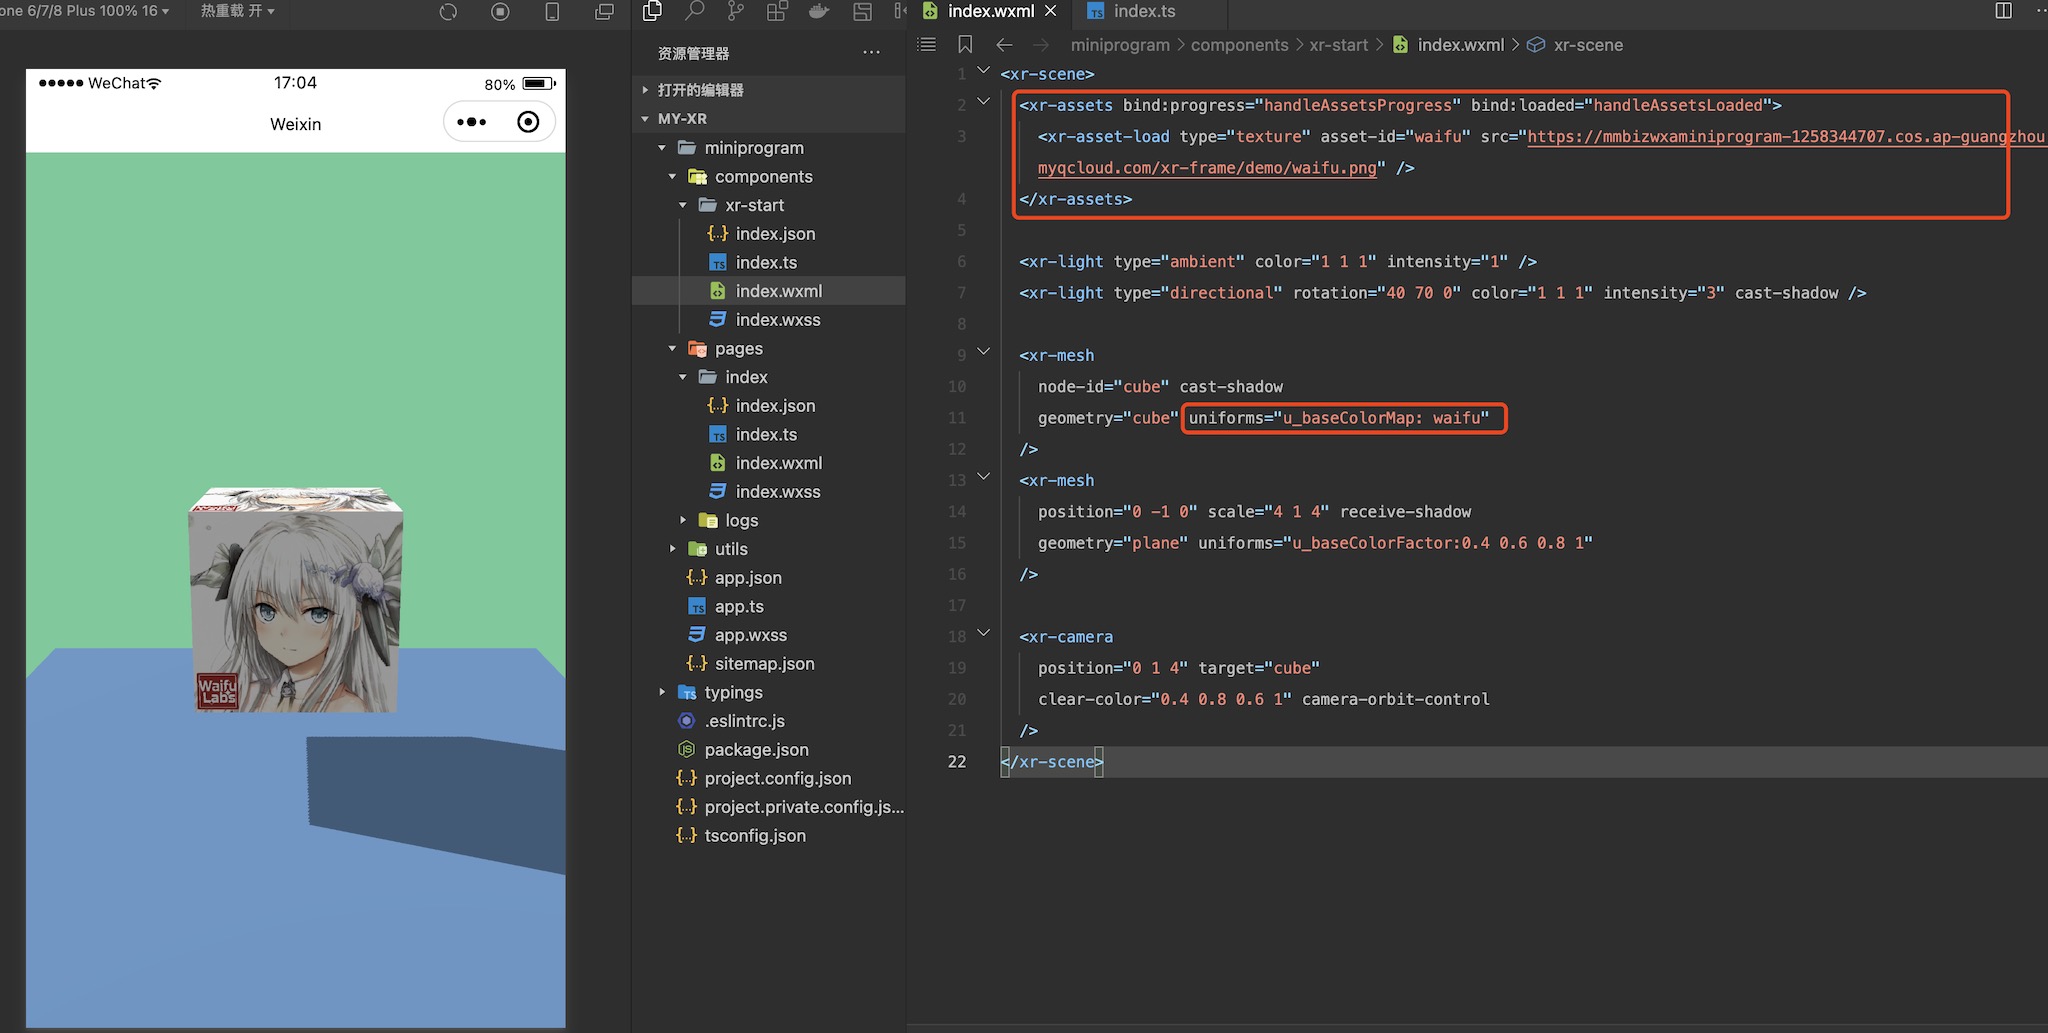
Despite the lights, only the pure colors are a little faint. Next we try to add texture to make the scene more colourful. This requires the resource loaderxr-asset-loadand`` xr-assets`:
<xr-assets bind:progress="handleAssetsProgress" bind:loaded="handleAssetsLoaded">
  <xr-asset-load type="texture" asset-id="waifu" src="https://mmbizwxaminiprogram-1258344707.cos.ap-guangzhou.myqcloud.com/xr-frame/demo/waifu.png" />
</xr-assets>

<xr-mesh
  node-id="cube" cast-shadow
  geometry="cube" uniforms="u_baseColorMap: waifu"
/>
Note that we bind two eventsprogresson and `` loaded,This allows developers to monitor the progress of resource loading and then do something as needed, such as when the resource is loaded andwx: ifcollaborate to display the object.By default, we use a progressive policy, which is automatically applied to the object when the resource is loaded:
methods: {
  handleAssetsProgress: function ({detail}) {
    console.log('assets progress', detail.value);
  },
  handleAssetsLoaded: function ({detail}) {
    console.log('assets loaded', detail.value);
  }
}
The effect of this change is as follows:
Of course, we can also use code to dynamically load a texture and then set it onto an object, using a profile picture that gets user information as an example:
data: {
  avatarTextureId: 'white'
},

methods: {
  handleReady: function ({detail}) {
    this.scene = detail.value;
    // 该接口已废弃,请授权后,采用 getUserInfo 代替。
    wx.getUserProfile({
      desc: '获取头像',
      success: (res) => {
        this.scene.assets.loadAsset({
          type: 'texture', assetId: 'avatar', src: res.userInfo.avatarUrl
        }).then(() => this.setData({avatarTextureId: 'avatar'}));
      }
    })
  }
}
Weixin Mini Program wx.getUserProfile was abandoned after 24: 00 on 25 October 2022
Note herehandleReady. We can bind [xr-scene`` bind: ready = "handleReady"trigger trigger.After completing avatar acquisition, set the data to the source ofuniforms:
<xr-mesh
  position="0 -1 0" scale="4 1 4" receive-shadow
  geometry="plane" uniforms="u_baseColorMap: {{avatarTextureId}}"
/>
The effect is as follows:

# Make the scene richer, environmental data
Objects have texture, so can the background have texture as well? Of course I can.We provide the environment elementsxr-envto define the environment information, and the camera can render the sky box, here with an environment data built into the framework]]xr-frame-team-workspace-dayFor example:
<xr-env env-data="xr-frame-team-workspace-day" />

<xr-mesh
  node-id="cube" cast-shadow
  geometry="cube" uniforms="u_baseColorMap: waifu,u_metallicRoughnessValues:1 0.1"
/>

<xr-camera
  position="0 1 4" target="cube" background="skybox"
  clear-color="0.4 0.8 0.6 1" camera-orbit-control
/>
Here we set thexr-camerabackgourndtoskybox`, while adjusting the metal roughness of the cube, the effect is as follows:

You can also see that the objects in the scene are subjected to a layer of reflection by the camera, as if they were influenced by the environment, because the environmental data also includes some IBL information, which we won't discuss here. Those interested can read more in the following chapter.
In addition to images, the Skybox supports video. We can load a video texture first and then cover the environmental information.sky-map:
<xr-asset-load type="video-texture" asset-id="office" src="https://mmbizwxaminiprogram-1258344707.cos.ap-guangzhou.myqcloud.com/xr-frame/demo/videos/office-skybox.mp4" options="autoPlay:true,loop:true" />

<xr-env env-data="xr-frame-team-workspace-day" sky-map="video-office" />
The effect is as follows:
In addition to this sky box, we also support the 2D background, which will be useful when doing some product displays:
<xr-asset-load type="texture" asset-id="weakme" src="https://mmbizwxaminiprogram-1258344707.cos.ap-guangzhou.myqcloud.com/xr-frame/demo/weakme.jpg" />

<xr-env env-data="xr-frame-team-workspace-day" sky-map="weakme" is-sky2d />
The effect is as follows:

# Move and join the animation
At the moment our entire scene is still static, and next we will add some animations to enrich it.To use frame animation resources here, let's first create a resource directory and create ajsonfile under it:
{
  "keyframe": {
    "plane": {
      "0": {
        "rotation.y": 0,
        "material.u_baseColorFactor": [0.2, 0.6, 0.8, 1]
      },
      "50": {
        "material.u_baseColorFactor": [0.2, 0.8, 0.6, 1]
      },
      "100": {
        "rotation.y": 6.28,
        "material.u_baseColorFactor": [0.2, 0.6, 0.8, 1]
      }
    },
    "cube": {
      "0": {
        "position": [-1, 0, 0]
      },
      "25": {
        "position": [-1, 1, 0]
      },
      "50": {
        "position": [1, 1, 0]
      },
      "75": {
        "position": [1, 0, 0]
      }
    }
  },
  "animation": {
    "plane": {
      "keyframe": "plane",
      "duration": 4,
      "ease": "ease-in-out",
      "loop": -1
    },
    "cube": {
      "keyframe": "cube",
      "duration": 4,
      "ease": "steps",
      "loop": -1,
      "direction": "both"
    }
  }
}
Then load it and reference it to two objects on the field:
<xr-asset-load asset-id="anim" type="keyframe" src="/assets/animation.json"/>

<xr-mesh
  node-id="cube" cast-shadow anim-keyframe="anim" anim-autoplay="clip:cube,speed:2"
  geometry="cube" uniforms="u_baseColorMap: waifu,u_metallicRoughnessValues:1 0.1"
/>
<xr-mesh
  node-id="plane" position="0 -1 0" scale="4 1 4" receive-shadow anim-keyframe="anim" anim-autoplay="clip:plane"
  geometry="plane" uniforms="u_baseColorMap: {{avatarTextureId}}"
/>

<xr-camera
  position="0 1 6" target="plane" background="skybox"
  clear-color="0.4 0.8 0.6 1" camera-orbit-control
/>
Here we willxr-camera``targetis set toplaneto prevent it from moving along withcube.
Note that because it is the
jsonfile inside the package, you need to addsetting field in the **project.config.json**"ignoreDevUnusedFiles": falseand"ignoreUploadUnusedFiles": false [(` Configuration parameters! The effect is as follows:
# It's not enough. Put a model on.
Looking at this scene, you might also think there's something missing, which is fine - it's all square geometries, or it's just too monotonous. So here we will load and use the glTF model to make the scene richer.To make the scene simpler, we remove all objects from the original scene and adjust the camera'starget:
<xr-asset-load type="gltf" asset-id="damage-helmet" src="https://mmbizwxaminiprogram-1258344707.cos.ap-guangzhou.myqcloud.com/xr-frame/demo/damage-helmet/index.glb" />
<xr-asset-load type="gltf" asset-id="miku" src="https://mmbizwxaminiprogram-1258344707.cos.ap-guangzhou.myqcloud.com/xr-frame/demo/miku.glb" />

<xr-gltf node-id="damage-helmet" model="damage-helmet" />
<xr-gltf model="miku" position="-0.15 0.75 0" scale="0.07 0.07 0.07" rotation="0 180 0" anim-autoplay />

<xr-camera
  position="0 1.5 4" target="damage-helmet" background="skybox"
  clear-color="0.4 0.8 0.6 1" camera-orbit-control
/>
Here we load two models: a static model that supports all the features of PBR rendering, and a simpler model that has animation.

# A little more interaction
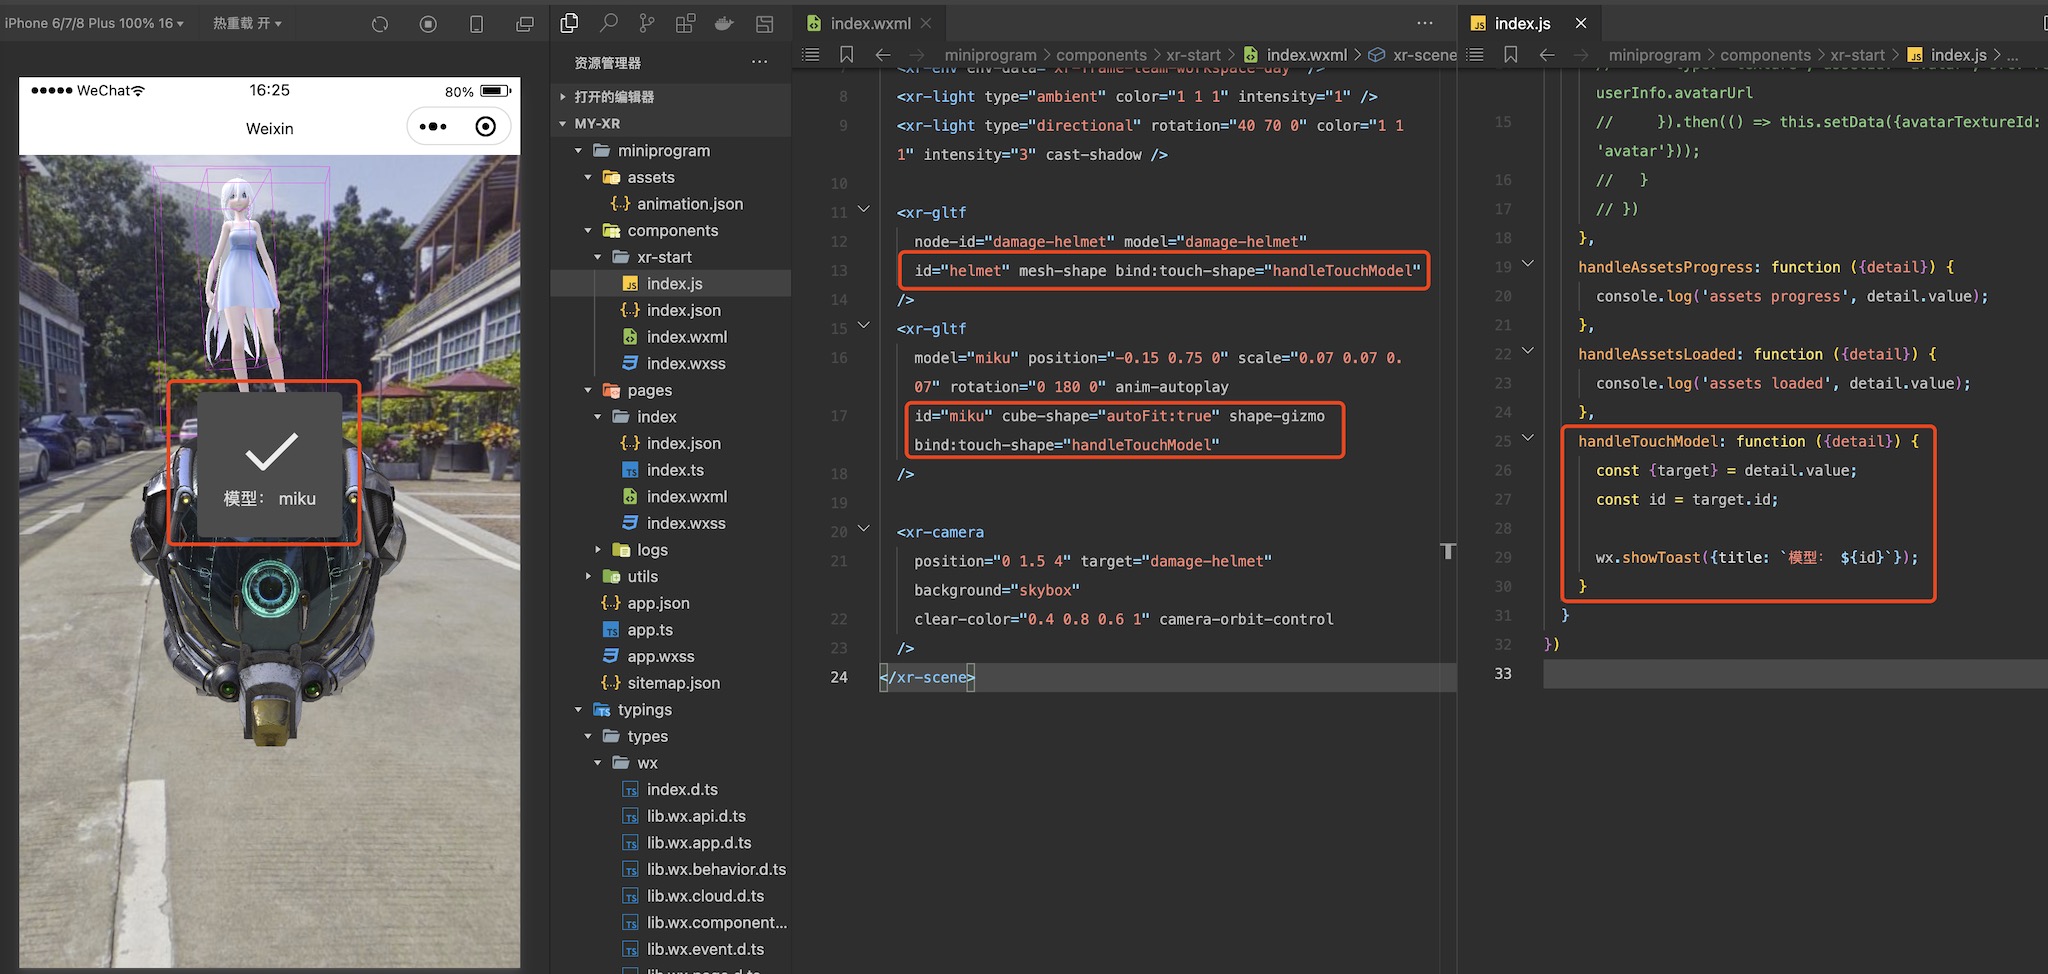
The rendering part is about the same here, but as an app, interaction with the user is essential.In many scenarios, developers may need to click on objects in the scene to do some logic, so we provideshapeseries of components:
<xr-gltf
  node-id="damage-helmet" model="damage-helmet"
  id="helmet" mesh-shape bind:touch-shape="handleTouchModel"
/>
<xr-gltf
  model="miku" position="-0.15 0.75 0" scale="0.07 0.07 0.07" rotation="0 180 0" anim-autoplay
  id="miku" cube-shape="autoFit:true" shape-gizmo bind:touch-shape="handleTouchModel"
/>
We set theidfor several models, add theshapewith different shapes,Amesh-shapecan exactly match the model,However, the cost is higher and has a ceiling limit. Acube-shapeis less expensive and can also open the debug switchshape-gizmoto display it.Finally, we bind the corresponding click event, and then we can write logic in the script to do the appropriate action:
handleTouchModel: function ({detail}) {
  const {target} = detail.value;
  const id = target.id;

  wx.showToast({title: `点击了模型: ${id}`});
}
Then when you click on the corresponding object, a prompt pops up:
# Component communication, plus HUD
Although there are interactions, you can't make interactions all this kind of pop-up.A lot of times we let interaction and UI elements interact with each other, but currentlyxr-frameand Weixin Mini Program-END]] UI elements are not yet supported (they will be supported in future versions), but we can use the same-layer scheme, which inevitably involves component communication.
The communication between the xr-framecomponent and the parent is basically the same as the traditional component. Here let's implement the Weixin Mini Program UI element to Weixin Mini ProgramHUD。There may be some 3D transformation knowledge here, but it doesn't matter, it's just calling the interface.
First, let's modify thewxmlof the component,Addtickevents to the scene, and addidto both the model and the camera for easy indexing.
<xr-scene bind:ready="handleReady" bind:tick="handleTick">
......
<xr-gltf
  node-id="damage-helmet" model="damage-helmet"
  id="helmet" mesh-shape bind:touch-shape="handleTouchModel"
/>
<xr-gltf
  model="miku" position="-0.15 0.75 0" scale="0.07 0.07 0.07" rotation="0 180 0" anim-autoplay
  id="miku" cube-shape="autoFit:true" shape-gizmo bind:touch-shape="handleTouchModel"
/>
<xr-camera
  id="camera" position="0 1.5 4" target="damage-helmet" background="skybox"
  clear-color="0.4 0.8 0.6 1" camera-orbit-control
/>
</xr-scene>
Then process the events in the component's script and write the logic:
handleReady: function ({detail}) {
  this.scene = detail.value;
  const xrFrameSystem = wx.getXrFrameSystem();
  this.camera = this.scene.getElementById('camera').getComponent(xrFrameSystem.Camera);
  this.helmet = {el: this.scene.getElementById('helmet'), color: 'rgba(44, 44, 44, 0.5)'};
  this.miku = {el: this.scene.getElementById('miku'), color: 'rgba(44, 44, 44, 0.5)'};
  this.tmpV3 = new (xrFrameSystem.Vector3)();
},
handleAssetsLoaded: function ({detail}) {
  this.triggerEvent('assetsLoaded', detail.value);
},
handleTick: function({detail}) {
  this.helmet && this.triggerEvent('syncPositions', [
    this.getScreenPosition(this.helmet),
    this.getScreenPosition(this.miku)
  ]);
},
handleTouchModel: function ({detail}) {
  const {target} = detail.value;
  this[target.id].color = `rgba(${Math.random()*255}, ${Math.random()*255}, ${Math.random()*255}, 0.5)`;
},
getScreenPosition: function(value) {
  const {el, color} = value;
  const xrFrameSystem = wx.getXrFrameSystem();
  this.tmpV3.set(el.getComponent(xrFrameSystem.Transform).worldPosition);
  const clipPos = this.camera.convertWorldPositionToClip(this.tmpV3);
  const {frameWidth, frameHeight} = this.scene;
  return [((clipPos.x + 1) / 2) * frameWidth, (1 - (clipPos.y + 1) / 2) * frameHeight, color, el.id];
}
Here we are in the ready event id Index gets the required instance coexist down, and then at each frame's tickThe event takes the world coordinates of the object in real time, converts them to the position of the screen, and adds the effect of changing the color when the user clicks.Finally, we initiate communication from the component to the page via this.triggerEvent, an event that completes the resource load assetsLoaded, one is coordinate update event syncPositions.Let's see how these events are handled in the script of the scene:
data: {
  width: 300, height: 300,
  renderWidth: 300, renderHeight: 300,
  loaded: false,
  positions: [[0, 0, 'rgba(44, 44, 44, 0.5)', ''], [0, 0, 'rgba(44, 44, 44, 0.5)', '']],
},
handleLoaded: function({detail}) {
  this.setData({loaded: true});
},
handleSyncPositions: function({detail}) {
  this.setData({positions: detail});
},
So you simply accepted the event and set it to data. So where does thisdatabe used? Look at the page's wxml:
<view>
  <xr-start
    disable-scroll
    id="main-frame"
    width="{{renderWidth}}"
    height="{{renderHeight}}"
    style="width:{{width}}px;height:{{height}}px;"
    bind:assetsLoaded="handleLoaded"
    bind:syncPositions="handleSyncPositions"
  />

  <block wx:if="{{loaded}}" wx:for="{{positions}}" wx:for-item="pos" wx:key="*this">
    <view style="display: block; position: absolute;left: {{pos[0]}}px;top: {{pos[1]}}px;background: {{pos[2]}};transform: translate(-50%, -50%);">
      <view style="text-align: center;color: white;font-size: 24px;padding: 8px;">{{pos[3]}}</view>
    </view>
  </block>
</view>
It's also simple, just add event binding to thexr-startcomponent, and then add some UI below that displays when the model is loaded and follows the model by location and color. This can be considered DOM-basedHUD。When the whole thing is done, the user clicks on the object, which will make these HUD colors, the effect is as follows:
Note here the left effect screenshot is real machine screenshot P up, because the tool does not support the same layer rendering!

# Virtual x Reality, Additional AR Capabilities
So far, we have achieved 3D scene rendering and interaction, but the frame is called XR -frame,So next we use the built-in AR system to transform the scene and make it AR capable.The modification is very simple, we first remove all irrelevant objects, and then use thear-systemandar-tracker,And modify the relevant properties ofxr-camera``is-ar-cameraand`background = "ar". That's fine:
<xr-scene ar-system="modes:Plane" bind:ready="handleReady">
  <xr-assets bind:loaded="handleAssetsLoaded">
    <xr-asset-load type="gltf" asset-id="anchor" src="https://mmbizwxaminiprogram-1258344707.cos.ap-guangzhou.myqcloud.com/xr-frame/demo/ar-plane-marker.glb" />
    <xr-asset-load type="gltf" asset-id="miku" src="https://mmbizwxaminiprogram-1258344707.cos.ap-guangzhou.myqcloud.com/xr-frame/demo/miku.glb" />
  </xr-assets>

  <xr-env env-data="xr-frame-team-workspace-day" />
  <xr-light type="ambient" color="1 1 1" intensity="1" />
  <xr-light type="directional" rotation="40 70 0" color="1 1 1" intensity="3" cast-shadow />

  <xr-ar-tracker mode="Plane">
    <xr-gltf model="anchor"></xr-gltf>
  </xr-ar-tracker>
  <xr-node node-id="setitem" visible="false">
    <xr-gltf model="miku" anim-autoplay scale="0.08 0.08 0.08" rotation="0 180 0"/>
  </xr-node>

  <xr-camera clear-color="0.4 0.8 0.6 1" background="ar" is-ar-camera />
</xr-scene>
Notice here we open thear-systemmode forPlane,In this mode, the camera cannot be controlled by the user, and the controller,target, etc., are deleted.At the same time, thear-tracker'smodemust be exactly the same as thear system.Then write a little simple logic in the script:
handleAssetsLoaded: function({detail}) {
  wx.showToast({title: '点击屏幕放置'});
  this.scene.event.add('touchstart', () => {
    this.scene.ar.placeHere('setitem', true);
  });
}
# Recognize faces and put a mask on yourself
After a preliminary understanding of the AR system, we can try more different modes to play with some fun effects. Next is the face recognition mode, for which we only need to change a few words in the above code, you can put on the mask of Joker (escape):
⚠️Gesture recognition, face recognition, body recognition all need basic library v2.28.1 above.
<xr-scene ar-system="modes:Face;camera:Front" bind:ready="handleReady" bind:tick="handleTick">
  <xr-assets bind:loaded="handleAssetsLoaded">
    <xr-asset-load type="gltf" asset-id="mask" src="https://mmbizwxaminiprogram-1258344707.cos.ap-guangzhou.myqcloud.com/xr-frame/demo/jokers_mask_persona5.glb" />
  </xr-assets>

  <xr-env env-data="xr-frame-team-workspace-day" />
  <xr-light type="ambient" color="1 1 1" intensity="1" />
  <xr-light type="directional" rotation="40 70 0" color="1 1 1" intensity="3" />

  <xr-ar-tracker mode="Face" auto-sync="43">
    <xr-gltf model="mask" rotation="0 180 0" scale="0.5 0.5 0.5" />
  </xr-ar-tracker>

  <xr-camera clear-color="0.4 0.8 0.6 1" background="ar" is-ar-camera />
</xr-scene>
Here we change thear-systemmodestoFace, and added thecameraattribute toFront,Indicates that the front camera is turned on ( <span style="color:red">Note that the front-facing camera only supports</span> after **8.0.31]] on the client side, which is a demonstration only here).At the same time on thear-trackerwe changed themodeto the same as thear -system[[]] Face, and appended the attributeauto-sync`,This is an array of numbers indicating that the facial features identified by and the corresponding sequence of subnodes are bound to and automatically synchronized. The specific features are described in detail in the component documentation.
# Gesture, like a favorite work
In addition to the human face, we also provide the body. and human hand recognition are similar in usage, but human hand provides "hand gesture" recognition in addition to synchronizing the feature points to which they belong. This is interesting. Let's see:
<xr-scene ar-system="modes:Hand" bind:ready="handleReady" bind:tick="handleTick">
  <xr-assets bind:loaded="handleAssetsLoaded">
    <xr-asset-load type="gltf" asset-id="cool-star" src="https://mmbizwxaminiprogram-1258344707.cos.ap-guangzhou.myqcloud.com/xr-frame/demo/cool-star.glb" />
  </xr-assets>

  <xr-env env-data="xr-frame-team-workspace-day" />
  <xr-light type="ambient" color="1 1 1" intensity="1" />
  <xr-light type="directional" rotation="40 70 0" color="1 1 1" intensity="3" cast-shadow />

  <xr-ar-tracker id="tracker" mode="Hand" auto-sync="4">
    <xr-gltf model="cool-star" anim-autoplay />
  </xr-ar-tracker>

  <xr-camera clear-color="0.4 0.8 0.6 1" background="ar" is-ar-camera />
</xr-scene>
WxmlHere we changed the model and replaced the patterns ofar-system and ar tracker with Hand,And modified thear-trackerfeature points and added aidconvenient index,Finally, thescenebinds thetickevent, and then thejslogic:
handleAssetsLoaded: function ({detail}) {
  this.setData({loaded: true});

  const el = this.scene.getElementById('tracker');
  this.tracker = el.getComponent(wx.getXrFrameSystem().ARTracker);
  this.gesture = -1;
},
handleTick: function() {
  if (!this.tracker) return;
  const {gesture, score} = this.tracker;
  if (score < 0.5 || gesture === this.gesture) {
    return;
  }

  this.gesture = gesture;
  gesture === 6 && wx.showToast({title: '好!'});
  gesture === 14 && wx.showToast({title: '唉...'});
}
The most important is thehandleTickmethod. At each frame we get a reference to thetrackerand get its propertiesgestureand score,Wheregestureis gesture number and score is confidence.The specific gesture number is visible in the component documentation. Here I filtered it with confidence and then revealed different information based on the value of the gesturegesture(6 thumbs up, 14 thumbs down). The result is as follows:
# OSDMarker, marking real objects
There are twomarker.One is the OSD Marker, which generally uses a photo of a real object as a source of recognition.To identify the two dimensional area of the object on the screen, we have to convert it to three dimensional space, but the developer has to ensure that the scale of the`tracker is consistent with the source.The OSD pattern works best at identifying two-dimensional, well-defined objects, such as billboards.
If you just want to try, just copy and visit ` src to open in your browser.
<xr-scene ar-system="modes:OSD" bind:ready="handleReady">
  <xr-assets bind:loaded="handleAssetsLoaded">
    <xr-asset-material asset-id="mat" effect="simple" uniforms="u_baseColorFactor: 0.8 0.6 0.4 0.7" states="alphaMode:BLEND" />
  </xr-assets>

  <xr-node>
    <xr-ar-tracker
      mode="OSD" src="https://mmbizwxaminiprogram-1258344707.cos.ap-guangzhou.myqcloud.com/xr-frame/demo/marker/osdmarker-test.jpg"
    >
      <xr-mesh geometry="plane" material="mat" rotation="-90 0 0" />
    </xr-ar-tracker>
  </xr-node>

  <xr-camera clear-color="0.4 0.8 0.6 1" background="ar" is-ar-camera />
</xr-scene>
Here we change thear-systemmode toOSD,The correspondingar-trackermode has also been changed toOSD,In this mode you need to providesrc, which is the image to be recognized.And this time we used an effect that issimplematerial because no light is required, and for better viewing,statesformaterialare set]]alphaMode: BLEND, that is, turn on transparent blend, and thenuniformsset the coloru_baseColorFactorand note that its transparency is0.7.The end result is as follows:
# 2DMarker + Video, Make Photos Move
The final capability is 2D Marker, which is used to accurately identify rectangular planes with a certain texture, which we can match with video texture, and it only takes very simple code to complete an effect, starting withwxml:
If you just want to try, just copy and visit ` src to open in your browser.
<xr-scene ar-system="modes:Marker" bind:ready="handleReady">
  <xr-assets bind:loaded="handleAssetsLoaded">
    <xr-asset-load
      type="video-texture" asset-id="hikari" options="loop:true"
      src="https://mmbizwxaminiprogram-1258344707.cos.ap-guangzhou.myqcloud.com/xr-frame/demo/xr-frame-team/2dmarker/hikari-v.mp4"
    />
    <xr-asset-material asset-id="mat" effect="simple" uniforms="u_baseColorMap: video-hikari" />
  </xr-assets>

  <xr-node wx:if="{{loaded}}">
    <xr-ar-tracker
      mode="Marker" bind:ar-tracker-switch="handleTrackerSwitch"
      src="https://mmbizwxaminiprogram-1258344707.cos.ap-guangzhou.myqcloud.com/xr-frame/demo/xr-frame-team/2dmarker/hikari.jpg"
    >
      <xr-mesh node-id="mesh-plane" geometry="plane" material="mat" />
    </xr-ar-tracker>
  </xr-node>

  <xr-camera clear-color="0.4 0.8 0.6 1" background="ar" is-ar-camera />
</xr-scene>
Here we change thear-systempattern toMarker,Then the type ofar-trackerwas changed toMarker,And change a recognition source, then load a prepared video texture, and change the color of thesimplematerial to the textureu_baseColorMap, while turning off blending.Note that we used the variableloadedto control the display ofar-trackerand bind eventsar-tracker-switch, which is to be handled in the script:
handleAssetsLoaded: function ({detail}) {
  this.setData({loaded: true});
},
handleTrackerSwitch: function ({detail}) {
  const active = detail.value;
  const video = this.scene.assets.getAsset('video-texture', 'hikari');
  active ? video.play() : video.stop();
}
Display the content after the video is loaded, and play the video afterar-tracker-switchevent, i.e. after the identification is successful, optimizing the experience. The end result is as follows:
# Add magic, and a little particles.
Just playing the video might seem a bit tedious, but here we can ask a particle system to create some magic to make the whole scene more vivid:
  ......
  <xr-asset-load type="texture" asset-id="point" src="https://mmbizwxaminiprogram-1258344707.cos.ap-guangzhou.myqcloud.com/xr-frame/demo/particles/point.png" />
  ......
  <xr-node wx:if="{{loaded}}">
    <xr-ar-tracker
      mode="Marker" bind:ar-tracker-switch="handleTrackerSwitch"
      src="https://mmbizwxaminiprogram-1258344707.cos.ap-guangzhou.myqcloud.com/xr-frame/demo/xr-frame-team/2dmarker/hikari.jpg"
    >
      <xr-mesh node-id="mesh-plane" geometry="plane" material="mat" />
      <xr-particle
        capacity="500" emit-rate="20"
        size="0.03 0.06" life-time="2 3" speed="0.04 0.1"
        start-color="1 1 1 0.8" end-color="1 1 1 0.2"
        emitter-type="BoxShape"
        emitter-props="minEmitBox:-0.5 0 0.5,maxEmitBox:0.5 0.2 0,direction:0 0 -1,direction2:0 0 -1"
        texture="point"
      />
    </xr-ar-tracker>
  </xr-node>
......
In addition to the previous 2DMarker video, we added thexr-particleelement and used the newly loadedpointandboxShapeemitters and other parameters to generate particles. The end result is as follows (which is limited to my very modest artistic foundation, of course, and I believe you can tune it up to blow me up 233):
# Post-processing to make the picture more fun
After the mainframe rendering is finished, it still seems to be somewhat monotonous and lacks a clear sense of separation from the real world, which is when full screen back-up can be used to achieve some more playful effects:
  ......
  <xr-asset-load asset-id="anim" type="keyframe" src="/assets/animation.json"/>
  ......
  <xr-asset-post-process
    asset-id="vignette" type="vignette" data="intensity:1,smoothness:4,color:1 0 0 1"
    anim-keyframe="anim" anim-autoplay
  />
  <xr-camera clear-color="0.4 0.8 0.6 1" background="ar" is-ar-camera post-process="vignette" />
Here I applied a vignettevignettepost-processing effect to the camera and added frame animation control parameters to it:
{
  "keyframe": {
    "vignette": {
      "0": {
        "asset-post-process.assetData.intensity": 0
      },
      "100": {
        "asset-post-process.assetData.intensity": 1
      }
    }
  },
  "animation": {
    "vignette": {
      "keyframe": "vignette",
      "duration": 2,
      "ease": "ease-in-out",
      "loop": -1,
      "direction": "both"
    }
  }
}
The end result is as follows:
# Share it with your friends!
Well, finally here we are. What's most important when we've made some satisfactory results? Share it to a friend, of course!Let's use thexr-framebuilt-in sharing system to do this:
......
<xr-mesh node-id="mesh-plane" geometry="plane" material="mat" cube-shape="autoFit:true" bind:touch-shape="handleShare" />
......
handleShare: function() {
  this.scene.share.captureToFriends();
}
The video displayed after recognition isMeshAdds the above-mentionedshapebinds the touch event and then uses it directly in the event handling functionthis.scene.share.captureToFriends ()The effect is as follows:
Of course, many times we just need a picture and use it to access other sharing interfaces of WeChat such as onShareAppMessage lifecycle, using share.captureToLocalPath interface, detailed component documentation.
# After that, let's give your ideas to you.
So far, we have briefly experienced the various capabilities of the framework, but mainlywxmlwith very little logic.For entry-level developers, we tend to offer developers a very simple way to achieve good results, which is the foundation of **progressive development.More detailed documentation is available in the component documentation .
But in addition to these simple uses, frameworks offer highly flexible componentization features. Developers can customize their own components, elements, all resources, etc., and even if there is a need, we can open the underlying RenderGraph to customize the rendering process. Detailed custom development capabilities can be seen in the documentation in the following sections, which we have described and guided in some detail.
Well, that's the end of getting started. Technology is always just a tool. The rest is up to you as the creator! Before that, let's take a look at these demos: