The image comparison capability generally serves as a supplement to automated testing. It can be used for relatively stable Mini Program pages. During version updates, it verifies whether existing functionality has been affected by checking if the UI remains consistent.
Read Before Use
Before using the image comparison feature, please understand the following points:
- Usage Limitations: Currently, the image comparison feature is only available for the Record and Playback and Custom Testing test types.
- Baseline Image: The baseline image is the template used to compare against the images in the test report, meaning it defines what the report images are compared with.
- Comparison Rules: After setting a baseline image, when an image to be compared is encountered in the report, comparison is performed only if it meets the "5 Matches" conditions (same Mini Program AppID, same device model, same page path, same name, same screenshot type).
- Judgment Method: The image comparison algorithm allows you to choose between SSIM (default) or visual comparison, which is detailed in the following sections. By default, the entire image is compared. To enhance usability, Cloud Testing also supports region-based comparison capabilities.
- Impact on Test Results: If the image comparison fails, the test result is marked as Failed, and the issue category is classified as Image Comparison Error/Anomaly.
The detailed usage workflow is described below.
1. Get Images
In every record & playback session and custom test, numerous screenshots are captured. Note only images retrieved following the instructions below will be used for image comparison:
Record and Playback
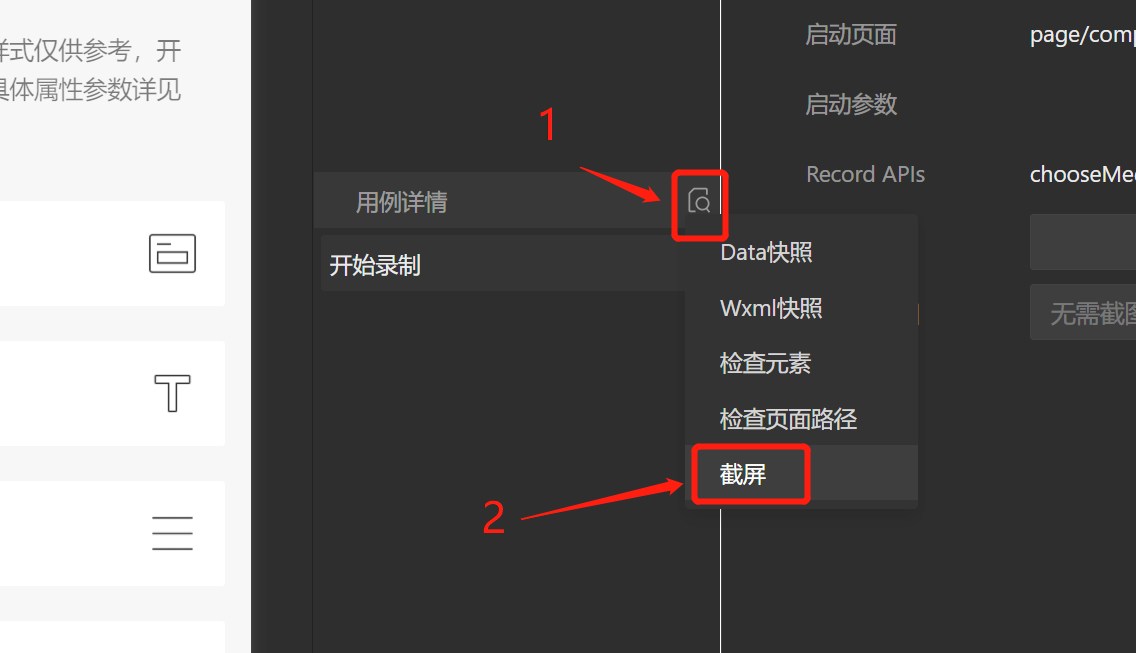
Record and playback is performed in the Developer Tools. During the operation, select Screenshot to capture images for comparison.
Important Notes:
- Only images obtained through the Screenshot operation will be included in the image comparison. Other screenshots, such as those taken during the step execution, are not included in the comparison.
- If the Developer Tools do not support the Screenshot operation, please upgrade the version.
- For existing Record and Playback test cases that use the Screenshot operation, you must re-sync the test case or re-upload the test case to collect the corresponding images.
Custom Testing (Minium)
With custom testing, you can use the capture API in Python code to specify screenshots.
Compared to record and replay, Minium is more flexible and supports capturing full-screen images as well as capturing specific elements.
Specifically: In the capture API, the screenshot type is determined based on the value of the region parameter:
- Page: Pass in the current page instance to capture the current screen image of the page (Note: To improve the success rate of comparison, the top banner of the phone is automatically removed when taking screenshots, as the time displayed in the banner can interfere with the screenshot comparison effect).
- Element: Pass in a specific element instance to capture the image of that element's region.
- Not passed in: Indicates that this screenshot does not require image comparison. By default, no value is passed in.
Once test cases using Record & Replay or Minium are completed, submit them to Cloud Testing for execution. Cloud Testing will automatically record and collect the images based on the test results.
The pros and cons of both methods are compared as follows:
| Method | Pros | Cons |
|---|---|---|
| Record & Replay | Low learning barrier; records actions simply by tapping, no coding required | Can only capture full-screen images; less flexible than Minium |
| Minium | Flexible operations; supports capturing specific elements and full-screen screenshots, and allows directly specifying ignored regions and related information | Requires writing Python 3 scripts; has a certain learning barrier |
Special Note:
- In subsequent image comparisons, full-screen images can only be compared with other full-screen images, and element-specific screenshots can only be compared with other element-specific screenshots.
- In the capture API, it is strongly recommended to specify the screenshot file name. The file name is very important, because in the test report's comparison rules, only screenshots with the same image name within the same page will be compared. It is recommended to use names that are relevant to the screenshot content and unique.
2. Determining the Reference Image and Comparison Method
Determine the Baseline Image
The baseline image serves as the reference source, defining which image the test result screenshots are compared against.
In Step 1, a large number of screenshots for comparison have already been collected.
To set the baseline image, first navigate to "Project Management" => "Image Comparison Management" in the left sidebar to access the image comparison management page.
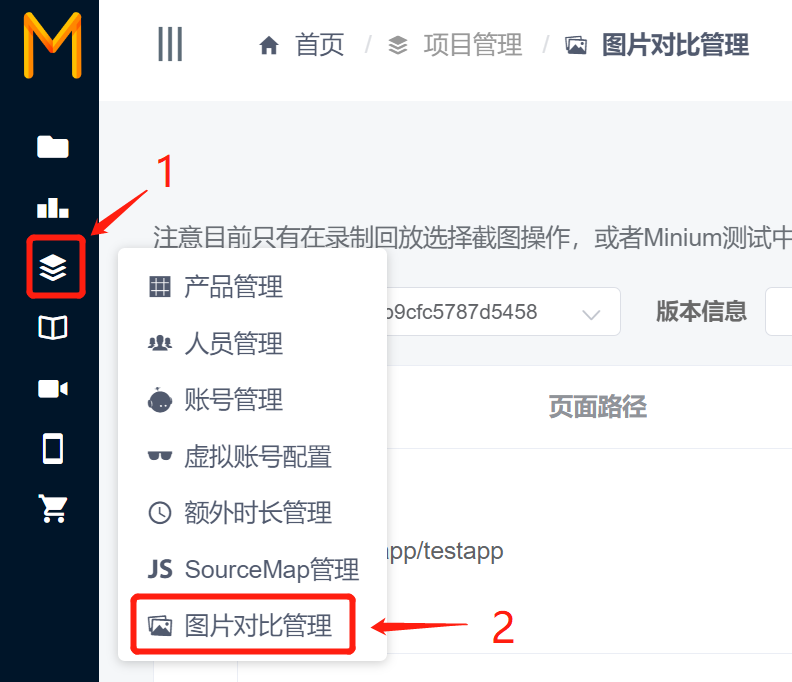
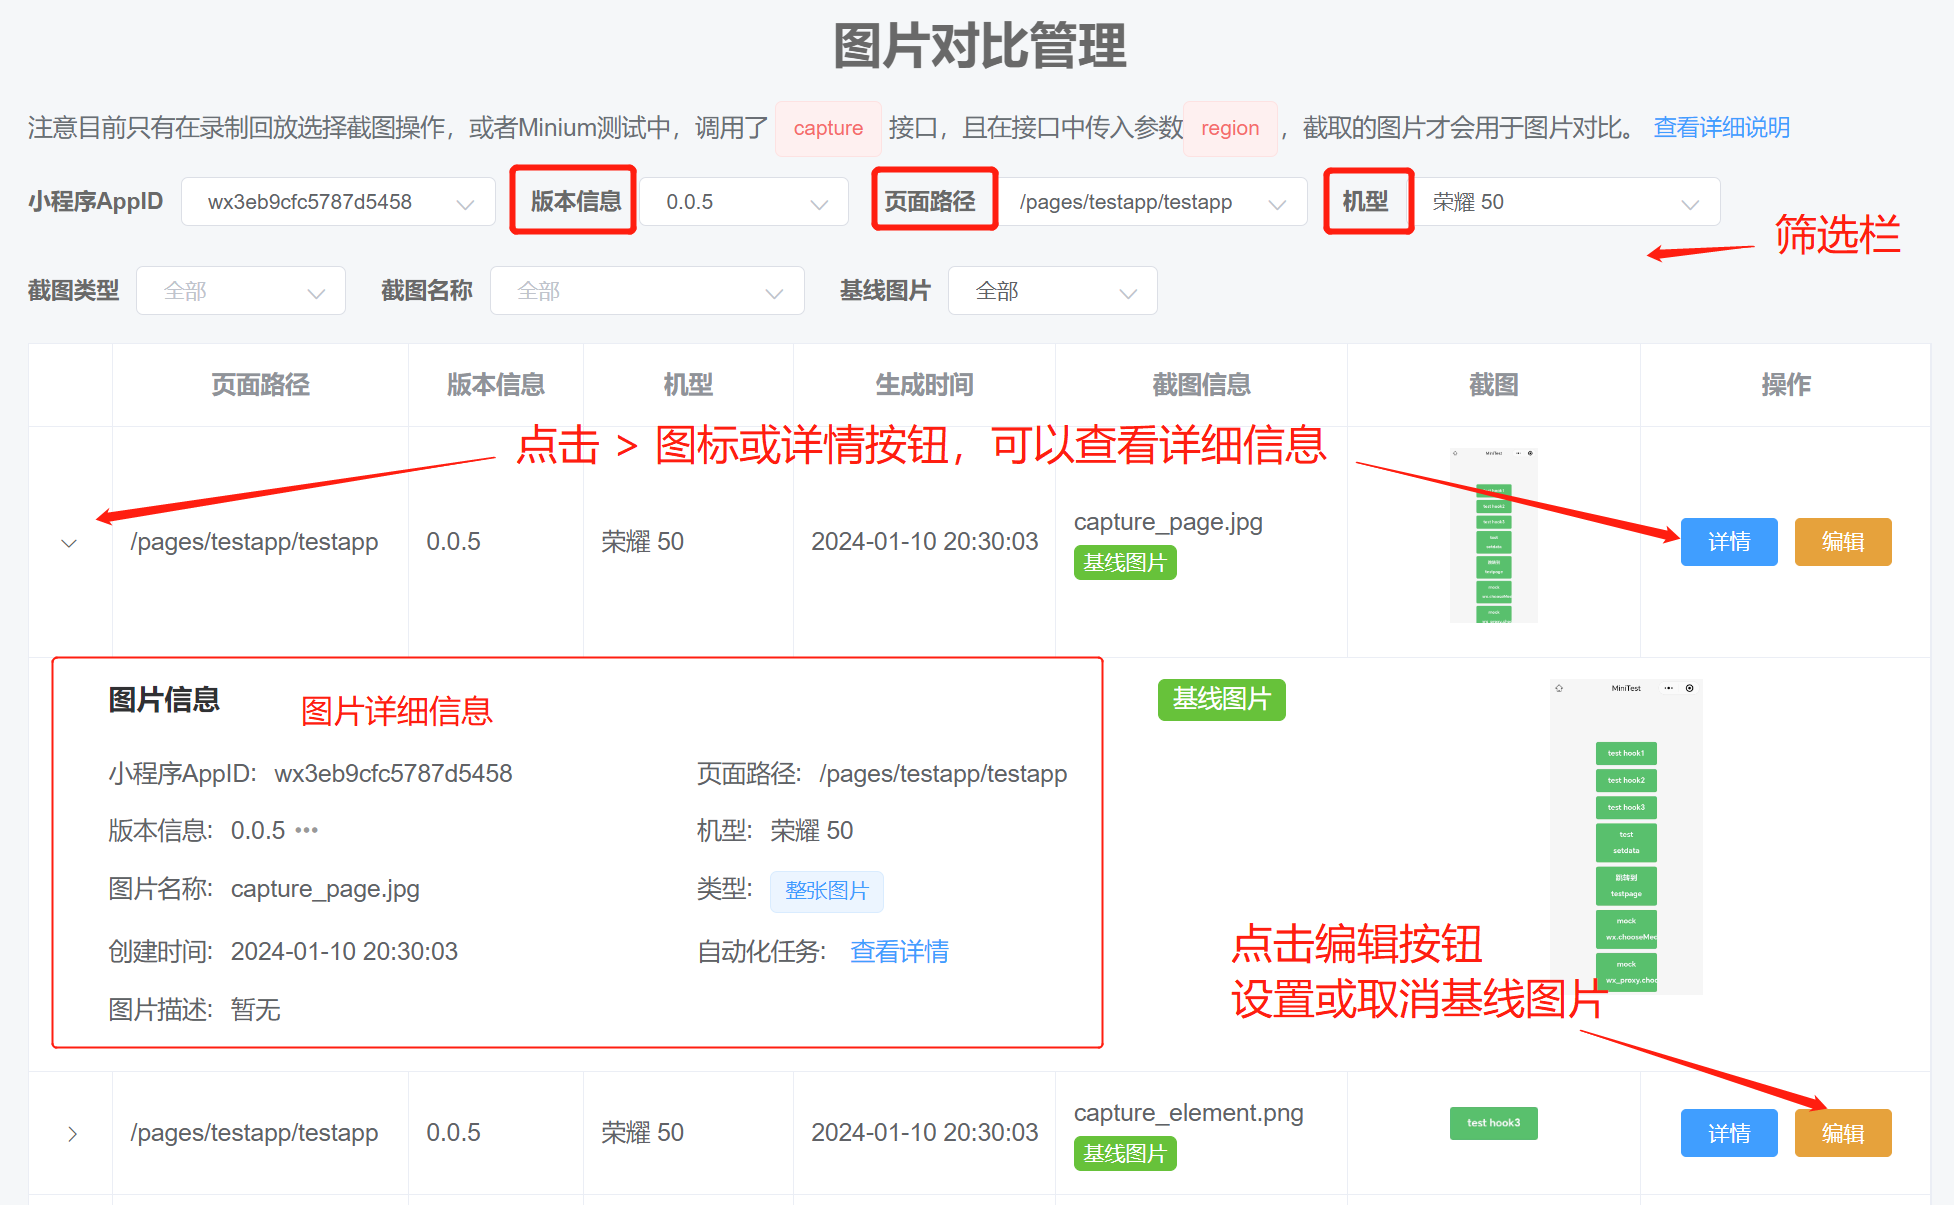
The image comparison management page displays all designated comparison images from the test reports.
There are numerous filter options available. Users can filter based on the specific page configurations required (e.g., page path, device model, etc.) and then set the baseline image for comparison. WeTest also supports setting all images of an entire task as baseline images. To facilitate quick setup, WeTest provides a corresponding API.
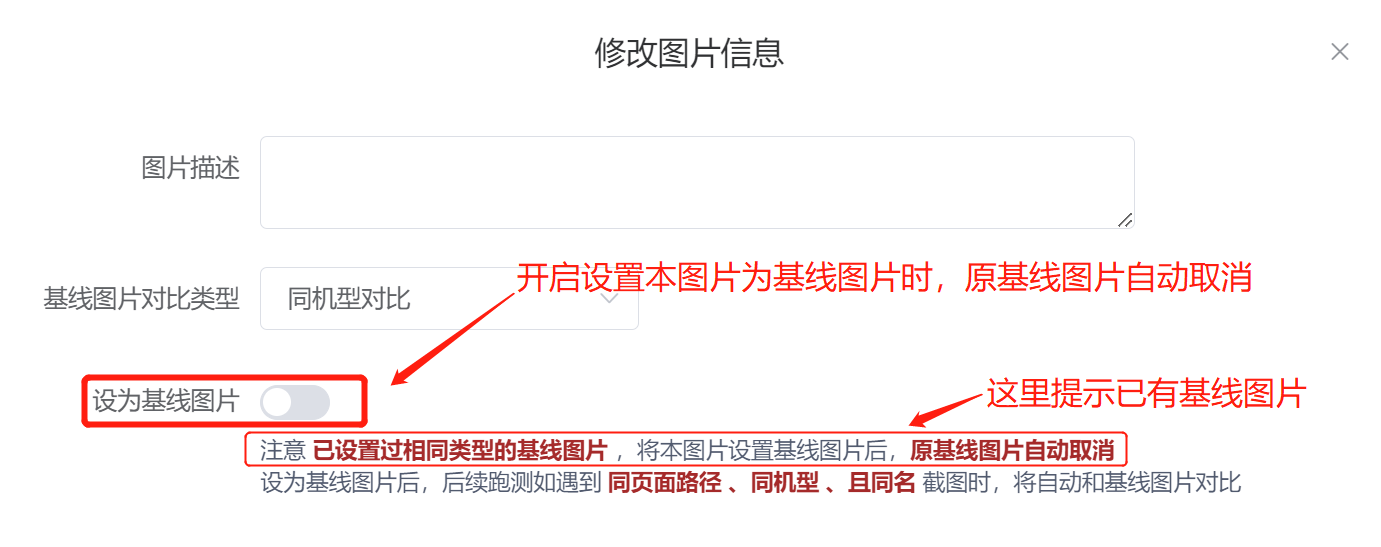
Note: For images that are "Identical in 5 aspects" (same Mini Program AppID, same device model, same page path, same name, same screenshot type), there can only be 1 baseline image. When setting the current image as the baseline, the original baseline image designation will be automatically canceled. If a baseline image already exists, a notification will be displayed when setting a new one.
Setting the Comparison Mode
In the workflow above, when setting the baseline image, the default is to compare the entire image at once. In practice, it is difficult to ensure that no part of the Mini Program page has been modified. Once any slight change occurs on the page, the full-image comparison will fail.
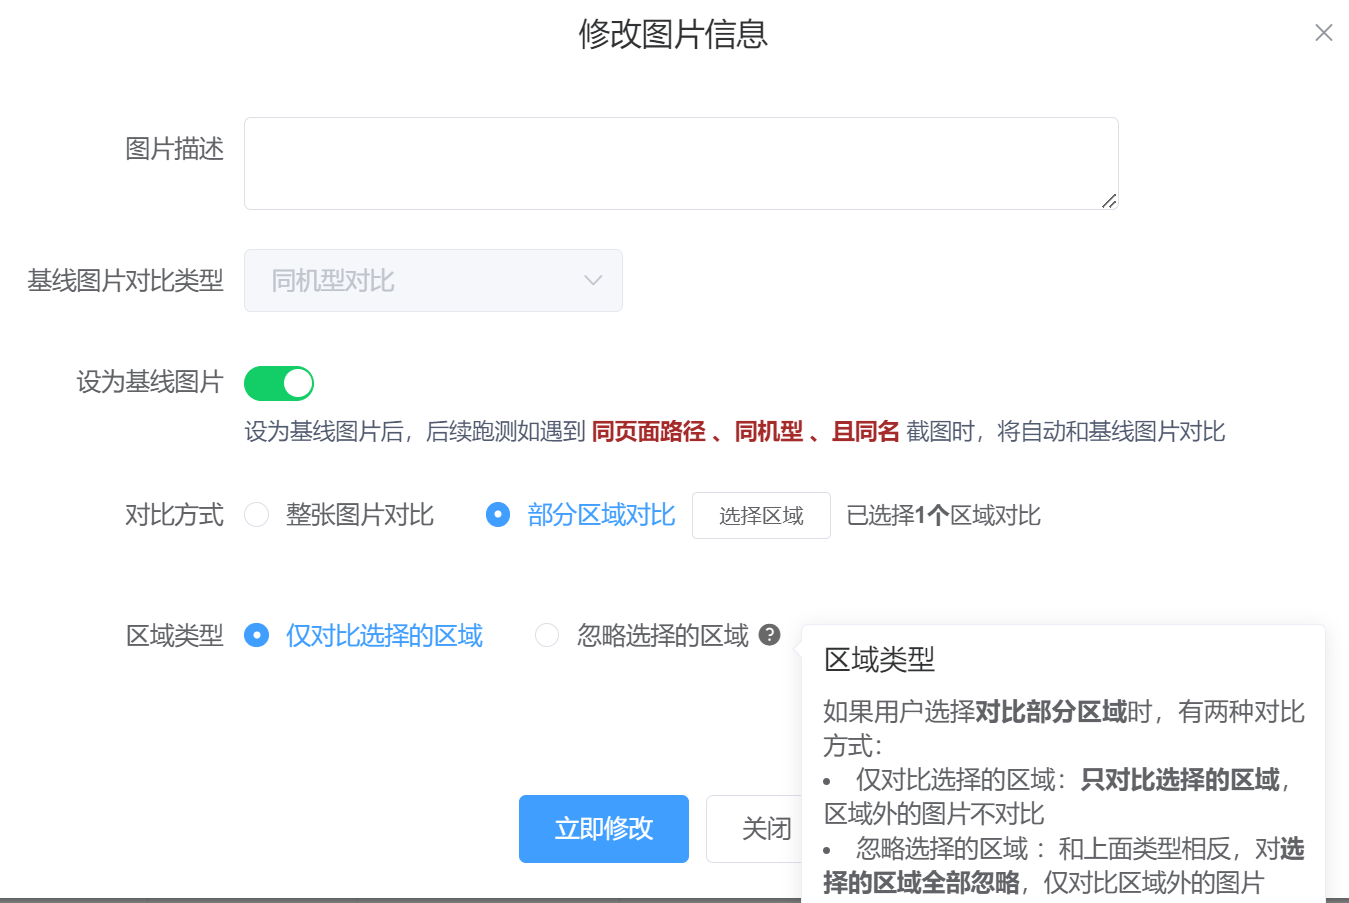
To improve the usability of image comparison, you can try Partial Region Comparison in this case.
Cloud Testing supports two types of region comparison:
- Compare Selected Regions Only: Only the selected regions are compared; images outside the regions are ignored.
- Ignore Selected Regions: The opposite of the above; all selected regions are ignored, and only images outside the regions are compared.
The operation is also simple. First, select "Partial Region Comparison" in the comparison type, then click "Select Region" to choose the specific area, and finally select the comparison type.
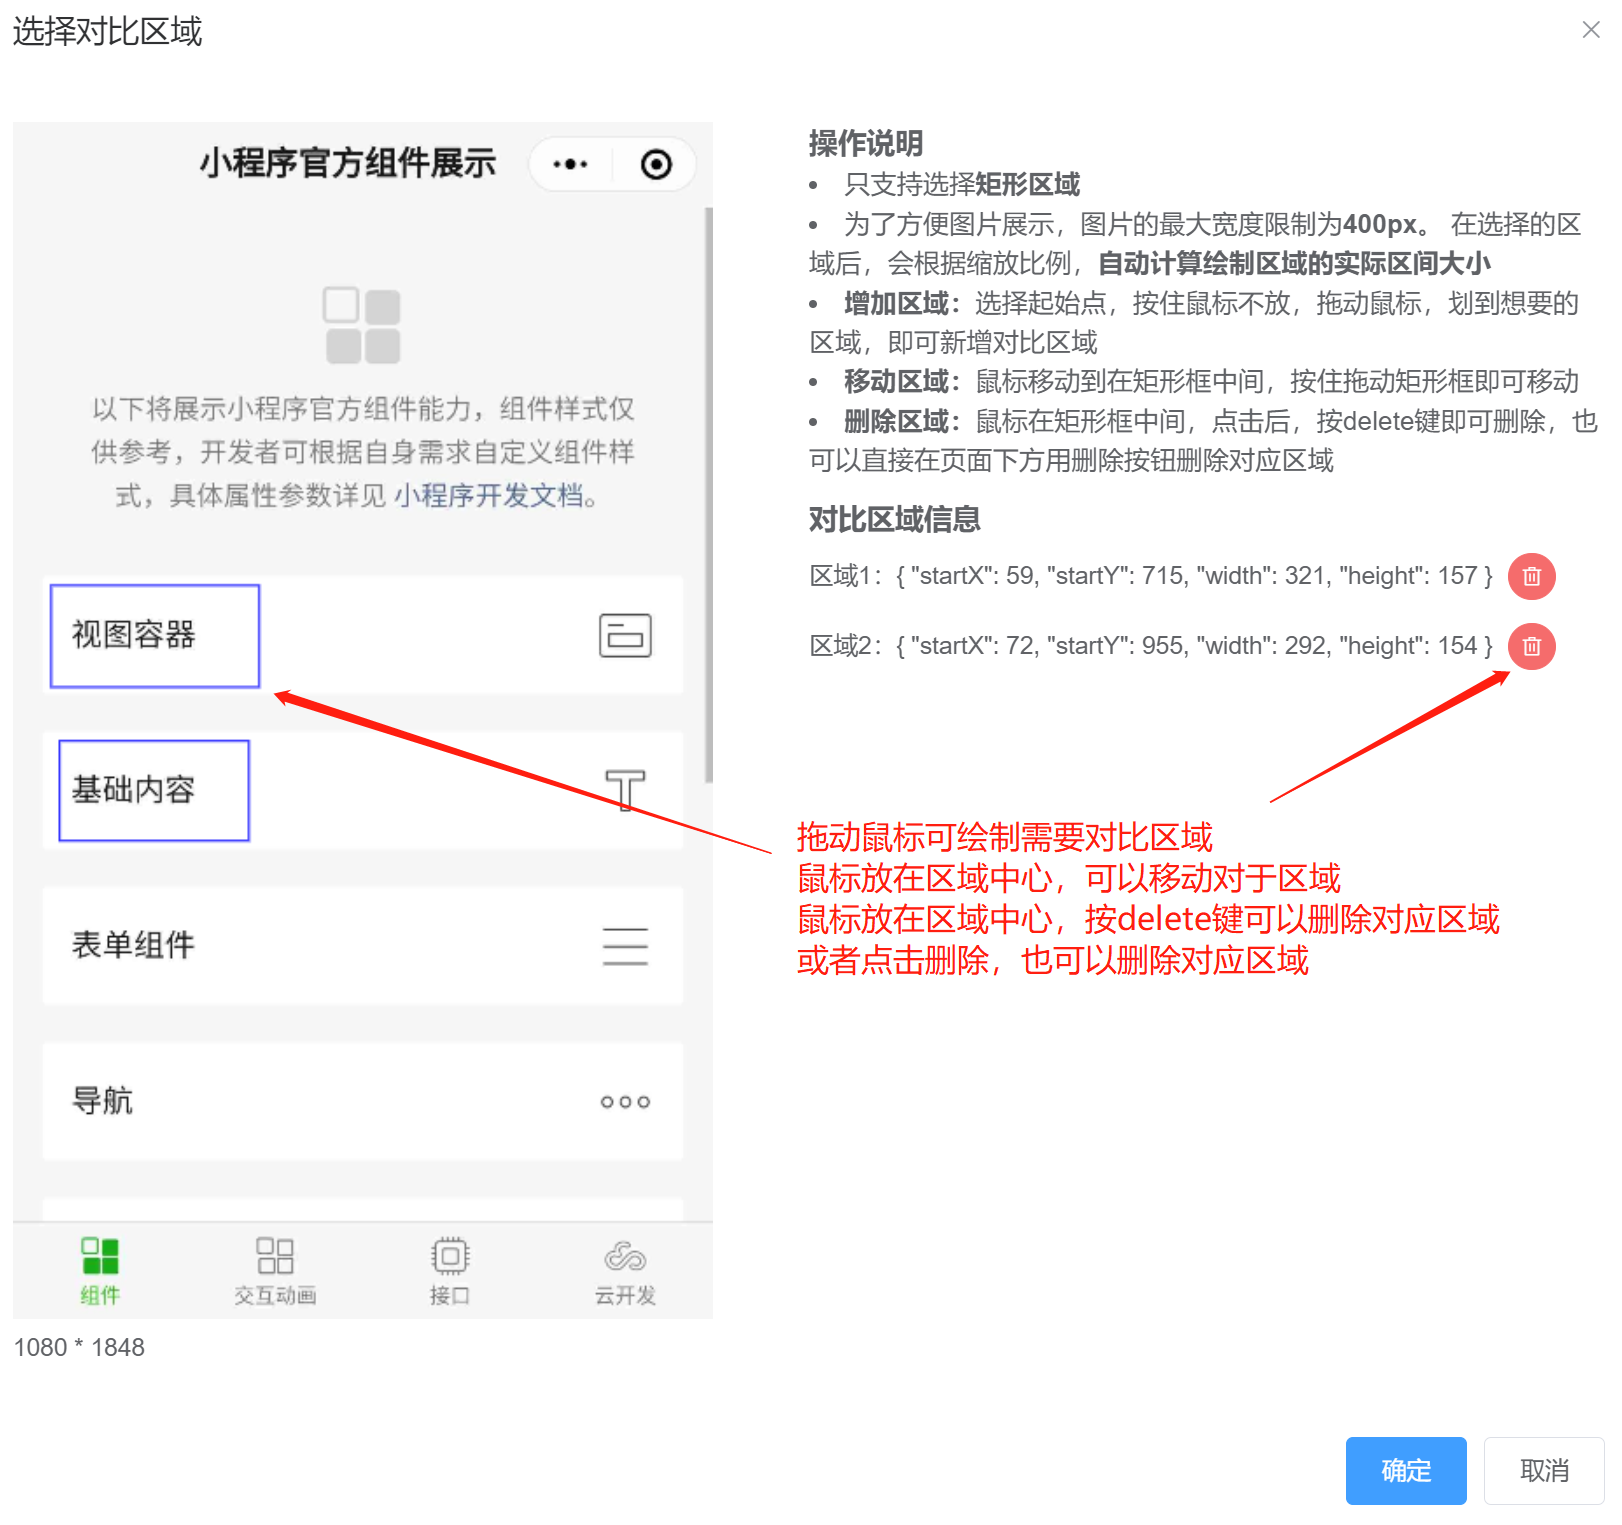
The popup window mainly consists of two areas. The left side displays the image, and the right side contains operation instructions and region comparison information.
In the left-side image, you can directly use the mouse to drag and draw the region for comparison. We support the following:
- Defining multiple regions. To add a region, continue drawing with the mouse.
- Moving a region: Move the mouse into the rectangular frame, then press and drag.
- Deleting a region: Move the mouse into the rectangular frame, click, and then hold the delete key to remove it. Alternatively, use the delete button on the right.
After selection is complete, remember to click OK, then return to the image information modification window and click "Modify Now". Note that you must click the "Modify Now" button for the changes to take effect.
In addition, if you use Minium for screenshots, you can directly specify the region comparison mode and region locations in the region_info parameter. The sample code is as follows:
region_info = {
 "type": "ignore", # Selects ignore mode for partial region comparison. If you want to compare only partial regions, change type to "focus"
 "rects": rects # Can specify multiple regions [[startx1,starty1,endx1,endy1], [startx2,starty2,endx2,endy2]]
 "extra_info": {}, # Supplementary information, which can be displayed in the image comparison overview
}
region=self.page indicates that the full screenshot is captured first, and then specific regions to ignore or compare are specified in region_info. Note that you need to replace xxx.png with your own screenshot filename.
self.capture("xxx.png", region=self.page, region_info=region_info)
## 3. Submit Tests and View Test Reports

Once baseline images are configured, each time an automated task is executed, if the condition of **5 identical** baselines is met, the system will automatically compare against the baseline images and display the results in the report.

To allow users to intuitively view all image comparison screenshots, Cloud Testing has added an image comparison page in the "Report Overview," enabling a direct view of all comparison results.
<img src="https://res8.wxqcloud.qq.com.cn/wxdoc/580d0f5c-4c99-4ead-93d0-0b7230eefe72.png" width="800px">

**Important Note:** In the test details, if an image comparison fails, the test result will also be marked as failed, with a prompt indicating image comparison failure or exception.

<img src="https://res8.wxqcloud.qq.com.cn/wxdoc/4798385c-c906-4022-ba39-fdfd0b1d9eab.png" width="800px">

Click on the details to view the detailed results of the failed comparison.

<img src="https://res8.wxqcloud.qq.com.cn/wxdoc/269d7a02-c0a9-4430-a43c-19c2a9e28af6.png" width="600px">

## 4. Update Comparison Results

Some users may find that inconsistencies in comparisons are caused by incorrect base image settings. In this case, you can first reconfigure the base image following Step 2, and then click "Recompare Images" in the "Test Report Overview" to immediately update the comparison results.

Cloud Testing also provides an <a href="api_image_diff" target="_blank">API interface</a> for reconfiguring image comparisons, facilitating integration with DevOps workflows.

<img src="https://res8.wxqcloud.qq.com.cn/wxdoc/2ef53d2e-496c-4f6e-b1fd-faf39d2e60f0.png" width="400px">

## 5. Summary

The summary of the entire comparison process is shown in the figure below.

<img src="https://res8.wxqcloud.qq.com.cn/wxdoc/33995467-cdd0-45e6-8a4f-edee8be33534.png" width="800px">

## Quick Start

The following example using ` Mini Program ` demonstrates how to quickly get started with image comparison.

First, in the Record & Replay module, we recorded a test case to verify whether the home page is functioning normally. The example test case is relatively simple, taking only a single screenshot of the home page. As shown in the figure below:

<img src="https://res8.wxqcloud.qq.com.cn/wxdoc/c243fc81-4eca-4f3a-af20-5de2aee65488.png" width="600px">

The test case is synced to Cloud Testing. Then, a test plan is created and a test task is submitted. After the task is completed, we locate the image on the "Compare Image Management" page. In this scenario, we only want to compare two specific areas of the home page, so we selected the partial area comparison mode.

<img src="https://res8.wxqcloud.qq.com.cn/wxdoc/792cf62b-d576-4c20-a686-a0a9c6e3804a.png" width="600px">

After setting the baseline image, suppose that during subsequent development, the view container on the home page is modified in a certain version. When we run the test case again, we can identify such changes through image comparison.

<img src="https://res8.wxqcloud.qq.com.cn/wxdoc/2951f7e6-dce7-4b61-8ff6-a8c9ca7fdba7.png" width="600px">

Click the "Details" button to view the specific differences. In the comparison results, the middle comparison image highlights the differences with red frames.

Tip: If the image is not clear enough, you can click to view the enlarged image.

<img src="https://res8.wxqcloud.qq.com.cn/wxdoc/3f2f81c0-4c3a-4ef0-8794-eef538e96fb9.png" width="600px">

## Frequently Asked Questions

### 1. My two test images and the baseline image look identical. Why does Cloud Testing report a difference? Isn't this a false positive?

By default, image comparison is determined based on the **SSIM** score. If the score is less than 1, the result is marked as failed.

However, due to mobile operating systems and display screen technologies, even on the same device, screenshots taken at different times of the same Mini Program page may exhibit subtle pixel-level differences. This makes the images appear identical to the human eye.

However, the **SSIM** algorithm is highly sensitive to these minor variations and will flag the comparison as failed, leading to a "false positive."

As shown in the image below, the same character "Mountain" (a Chinese character) may show slight differences in test results on the same device. This does not actually affect the user experience, but the SSIM algorithm will mark the comparison as failed.

<img src="https://res8.wxqcloud.qq.com.cn/wxdoc/924221f2-c000-4415-b4b5-6a43d8d7611c.png" width="600px">

To address this issue, Cloud Testing provides two solutions:

### a. Add Ignore Region and Gaussian Blur Features to SSIM Algorithm Configuration

To address these artifact issues, Cloud Testing has added ignore region and Gaussian blur capabilities to the SSIM algorithm. Users can configure these settings in "Project Management" => "Product Management".

- Ignore Region: You can configure the ignore area size and ignore distance. When the difference area is smaller than the set threshold, it can be considered identical. For example, configuring the ignore area size to 200 means that if the area of the difference region is less than 200, the difference is considered negligible and treated as identical. **Disabled by default**
- Gaussian Blur: The principle of Gaussian blur is to make the image slightly "blurry," which allows small artifacts to be smoothed out. The higher the blur value set, the stronger the blurring effect. **Disabled by default**

<img src="https://res8.wxqcloud.qq.com.cn/wxdoc/3ae387d3-3b58-4eac-9215-7f00d9507843.png" width="800px">

### b. Using the Visual Comparison Algorithm

The cloud testing service also integrates an open-source visual comparison algorithm, which effectively resolves false positive issues associated with SSIM and enables the "incremental" display of differential regions.

However, the algorithm compresses data row by row. When differences are minimal, they may not be correctly identified. For example, in the image below, the difference in the product review count was not detected.

<img src="https://res8.wxqcloud.qq.com.cn/wxdoc/2d7f474a-b0b9-4235-8da5-006390580f1b.png" width="800px">

Similar to the SSIM algorithm configuration, the visual comparison algorithm is configured in "Project Management" => "Product Management".

<img src="https://res8.wxqcloud.qq.com.cn/wxdoc/309fa340-485d-4bde-ad47-71c2aabd3dea.png" width="600px">

## More Reference Materials
- <a href="https://developers.weixin.qq.com/community/minihome/article/doc/000e40922f4418bb9592d8b7a61c13" target="_blank">Best Practices for Image Comparison - WeChat Store</a>

## Need Help

If you have any suggestions or requests, please visit the <a href="help" target="_blank">Need Help</a> page, scan the QR code to join the official WeCom group for Beta Testing, and contact the group owner to provide feedback.